Enter a load by hand from the broker's rate confirmation, then assign a driver, truck and trailer so it shows up in the driver's queue.
For owners and dispatchersAbout 3 minutes11 steps
Before you start
Have the rate confirmation in front of you. You'll need:
Broker name and the load's reference number
Linehaul rate and miles
Pickup and delivery city, state and date (plus facility, address and appointment window if you have them)
A driver, truck and trailer already set up in RovexOne
Faster option:
If you have the rate con as a PDF, Upload Rate Con fills most of these fields for you. Use this manual flow when there's no PDF or the upload misses something.
Part 1: Enter the load
Fields marked * are required. Everything else is optional but helps with invoicing and driver instructions.
Open the Load Board and click New Load
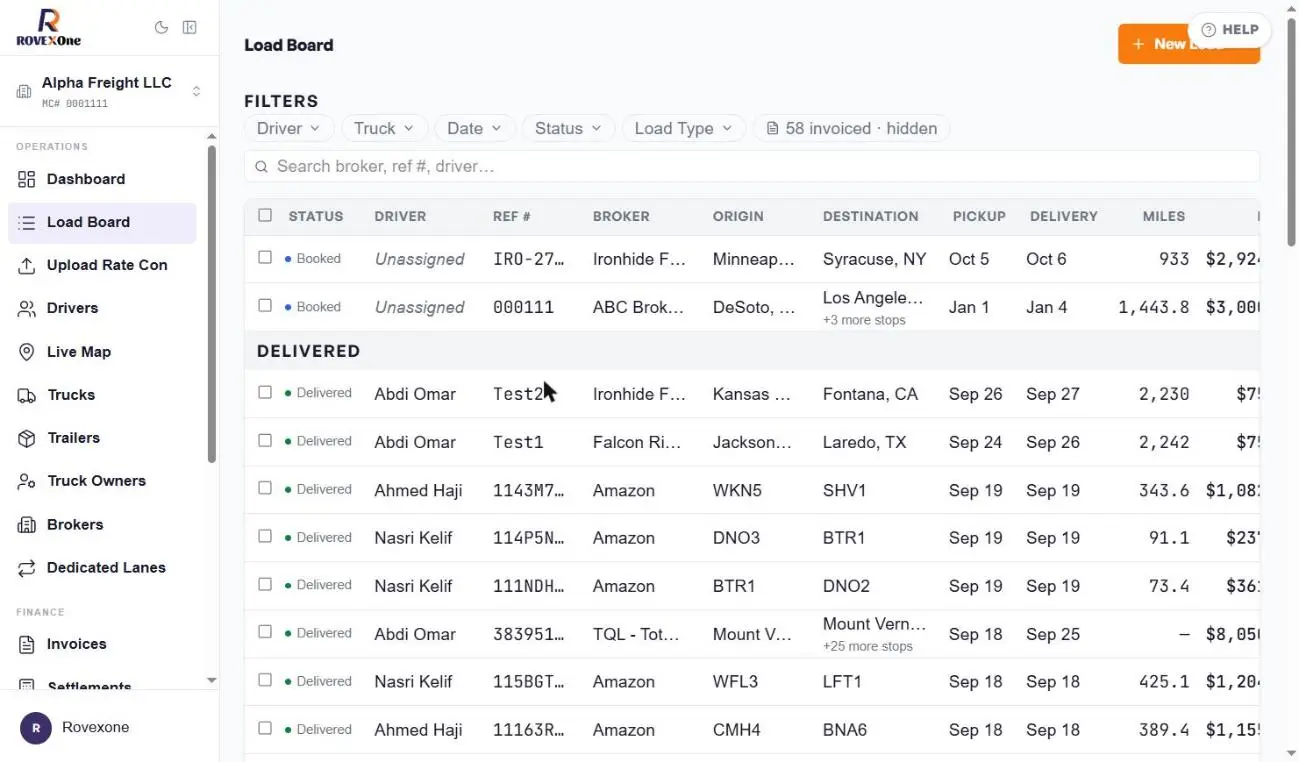
In the left sidebar, click Load Board. Then click the orange + New Load button in the top right.
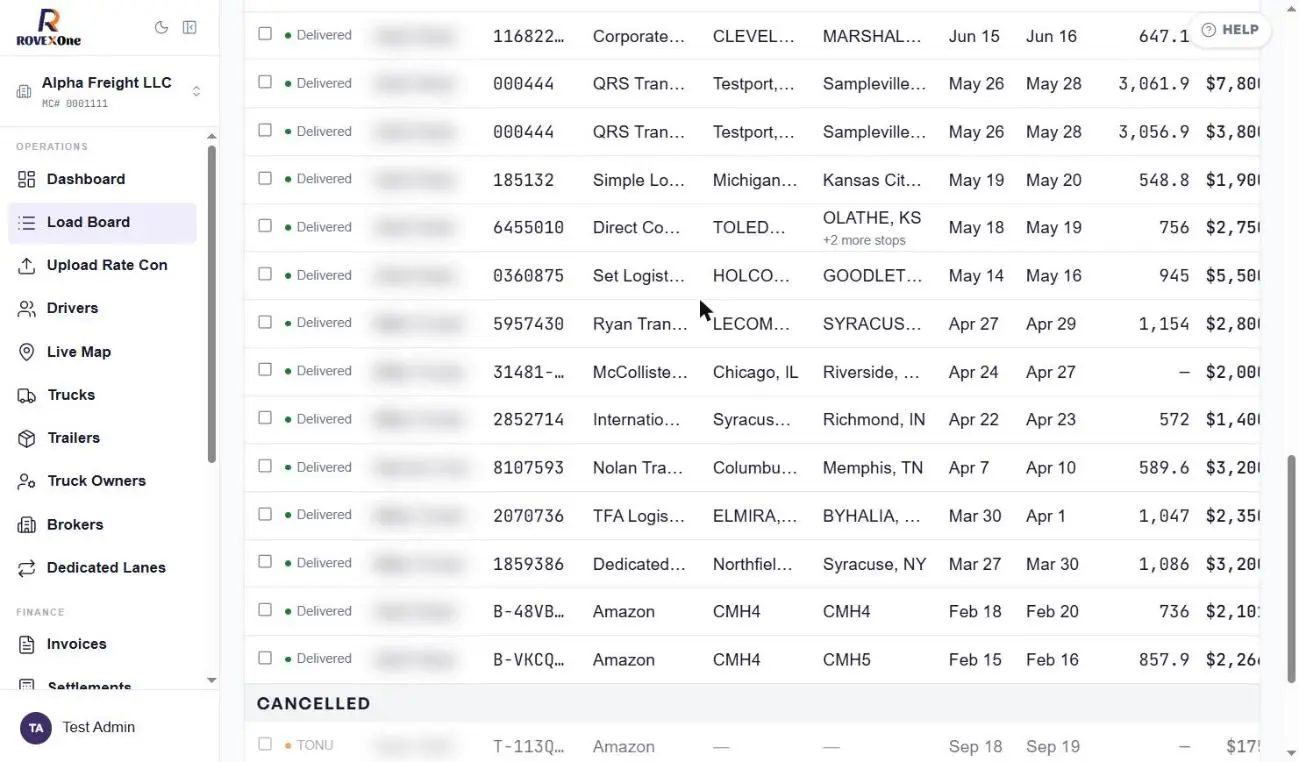
The Load Board lists every load by status. New Load is in the top right.
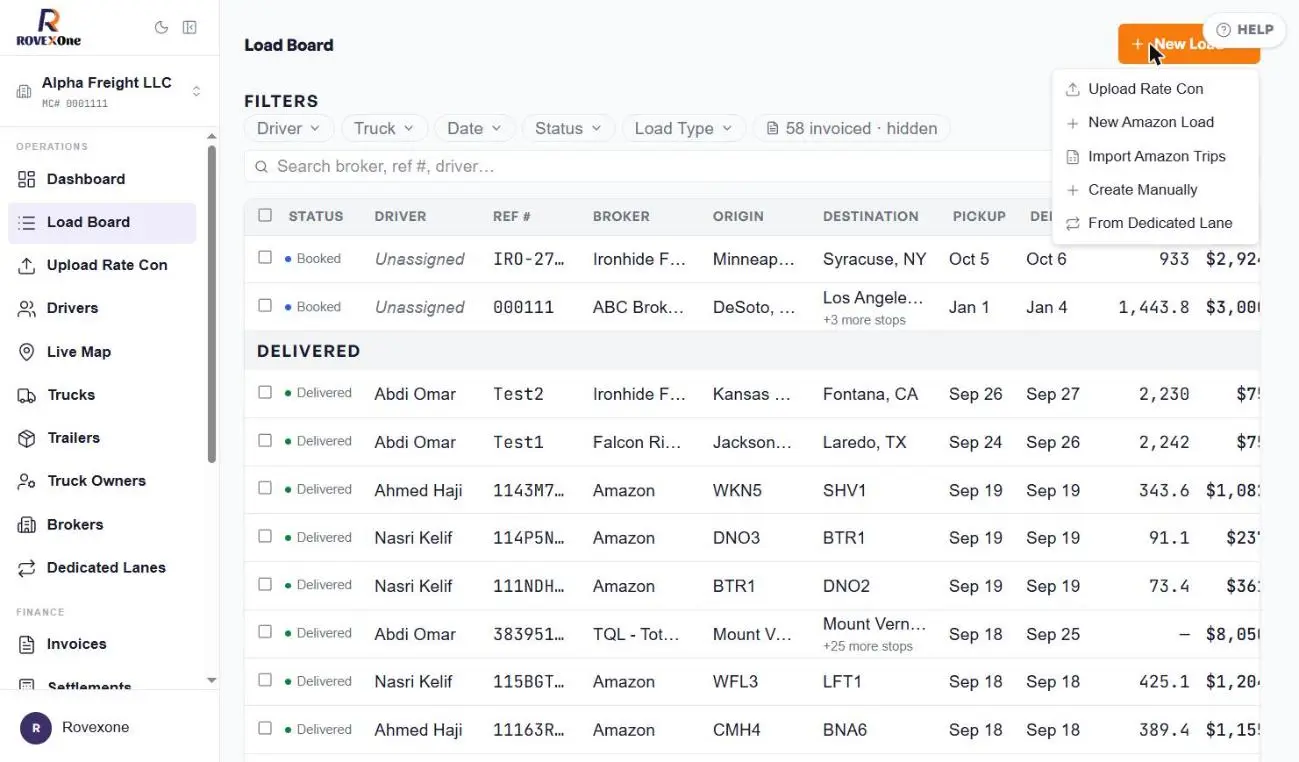
Choose Create Manually
A menu opens with five ways to add a load. Pick Create Manually.
Option
Use it when
Upload Rate Con
You have the broker's rate confirmation as a file
New Amazon Load
You're adding a single Amazon Relay load
Import Amazon Trips
You're bringing in several Amazon trips at once
Create Manually
You're typing the load in yourself (this guide)
From Dedicated Lane
The load runs on a lane you've already saved
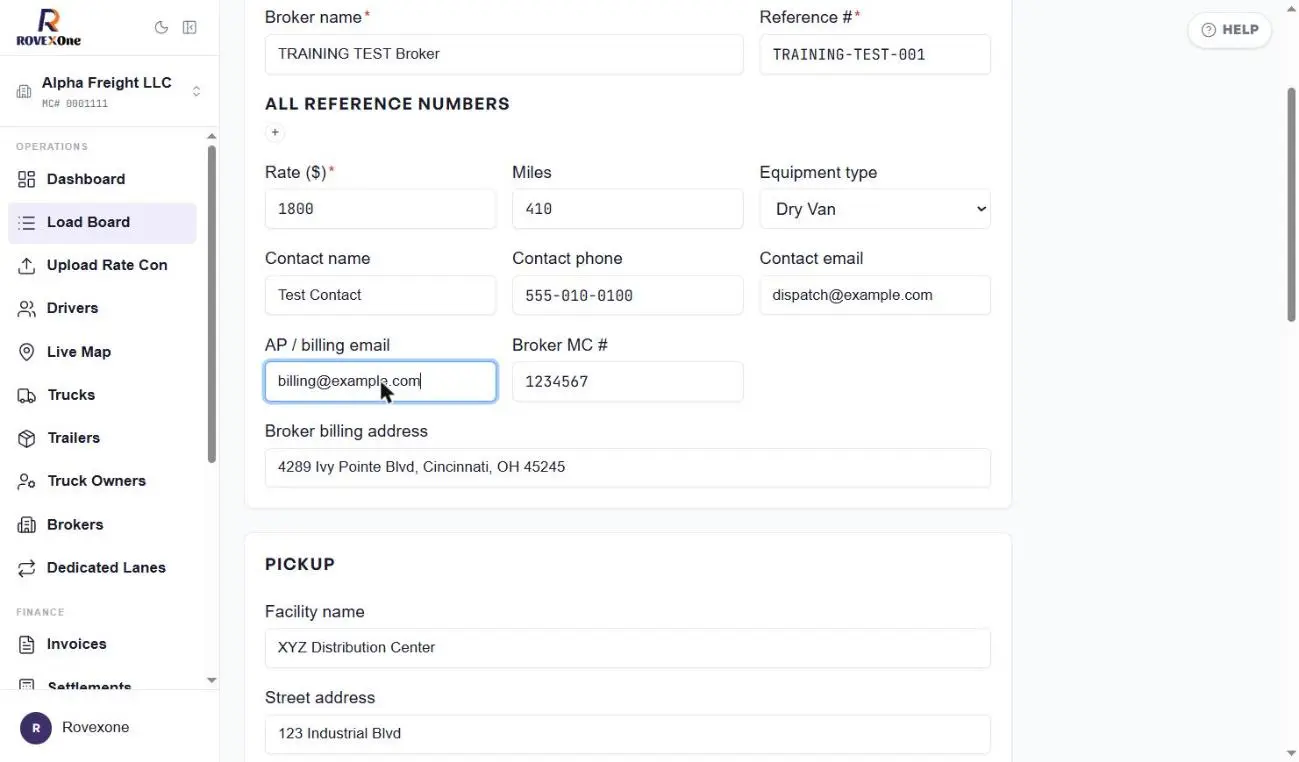
Fill in Broker & Rate
The grey text in each box is only an example. Type over it with the details from your rate con.
Field
What to enter
Broker name *
The brokerage on the rate con
Reference # *
The broker's load or PO number. Copy it exactly, because it goes on the invoice.
All reference numbers
Click + to add extra numbers like a PU# or PO#
Rate ($) *
The total agreed rate
Miles
Loaded miles
Equipment type
Dry Van, Flatbed, Reefer, Step Deck or Other
Contact name, phone, email
The broker rep handling the load
AP / billing email
Where invoices for this load should be sent
Broker MC # and billing address
Used on the invoice
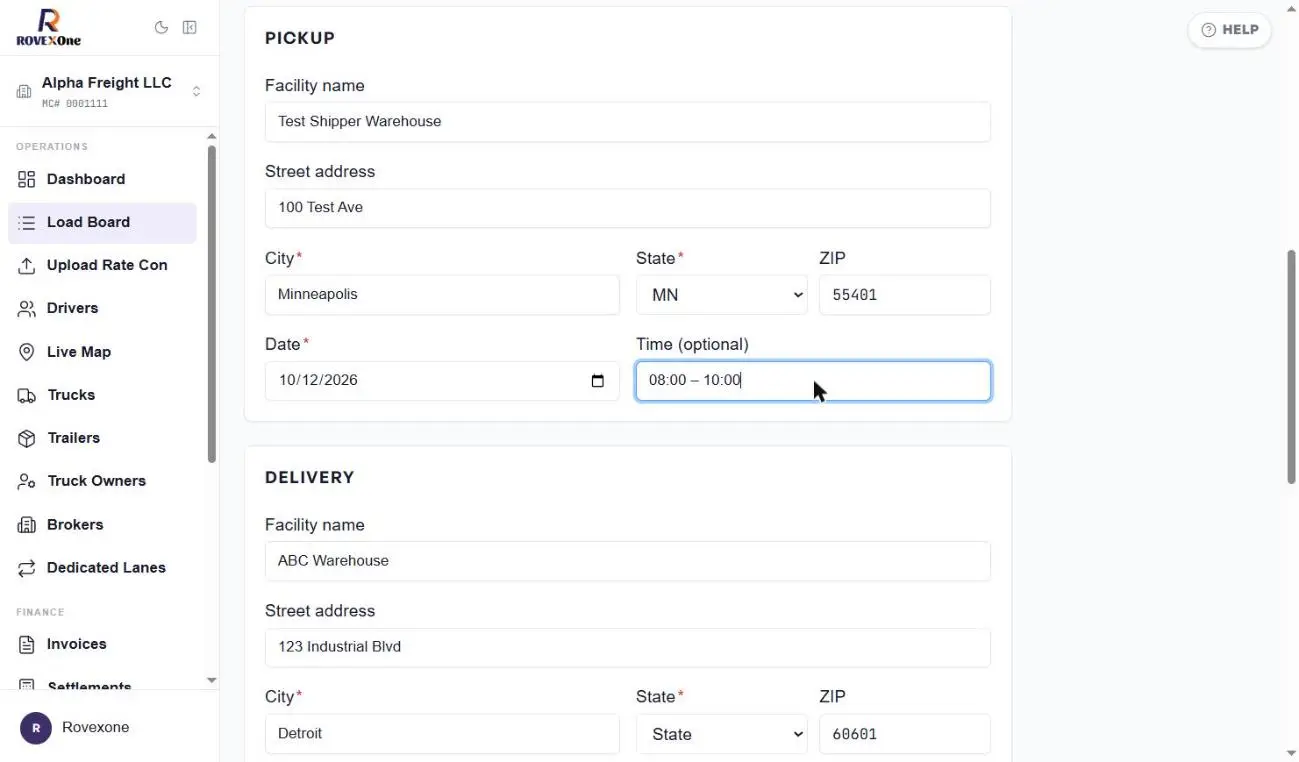
Add the pickup
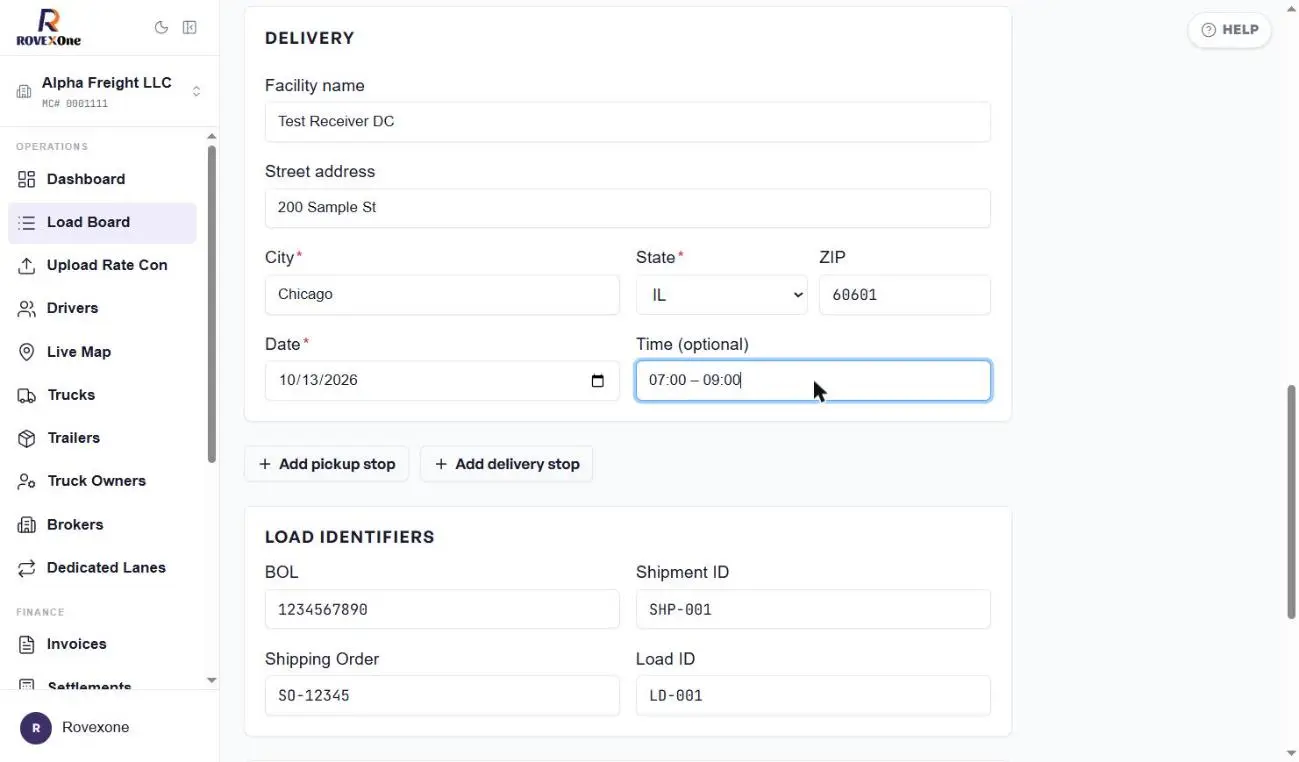
Enter the facility name, street address, city *, state *, ZIP and pickup date *. Add the appointment window in Time (optional), for example 08:00 – 10:00.
Add the delivery
Fill in the Delivery section the same way. For loads with more than one pickup or drop, click + Add pickup stop or + Add delivery stop under the delivery section.
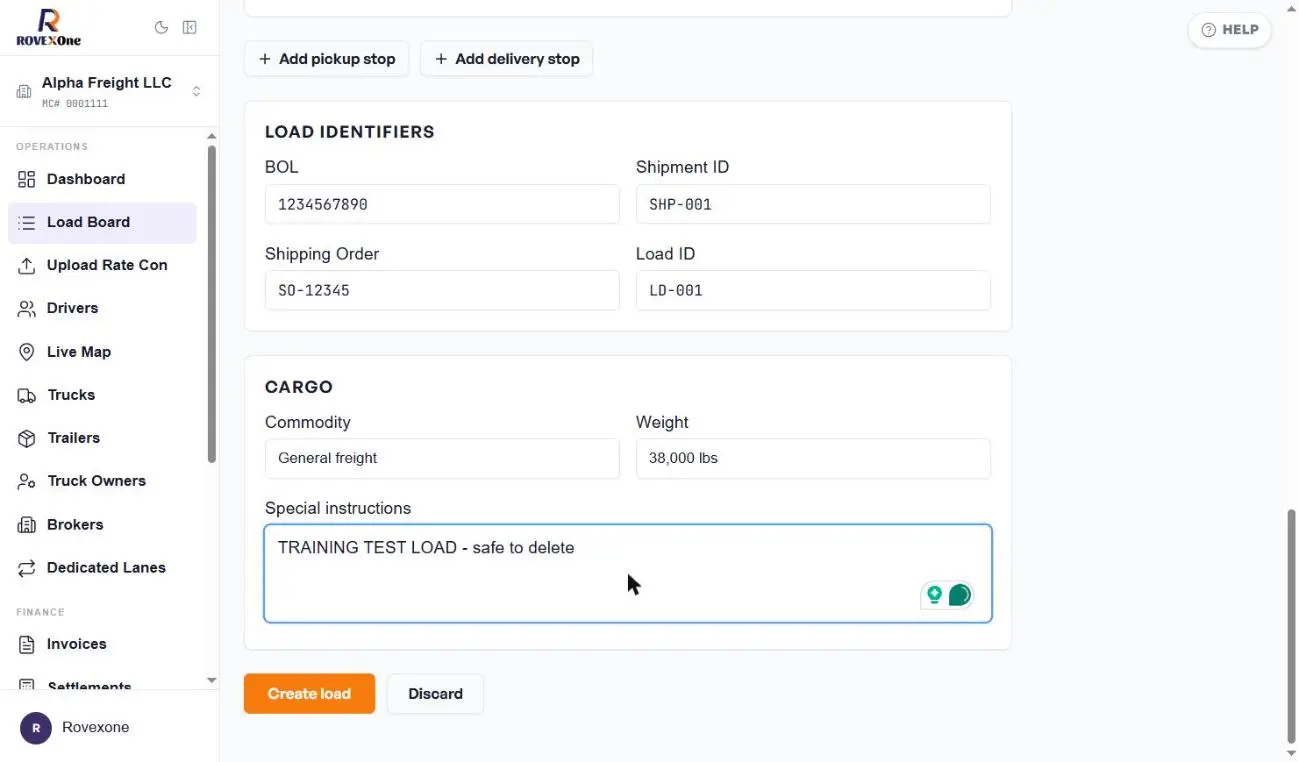
Add identifiers and cargo, then click Create load
Load identifiers: BOL, Shipment ID, Shipping Order and Load ID, if the shipper or broker gave them to you.
Cargo: commodity, weight, and any special instructions for the driver (appointment rules, lumper, check-in calls).
Click Create load. To throw the form away instead, click Discard.
What you'll see
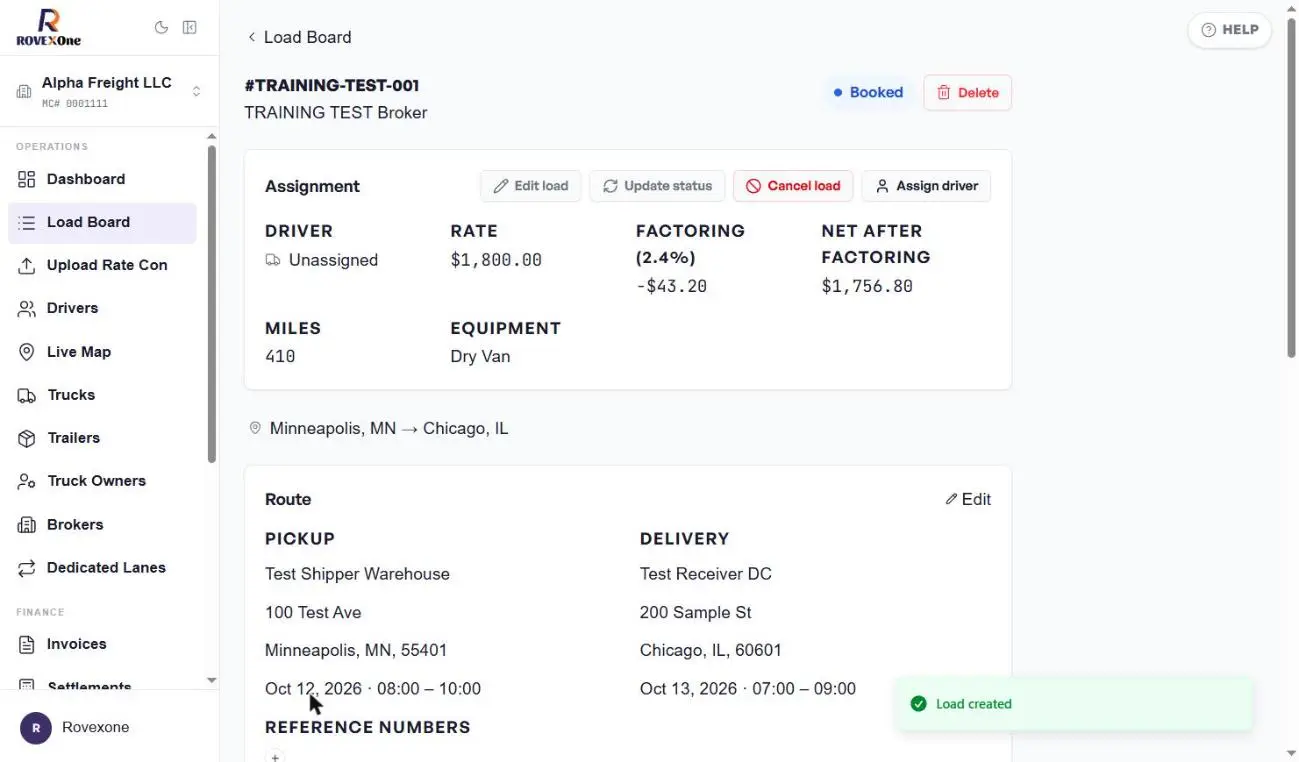
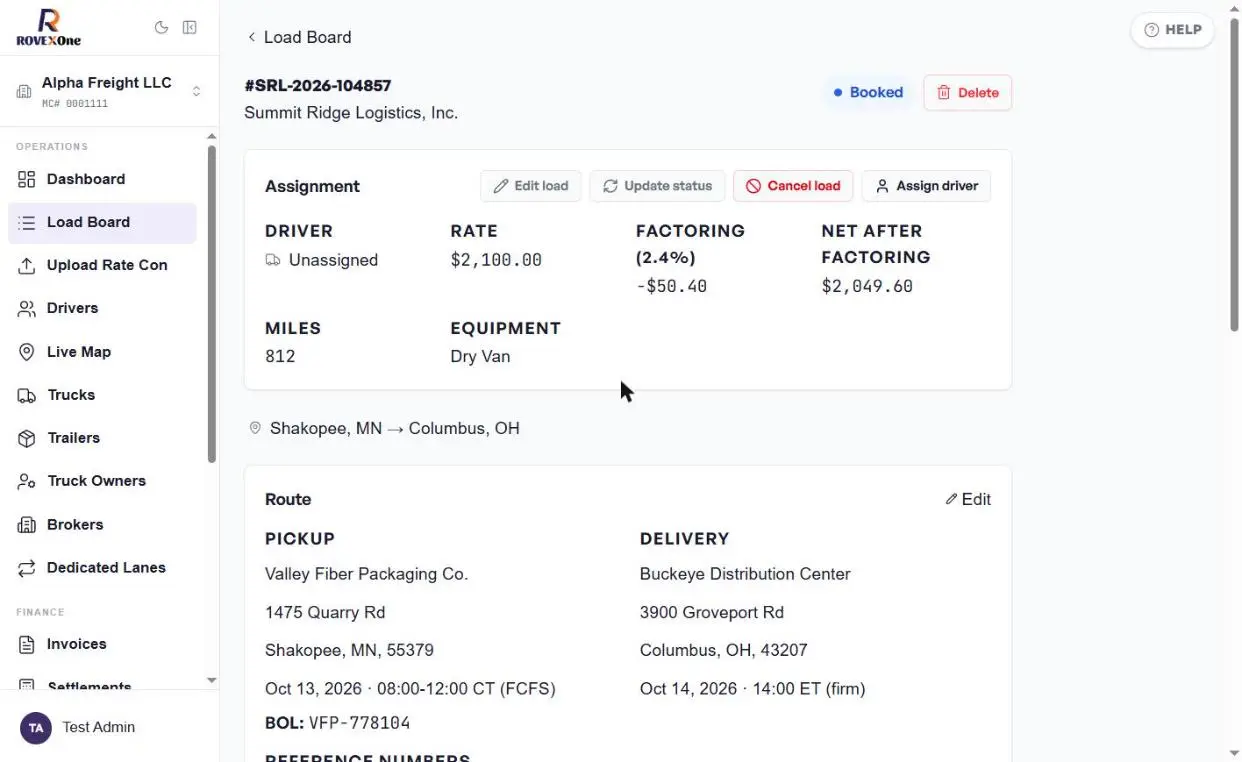
A green Load created message appears and the load opens with status Booked. The Assignment card shows the rate, your factoring fee and the net after factoring.
Part 2: Assign driver, truck and trailer
A load isn't dispatched until it has a driver. Assigning happens in three steps: driver, then truck, then trailer.
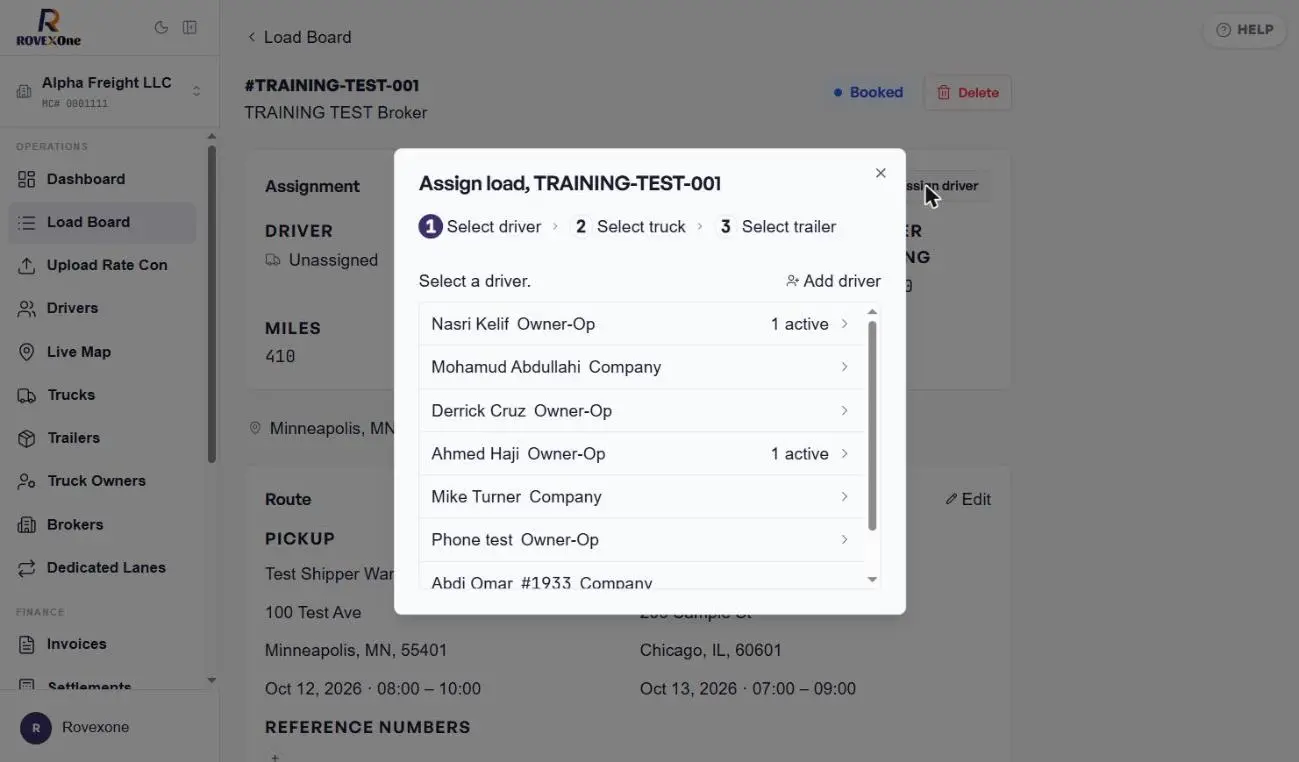
Click Assign driver and pick a driver
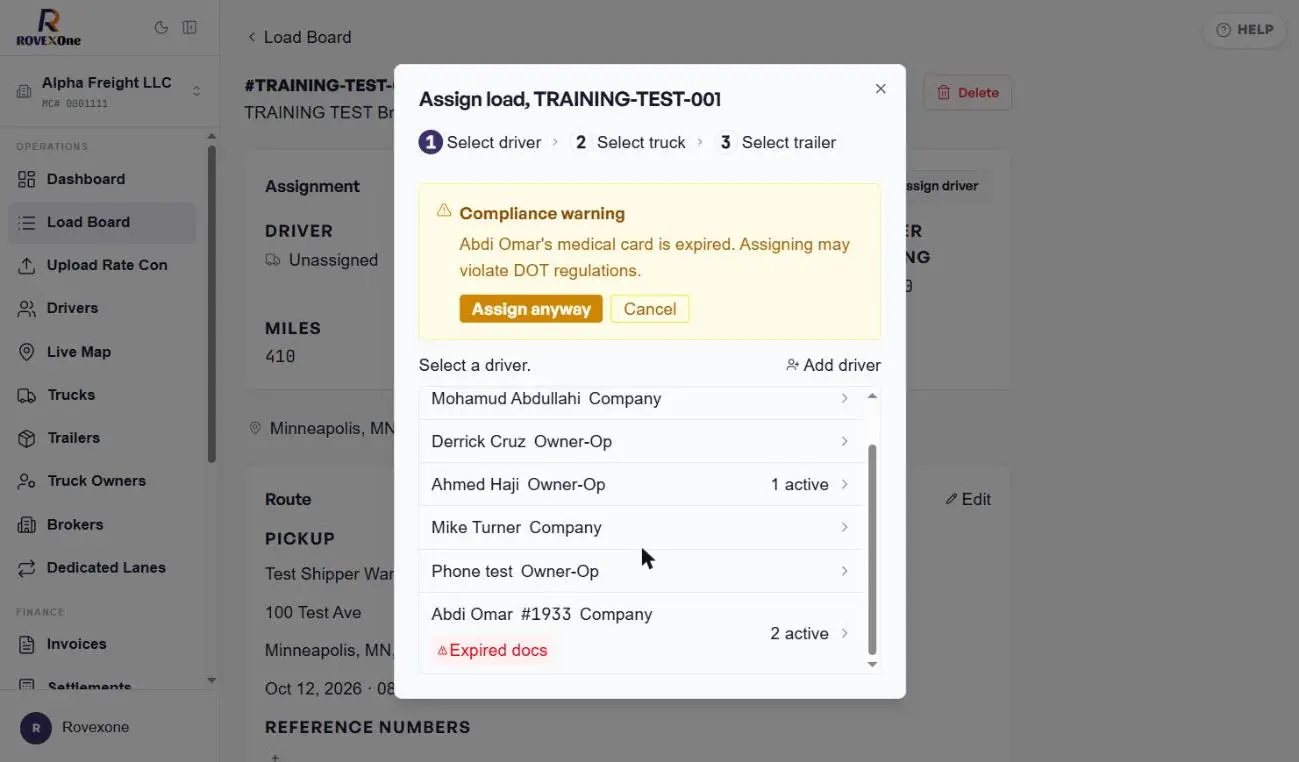
On the load page, click Assign driver. The list shows each driver with:
Company or Owner-Op
How many loads they already have active (for example "1 active")
A red Expired docs badge if any of their documents have expired
If the driver isn't in the list, click Add driver to create them without leaving the load.
Handle any compliance warning
If the driver has expired documents, RovexOne stops you with a Compliance warning that names what's expired, for example a medical card.
Cancel goes back to the driver list so you can choose someone else.
Assign anyway continues with this driver.
Check first:
Dispatching a driver with an expired medical card or other required document may violate DOT regulations. Update the driver's documents on the Drivers page whenever you can.
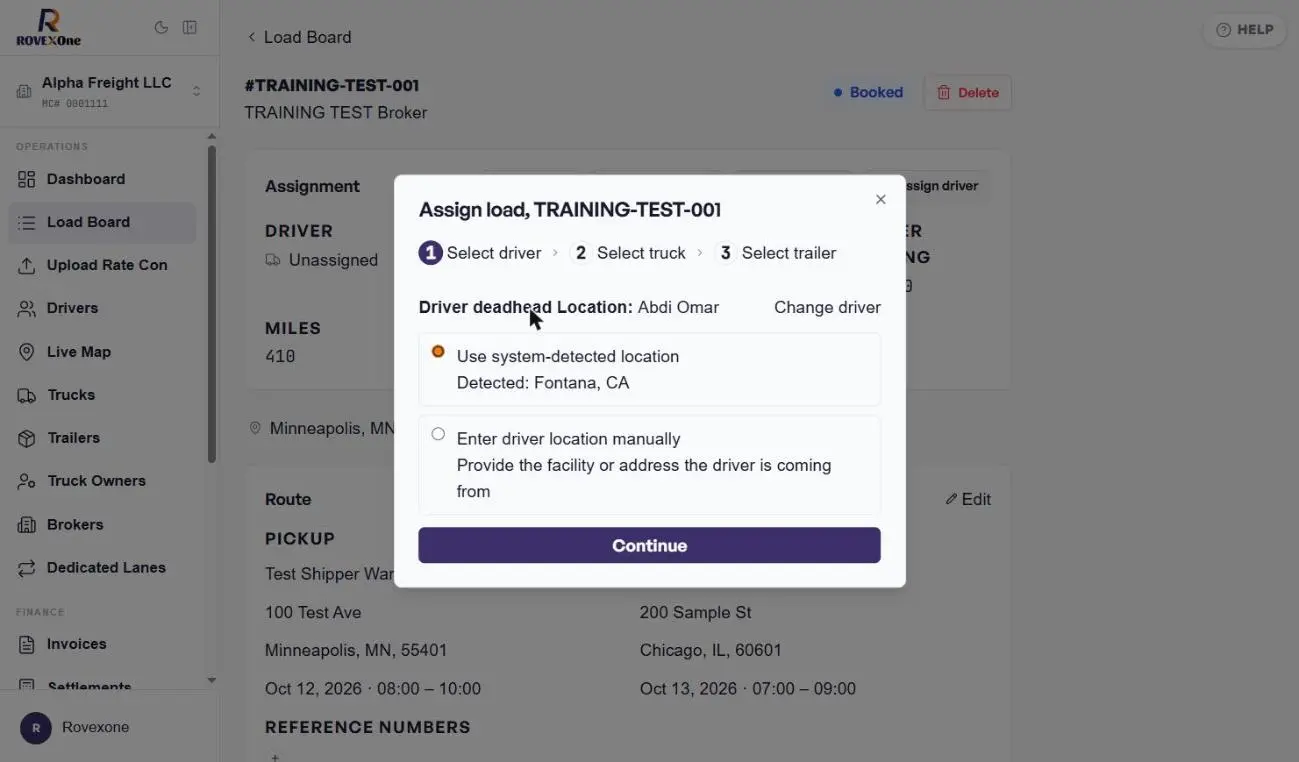
Confirm where the driver is starting from
RovexOne uses this to work out deadhead miles. Choose one:
Use system-detected location: the location RovexOne detected for the driver (here, Fontana, CA).
Enter driver location manually: type the facility or address the driver is coming from.
Click Continue.
Check the truck, set queue order and pick a trailer
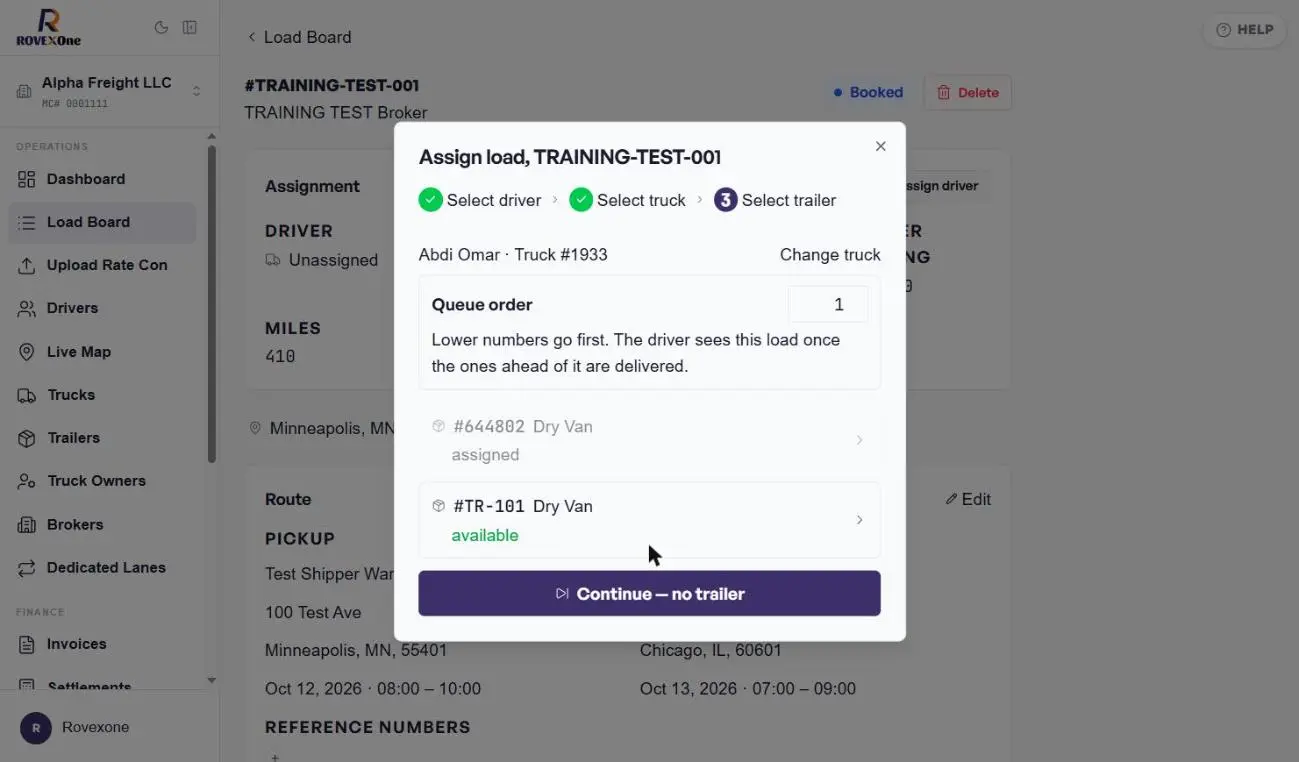
The top line shows the driver and truck. In this example, truck #1933 was filled in for Abdi Omar. Click Change truck to use a different one.
Queue order controls when the driver sees this load. Lower numbers go first, and the driver sees this load once the loads ahead of it are delivered. Leave it at 1 if this is the next load.
Then pick a trailer. Each trailer is marked available or assigned. Click an available one, or click Continue — no trailer for power-only loads.
Confirm the load is dispatched
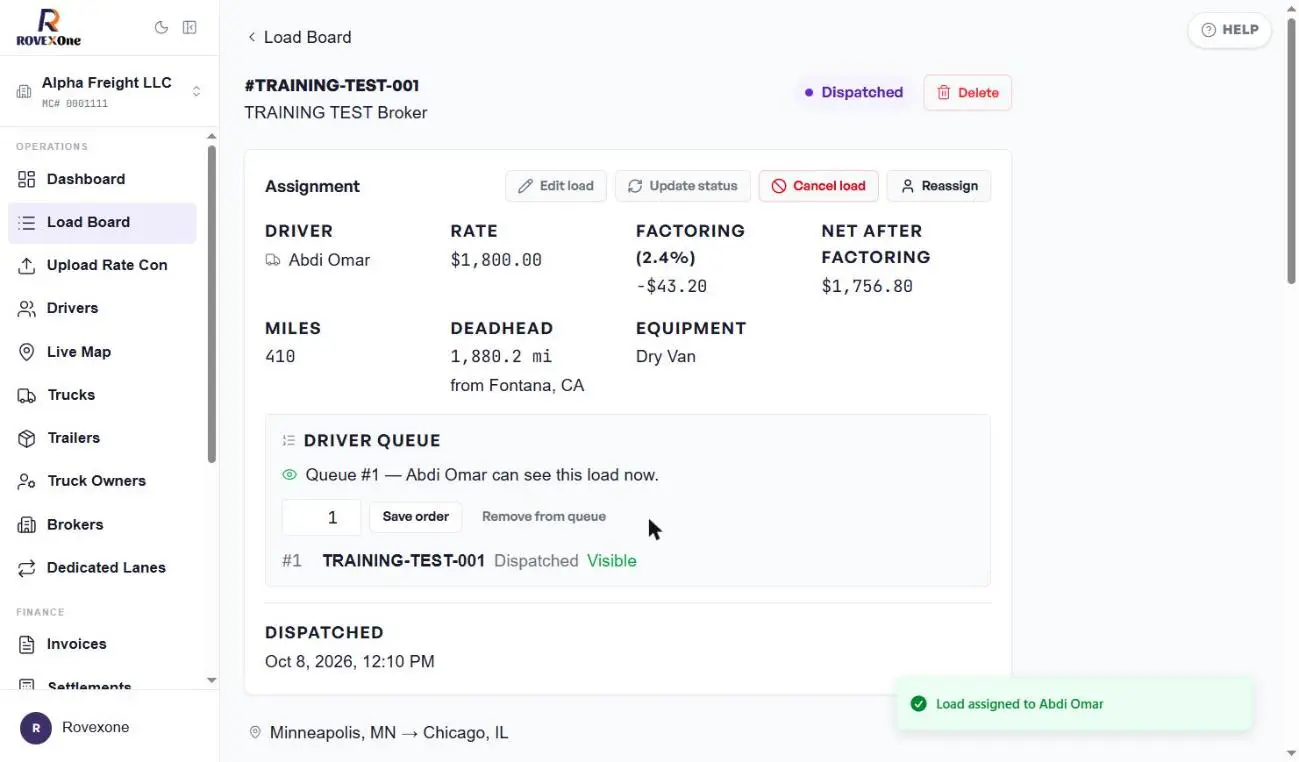
You'll see Load assigned to [driver] and the status changes to Dispatched. The load page now shows:
The driver and the deadhead miles from their starting location
A Driver queue panel confirming whether the driver can see the load now
The date and time it was dispatched
After dispatch
From the load page you can:
Button
What it does
Edit load
Change rate, stops or any other details
Update status
Move the load forward as it runs, for example to Delivered
Reassign
Swap the driver, truck or trailer
Cancel load
Mark the load cancelled
Delete
Remove the load entirely. Use this only for loads entered by mistake.
Common questions
The load won't save when I click Create load. Why?
A required field is probably empty. Check Broker name, Reference #, Rate, and the city, state and date for both pickup and delivery.
The grey text is already in the boxes. Do I need to clear it?
No. Grey text is only an example. It isn't saved unless you type your own value.
How do I add a load with several stops?
Fill in the first pickup and the final delivery, then use Add pickup stop or Add delivery stop for each extra stop.
The driver I need has an Expired docs badge. What should I do?
Update their documents on the Drivers page, then assign them. Assign anyway is there for exceptions, but you're responsible for DOT compliance.
Can I create the load now and assign a driver later?
Yes. The load stays Booked with the driver shown as Unassigned until you click Assign driver.
Loads › Create a load from a rate con
Create a load from a rate con
Upload the broker's rate confirmation PDF and RovexOne reads it for you. You check the details, click Create Load, and the rate con is saved to the load.
For owners and dispatchersAbout 1 minute7 steps
Why use this:
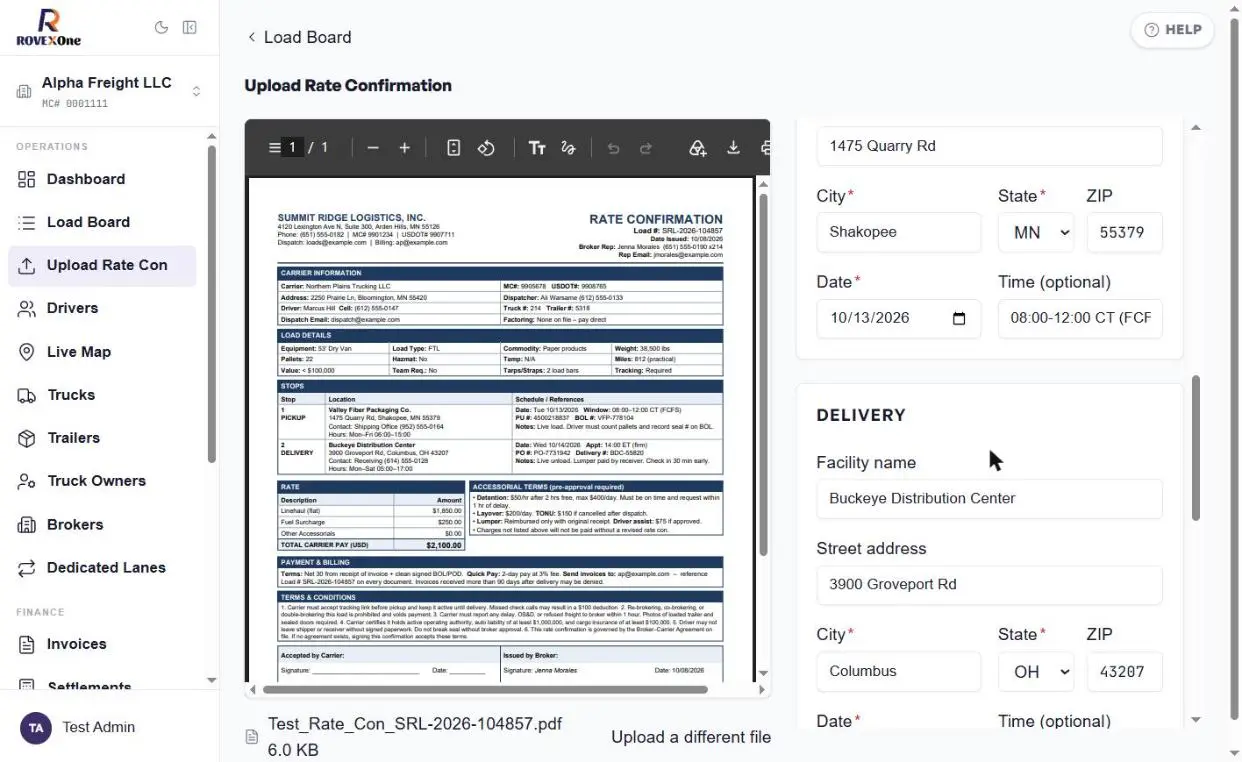
It's the fastest way to add a load. In our test, RovexOne filled in the broker, rate, miles, both stops, 5 reference numbers, cargo and the broker's accessorial terms from a single PDF in about 10 seconds.
Steps
Open Upload Rate Con
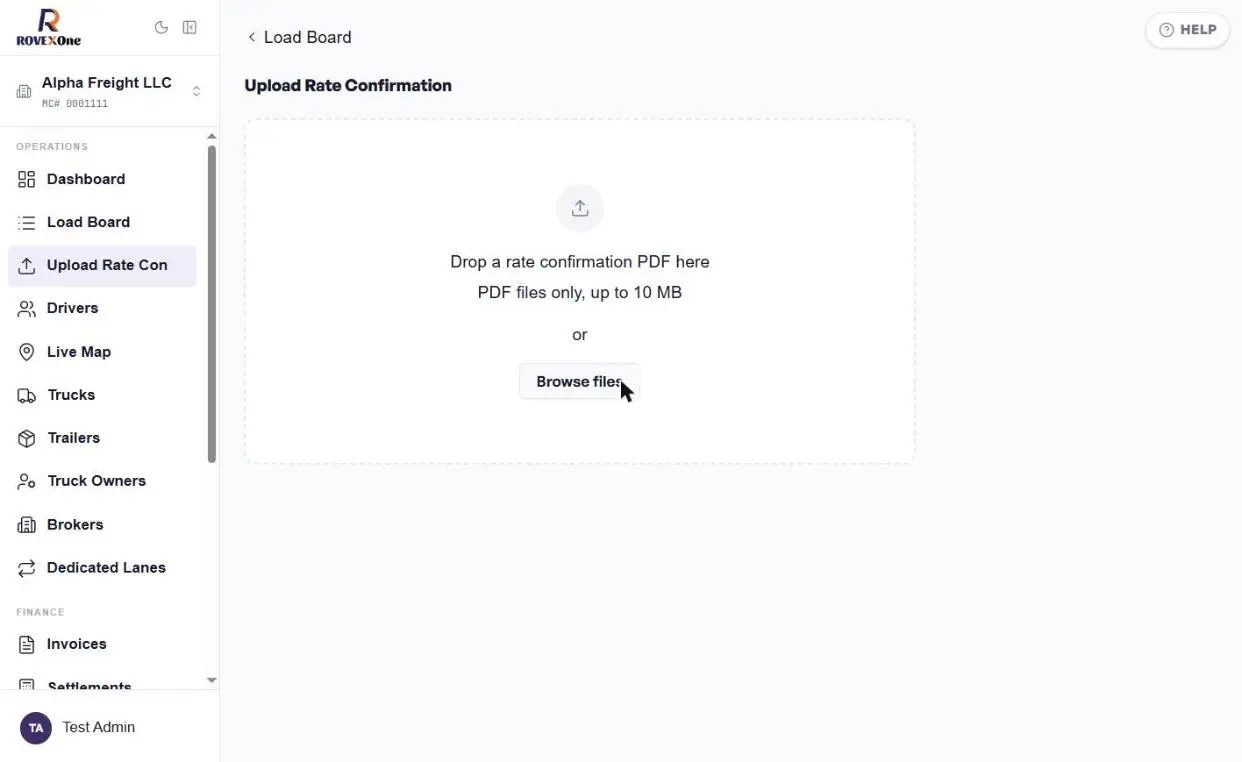
Click Upload Rate Con in the left sidebar. You can also click + New Load on the Load Board and pick Upload Rate Con.
Add the PDF
Drag the rate con onto the box, or click Browse files and pick it. Only PDFs are accepted, up to 10 MB.
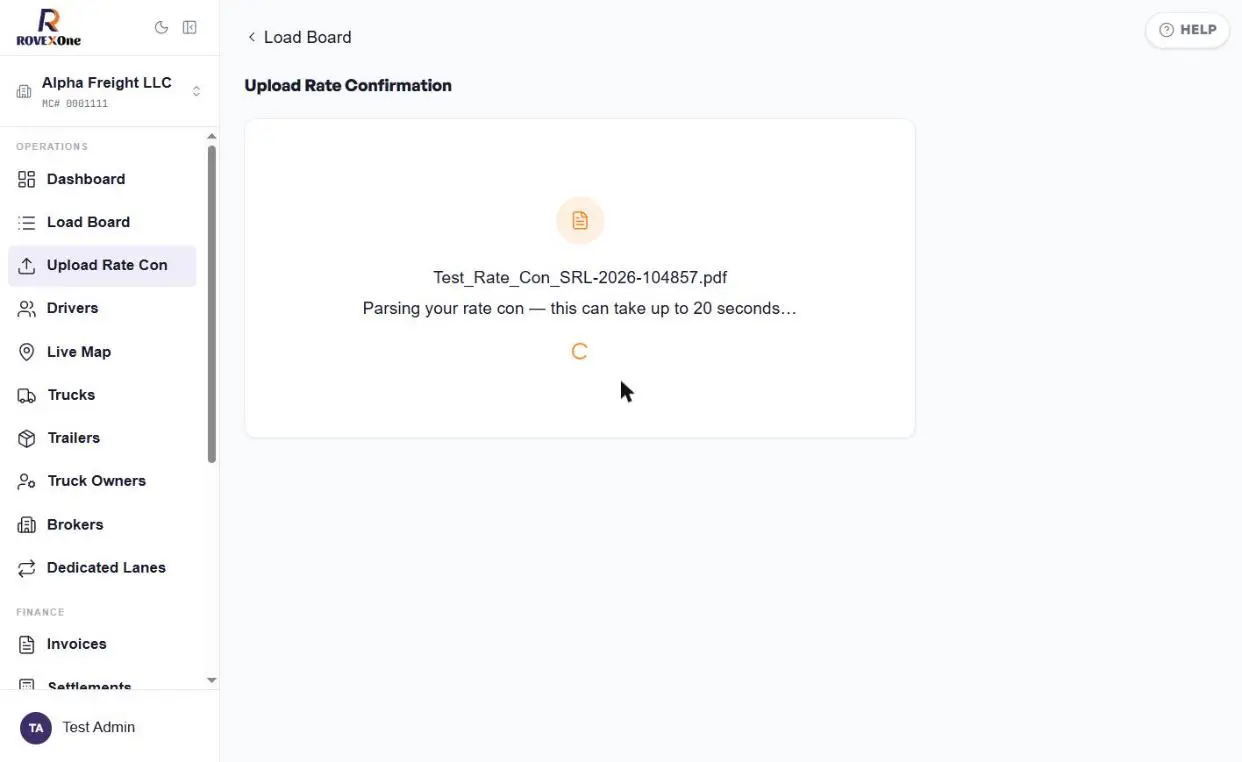
RovexOne shows Parsing your rate con while it reads the file. This can take up to 20 seconds.
Match the broker
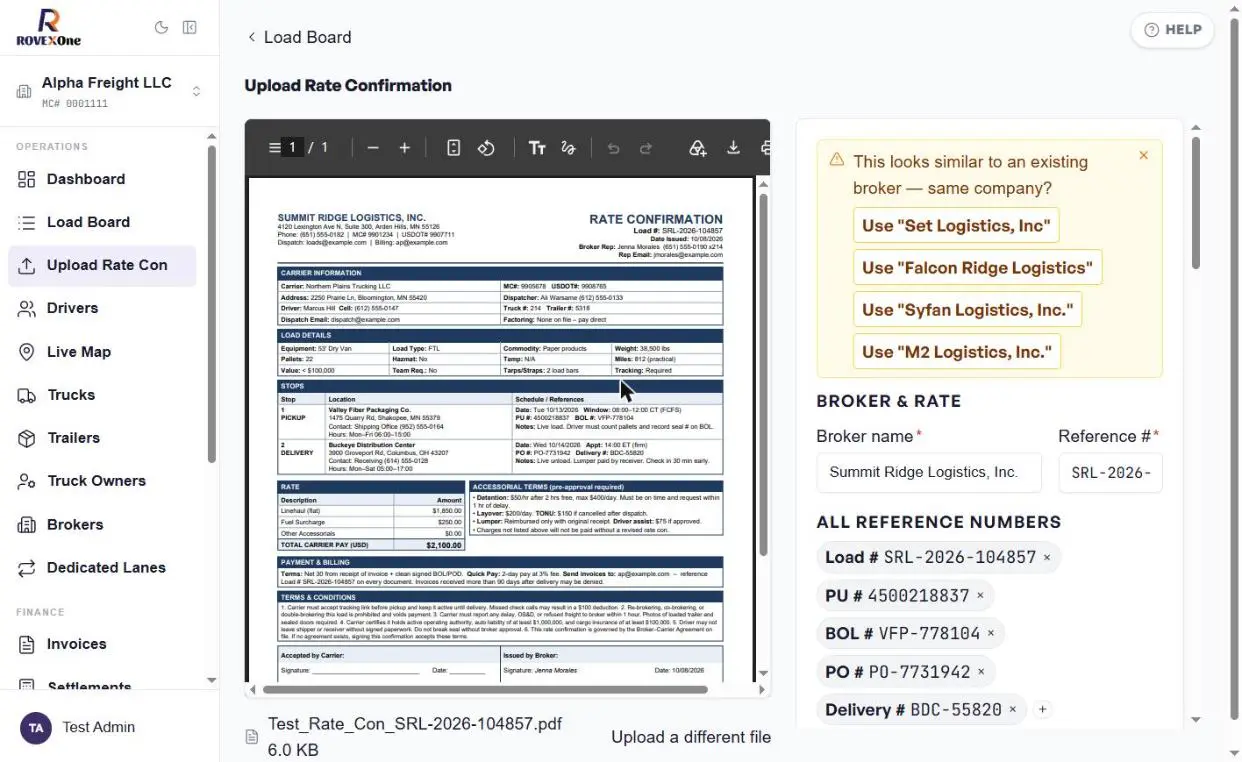
The PDF opens on the left and the filled-in load form on the right. If the broker's name looks like one you already have, a yellow box asks "This looks similar to an existing broker — same company?"
If it's the same company, click its name (for example Use "Set Logistics, Inc"). The load is linked to the broker you already have.
If it's a new broker, close the box with ×.
Avoid duplicates:
Picking the existing broker keeps all of that broker's loads and invoices in one place. Only close the box when the broker really is new.
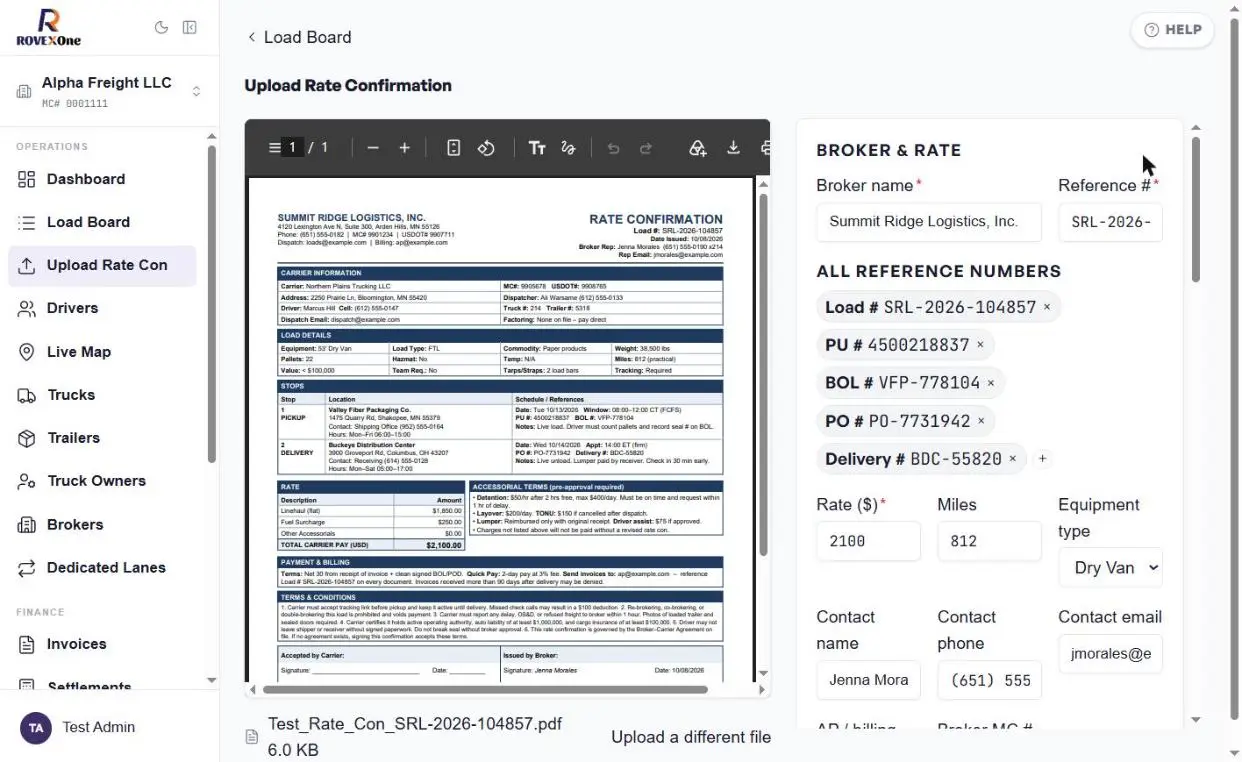
Check Broker & Rate against the PDF
Compare each field with the PDF on the left. RovexOne fills in:
Broker name and Reference #, which is the broker's load number
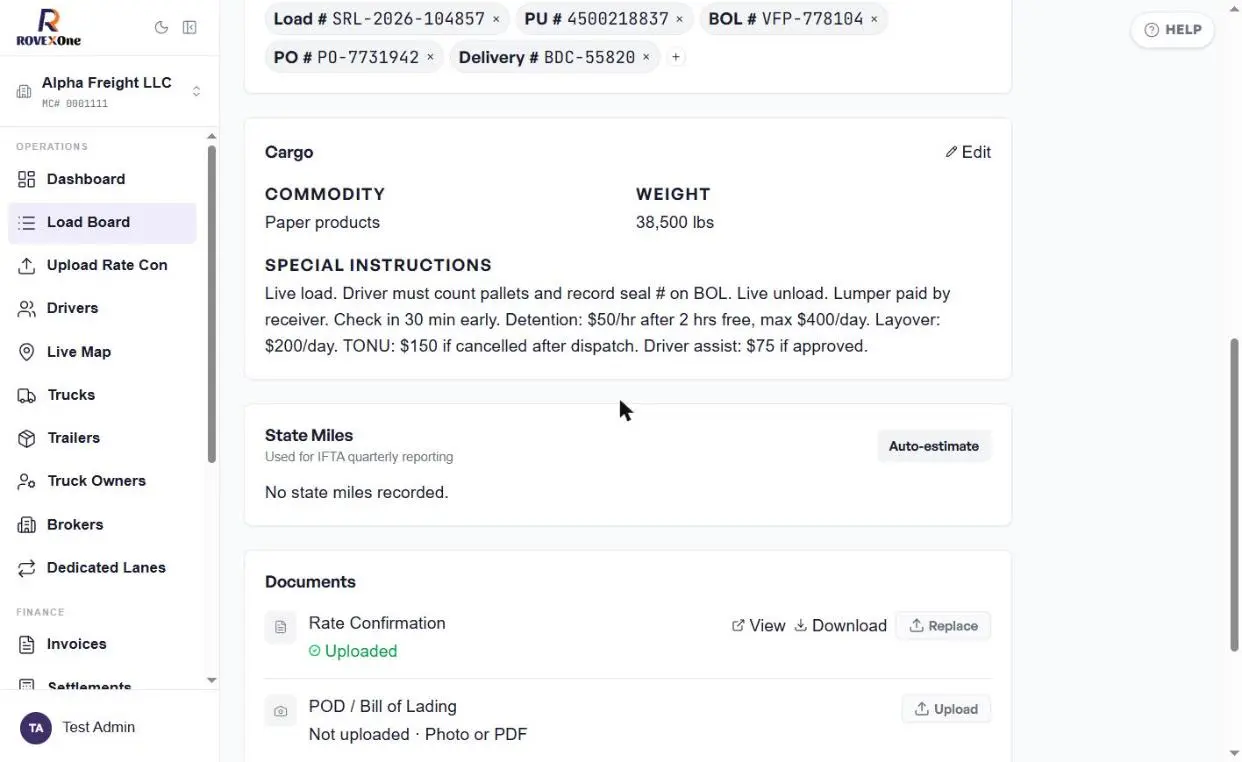
All reference numbers as tags, such as Load #, PU #, BOL #, PO # and Delivery #. Click × to remove one or + to add one.
Rate, which is the total carrier pay. In this example that's $1,850 linehaul + $250 fuel = $2,100.
Miles, equipment type, broker contact, billing email, MC # and billing address
Check the pickup and delivery
Scroll down the form. Check each stop's facility, address, date and time. Time windows are copied as written on the rate con, including the time zone and notes like FCFS or firm.
If the rate con has extra stops, check that each one came through. Use + Add pickup stop or + Add delivery stop if one is missing.
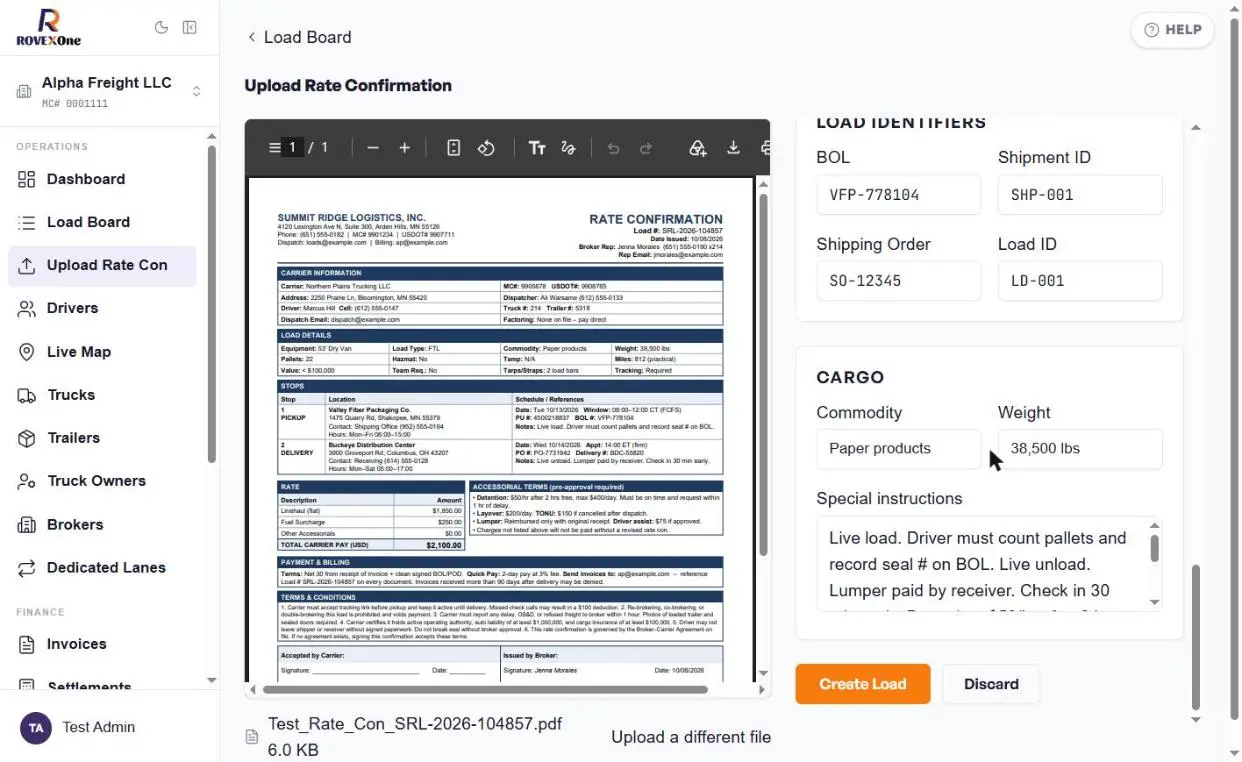
Check cargo and special instructions, then click Create Load
Commodity and weight come from the rate con. Special instructions collect the stop notes and the broker's accessorial terms, such as detention, layover, TONU and lumper rules, so your driver can see them.
Load identifier boxes with grey text were not found on the rate con. Grey text is only an example and isn't saved.
When everything matches, click Create Load. If you uploaded the wrong PDF, click Upload a different file under the preview.
Check the new load and its documents
The load opens with status Booked, using the broker's load number as its title.
Scroll down to Documents. The rate con is already attached as Uploaded, with View, Download and Replace. Upload the POD or BOL here after delivery.
Yes. Change any field before you click Create Load. After the load is created, use Edit load or the Edit links on the Route and Cargo cards.
Can I upload a scanned or photographed rate con?
The upload accepts PDF files only. Save photos as a PDF first, and check the extracted fields carefully because scans can be harder to read.
Why is the rate higher than the linehaul?
RovexOne uses the total carrier pay on the rate con, which includes fuel surcharge and any listed accessorials.
The broker gave me a revised rate con. What do I do?
Open the load, click Replace next to Rate Confirmation, and update the rate or stops with Edit load.
Loads › Mark a load delivered and invoice it
Mark a load delivered and invoice it
Close out a load once it's delivered: update the status, upload the signed POD, then create the invoice from the Load Board and send it to your factoring company or broker.
For owners and dispatchersAbout 3 minutes4 parts
The flow at a glance
Part 1: Change the load's status to Delivered
Part 2: Upload the signed POD / Bill of Lading
Part 3: Select the load on the Load Board and create its invoice
Part 4: Review the draft invoice and send it
Part 1: Mark the load delivered
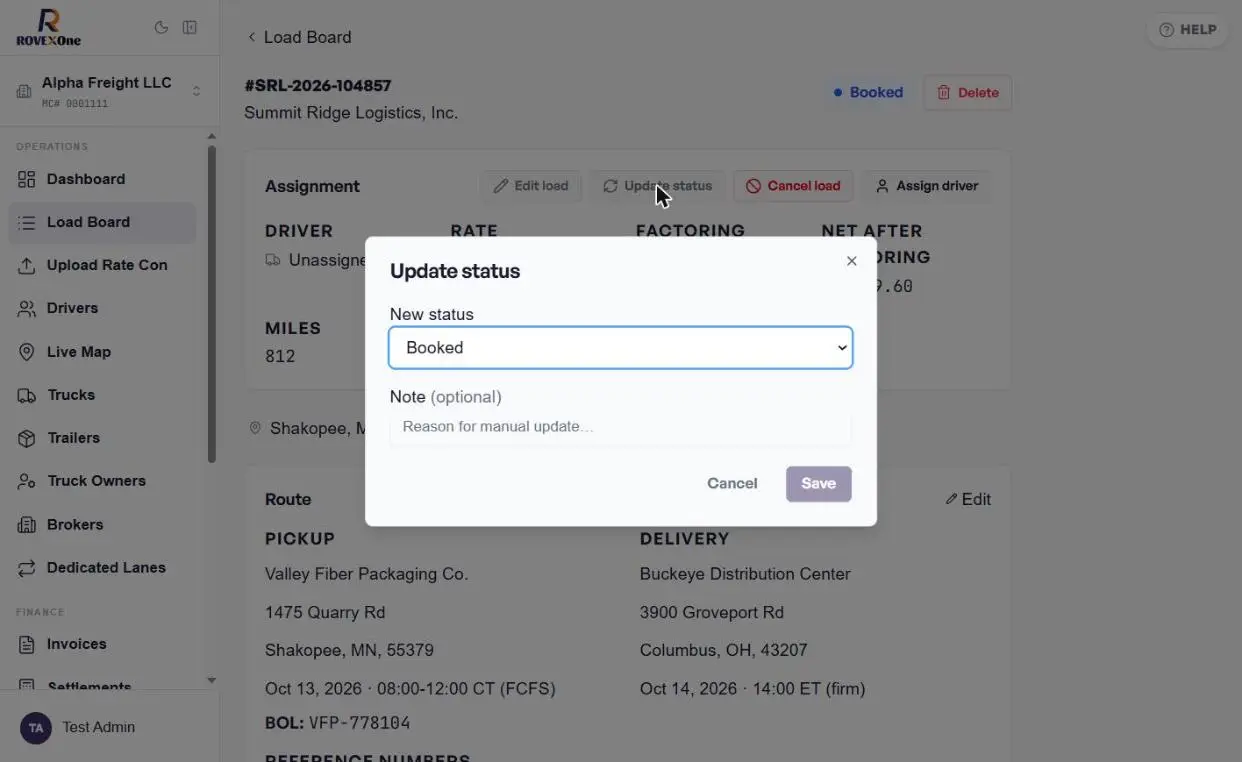
Open the load and click Update status
Open the load from the Load Board. In the Assignment card, click Update status.
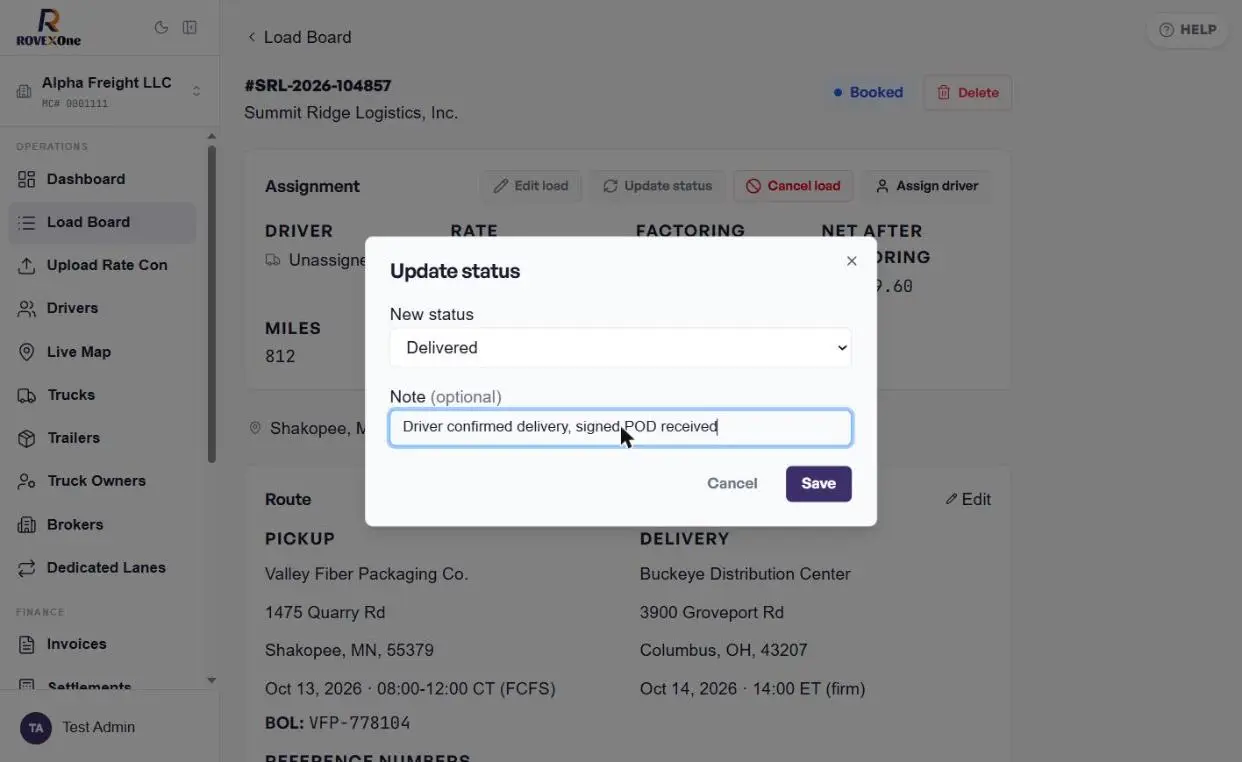
Choose Delivered and add a note
In New status, pick Delivered. The list also includes Booked, Dispatched, At Pickup, In Transit and At Delivery, so you can use the same dialog to move a load forward at any stage.
Add a short Note such as "Driver confirmed delivery". It's optional, but it shows up in the load's status history so your team knows why the status changed. Click Save.
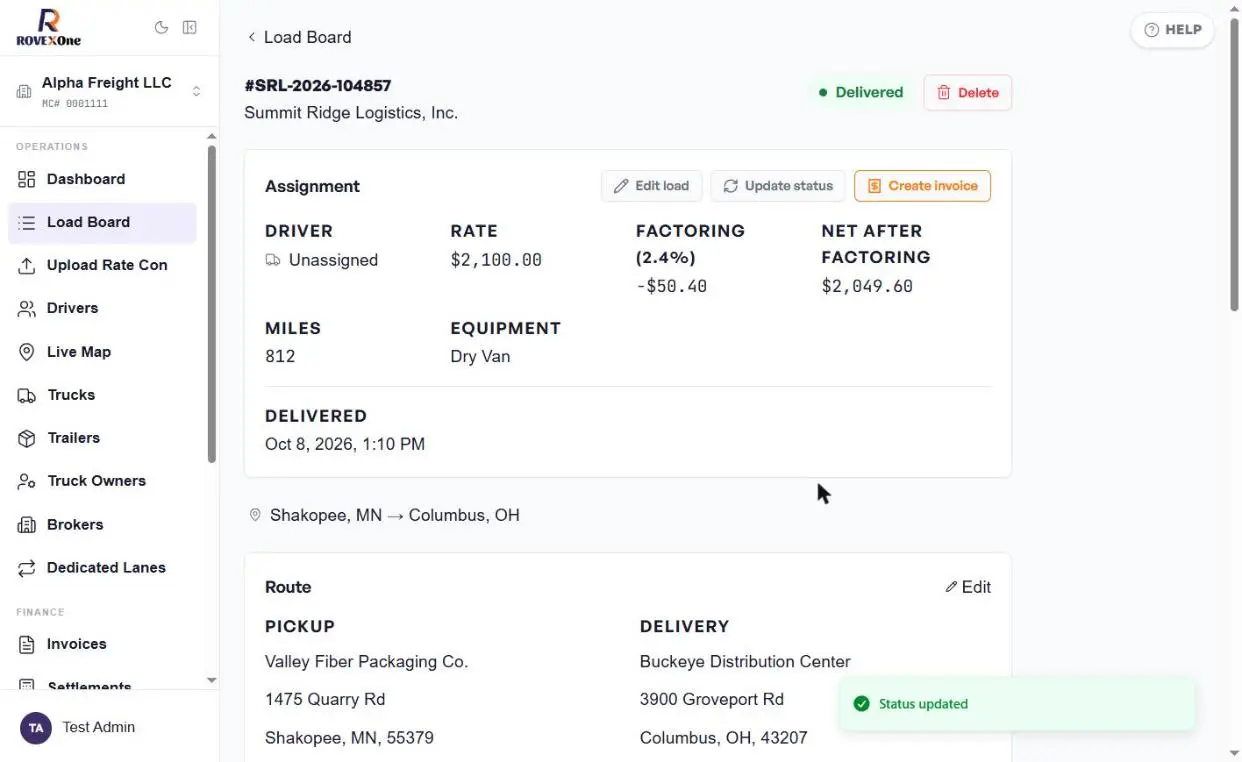
Check the status changed
You'll see Status updated. The badge now reads Delivered, the delivery date and time are recorded, and a Create invoice button appears in the Assignment card.
Part 2: Upload the POD
Brokers and factoring companies need the signed POD before they'll pay. Attach it to the load so it goes out with the invoice automatically.
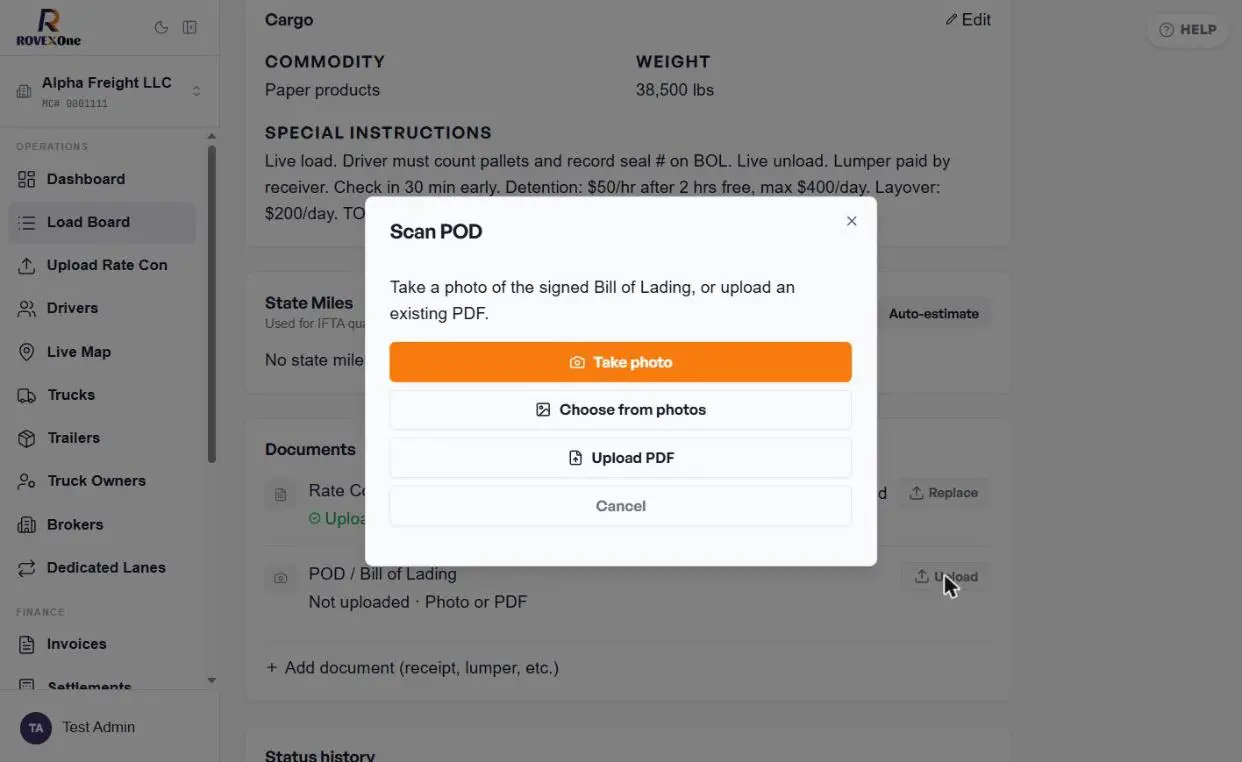
Click Upload next to POD / Bill of Lading
Scroll down to Documents and click Upload on the POD / Bill of Lading row. Choose how to add it:
Take photo to snap the paper BOL with your phone camera
Choose from photos for a picture you already took
Upload PDF for a scanned or emailed POD
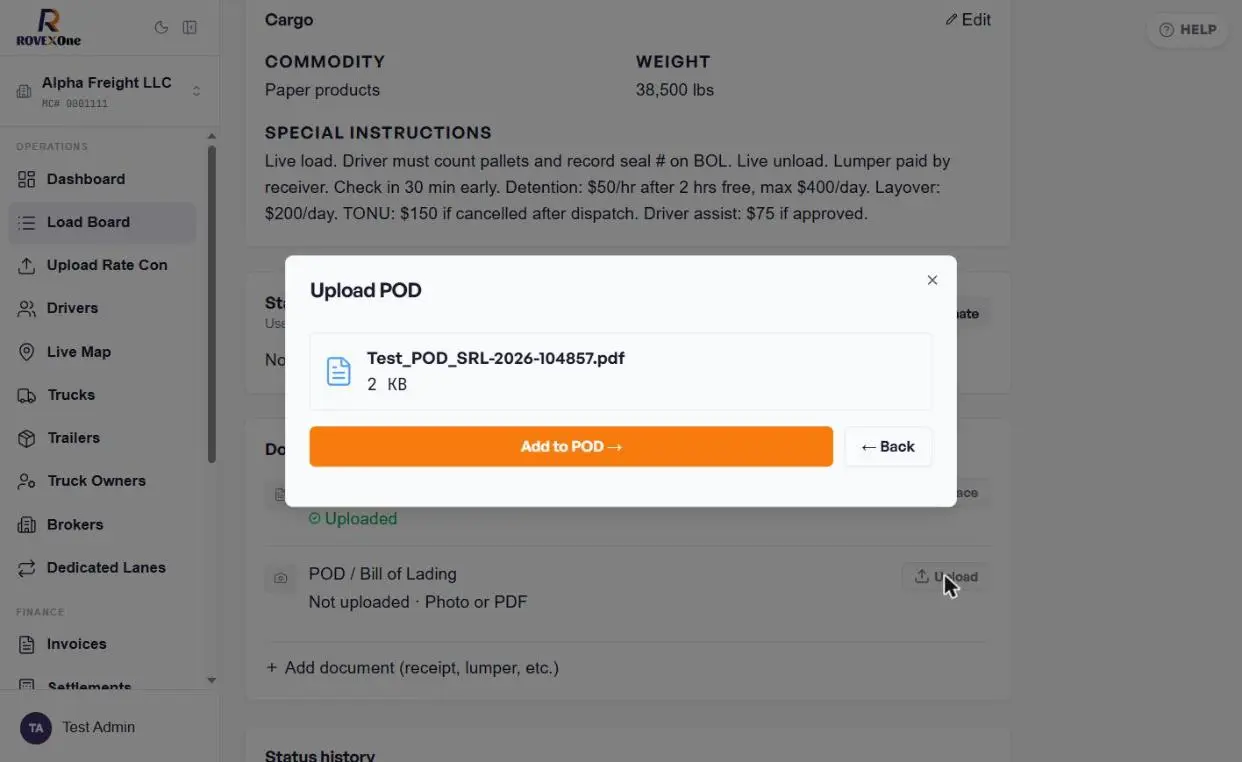
Confirm the file and click Add to POD
Check the file name is the right POD, then click Add to POD →. Click ← Back if you picked the wrong file.
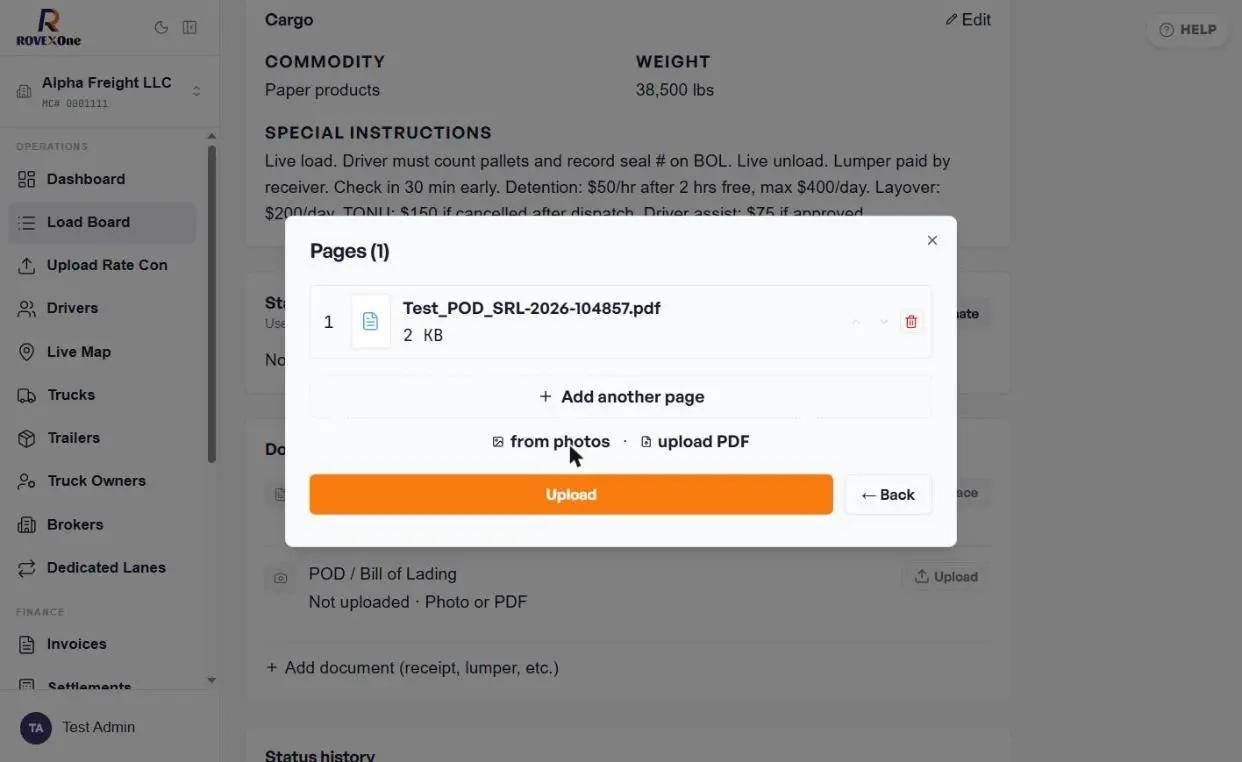
Add more pages if needed, then click Upload
Multi-page PODs are common, for example a BOL plus a lumper receipt. Click + Add another page, or use from photos or upload PDF, to add each page. Use the arrows to reorder pages or the trash icon to remove one. RovexOne keeps them together as one POD.
Click Upload.
Check the POD is attached
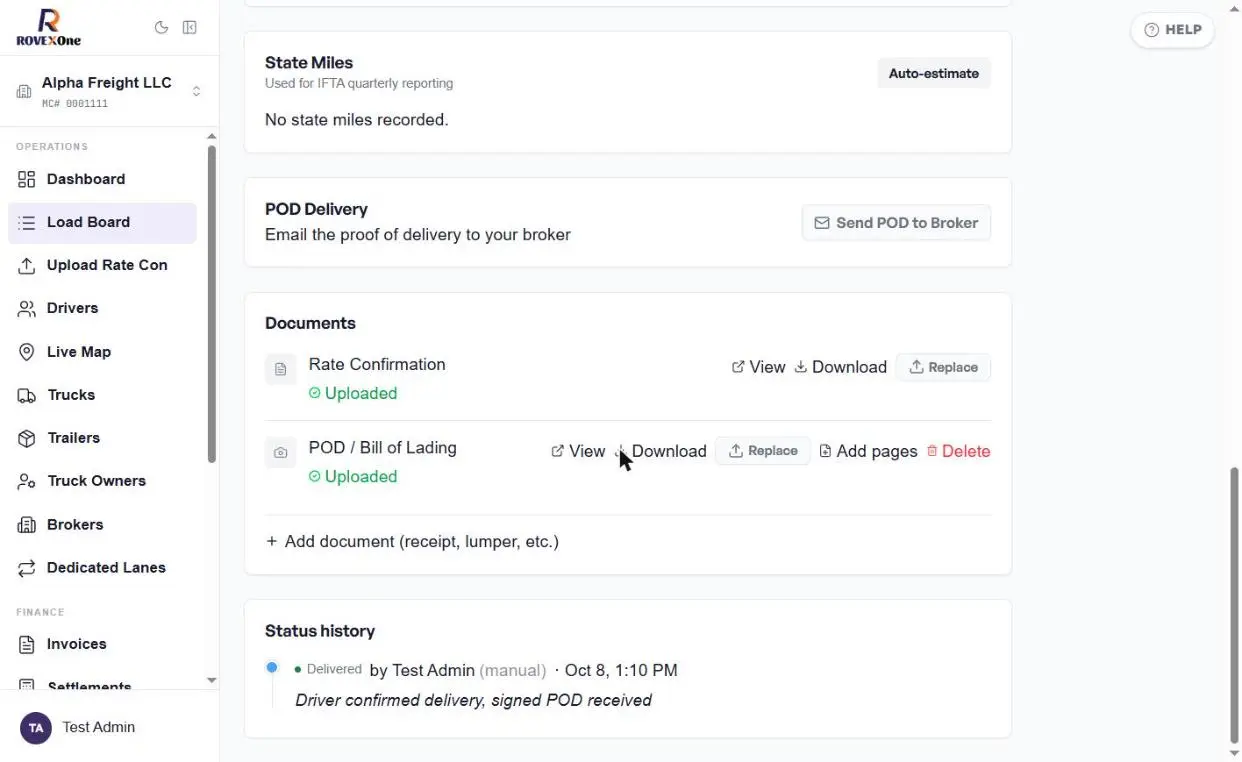
You'll see POD uploaded, load delivered. The POD row now shows Uploaded with View, Download, Replace, Add pages and Delete. The Status history at the bottom shows who marked the load delivered, when, and your note.
A new POD Delivery card also appears with Send POD to Broker, which emails the POD to the broker on its own. You don't need it if you're about to send the invoice, because the POD is attached to the invoice.
Part 3: Create the invoice from the Load Board
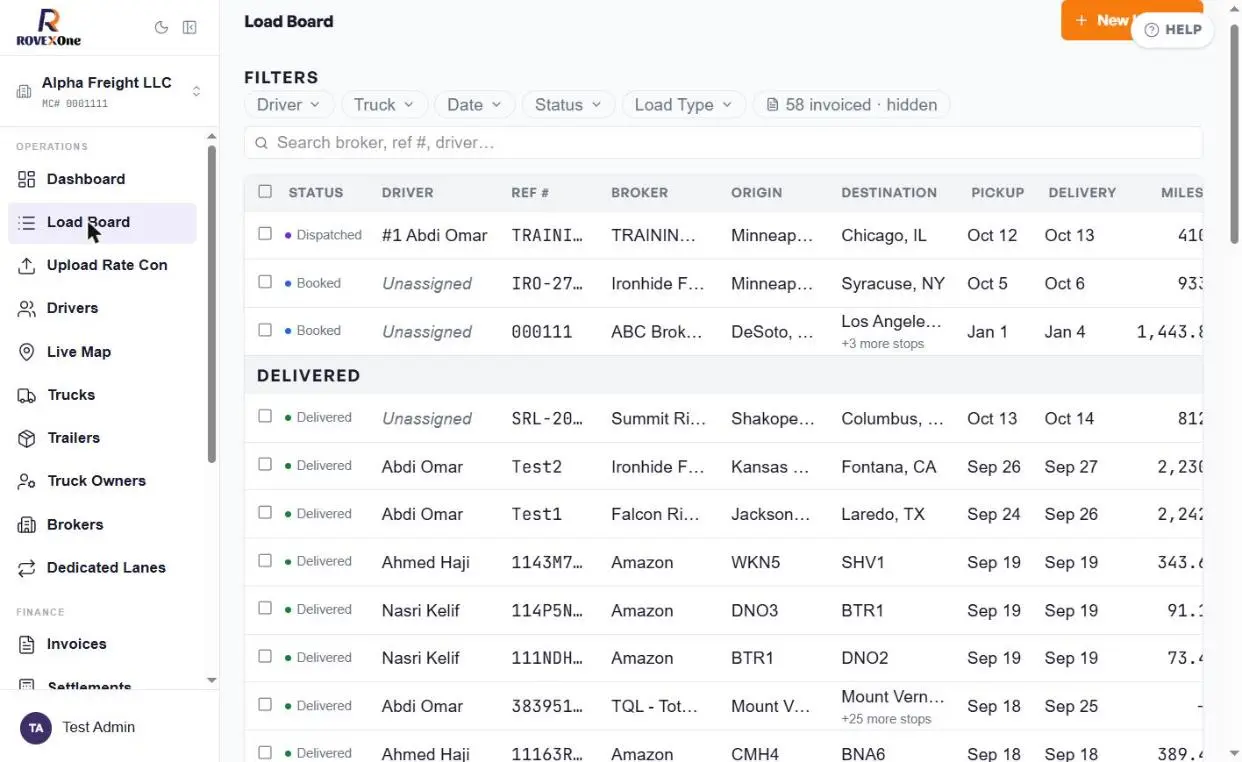
Find the load in the Delivered section
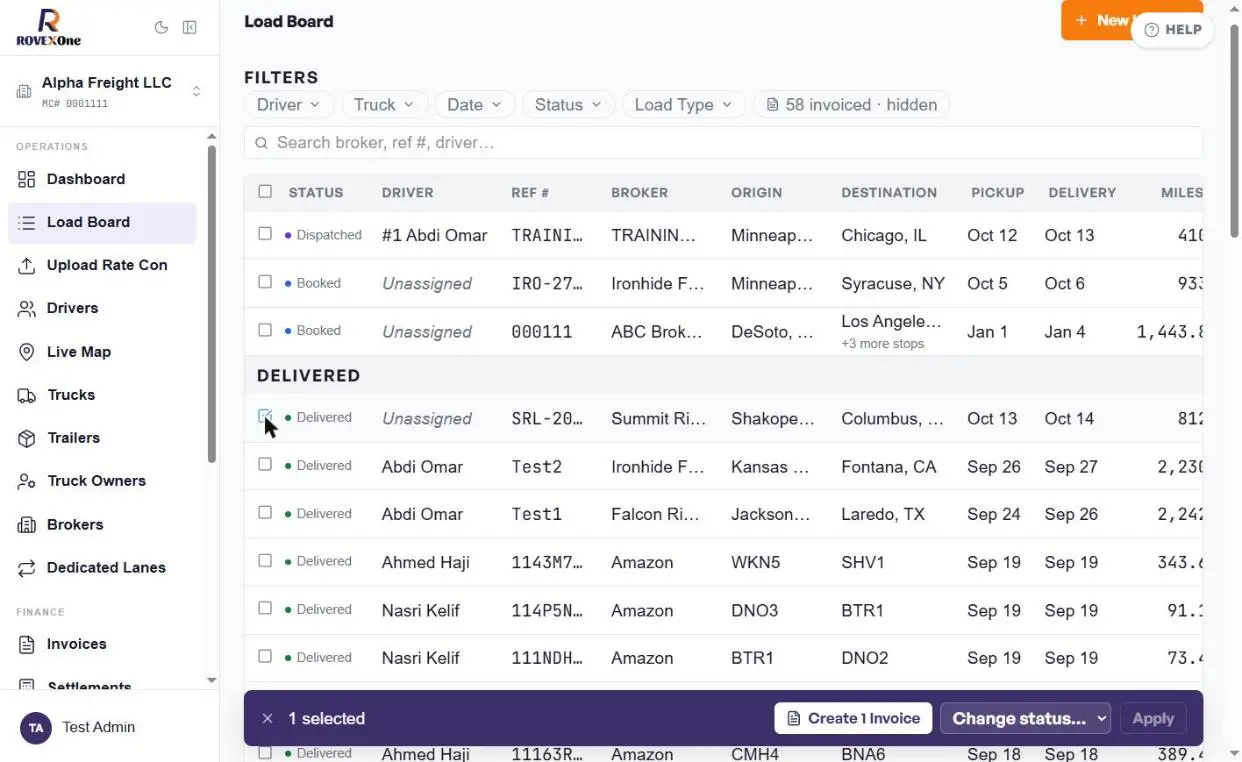
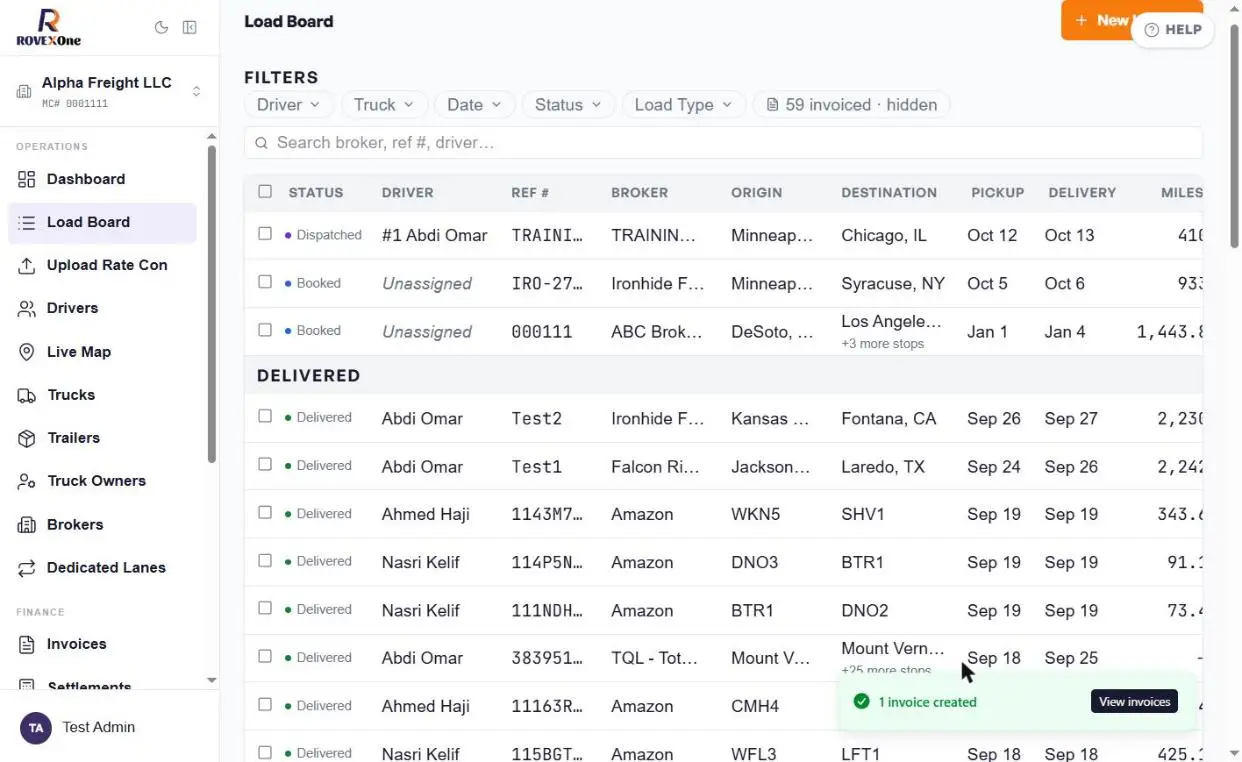
Go to Load Board. Delivered loads move out of your active loads into their own DELIVERED section, so you can see at a glance what's ready to bill.
Check the box and click Create Invoice
Tick the checkbox on the load's row. A bar appears at the bottom of the screen showing how many loads you've selected. Click Create 1 Invoice.
Billing several loads:
Tick every delivered load you want to bill. The button changes to "Create 3 Invoices", for example, and each load gets its own invoice.
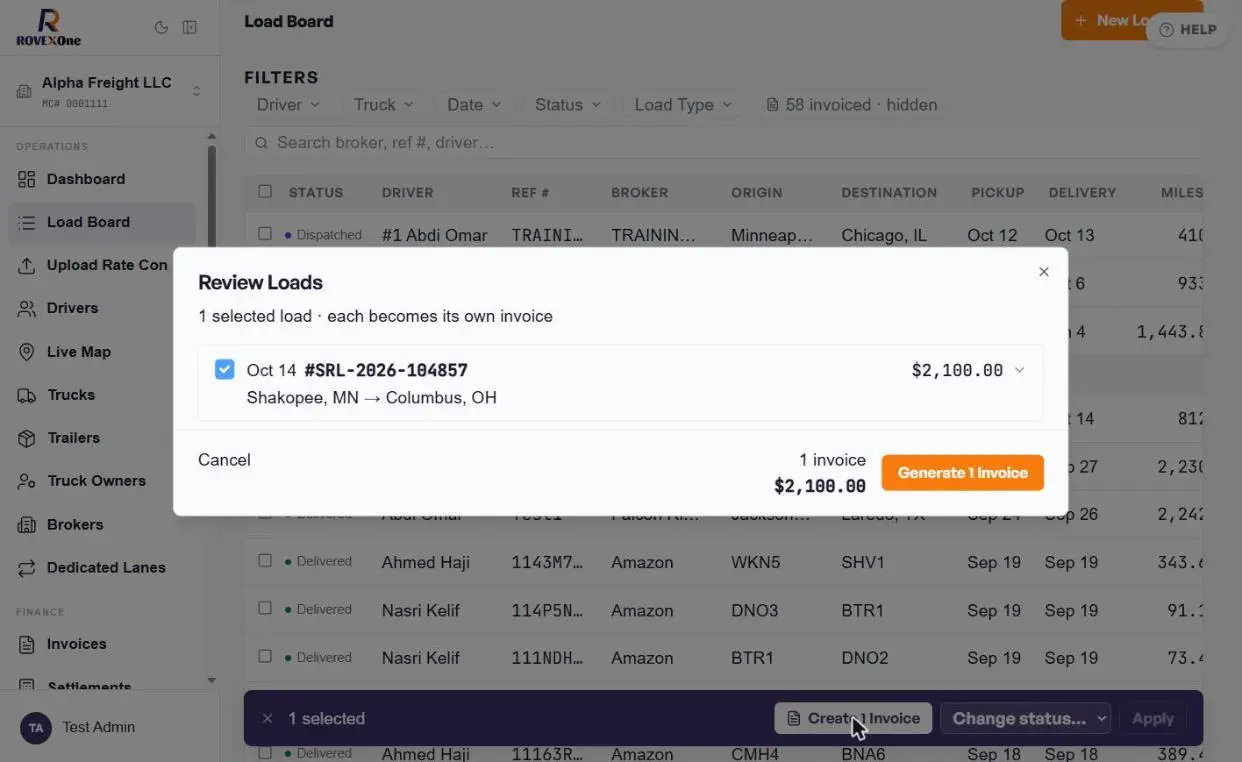
Review the load
The Review Loads window lists each selected load with its rate. Click the arrow on the right of a load to open its invoice details.
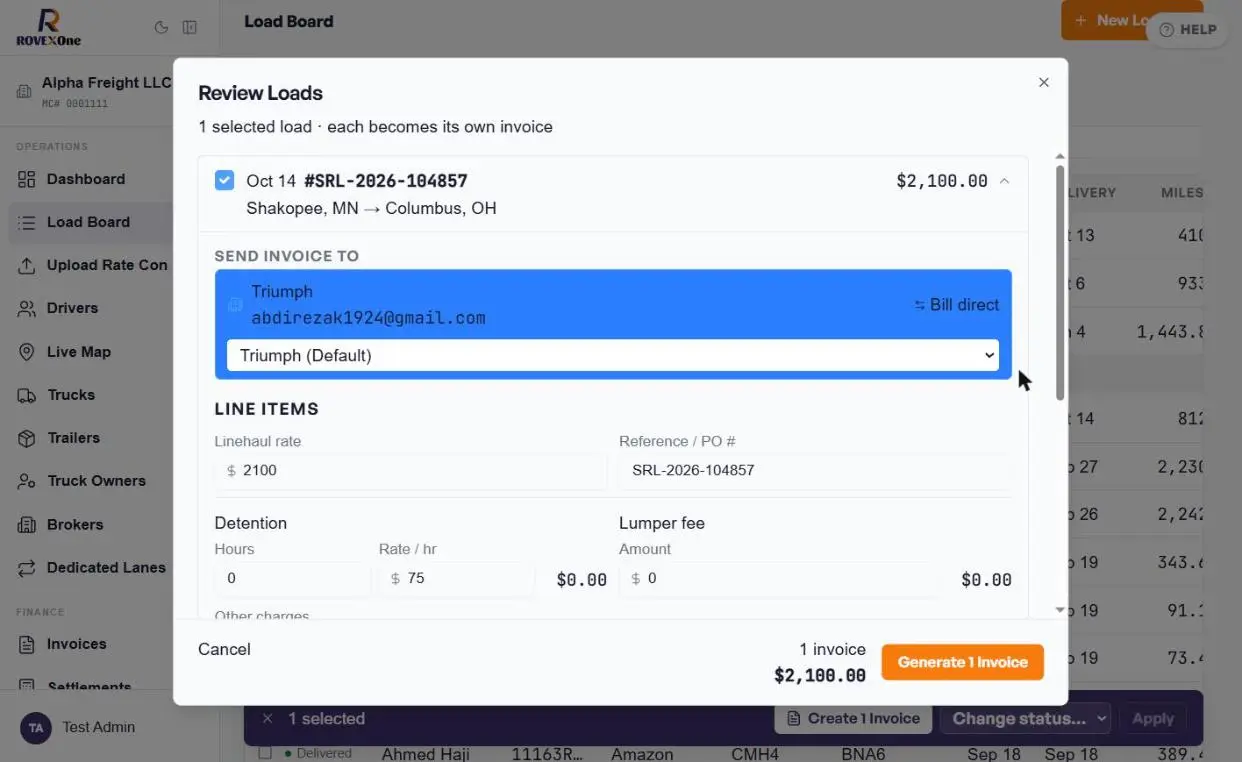
Check who gets the invoice and the line items
Send invoice to shows where the invoice goes. If you use a factoring company it's selected by default (Triumph in this example). Click Bill direct to bill the broker yourself.
Under Line items, check:
Linehaul rate and Reference / PO #. These come from the load.
Detention: enter hours and the rate per hour
Lumper fee if you paid one
Other charges with a short description, for example layover or driver assist
Check the detention rate:
The rate per hour is pre-filled with a default ($75 here). Change it to match the rate con. In this example the broker pays $50/hr.
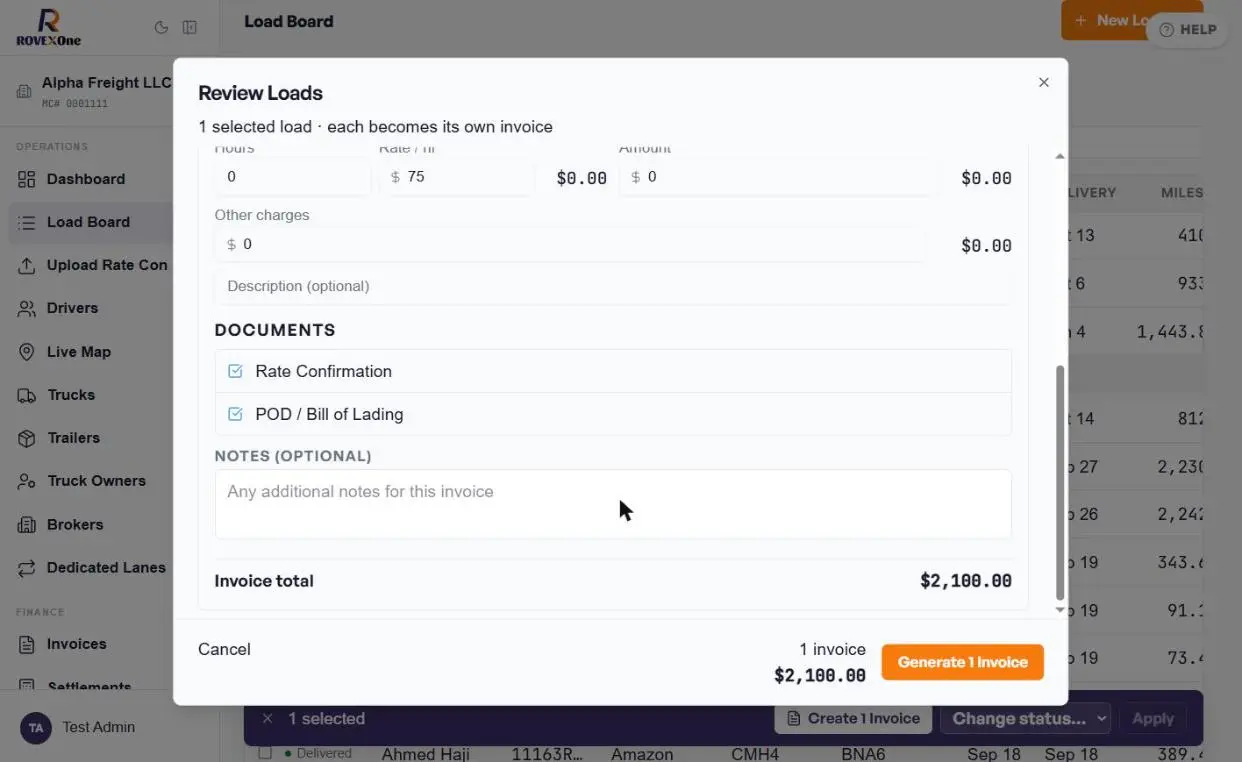
Pick the documents and click Generate Invoice
Under Documents, the rate con and POD are ticked so they're attached to the invoice. Untick anything you don't want to send. Add Notes if needed, check the Invoice total, then click Generate 1 Invoice.
This creates a draft. Nothing is sent yet.
Confirm the invoice was created
You'll see 1 invoice created. The load leaves the Delivered section, and the invoiced · hidden count at the top of the Load Board goes up by one. Click View invoices on the message to go straight to the invoice.
Part 4: Review and send the invoice
Open the draft invoice
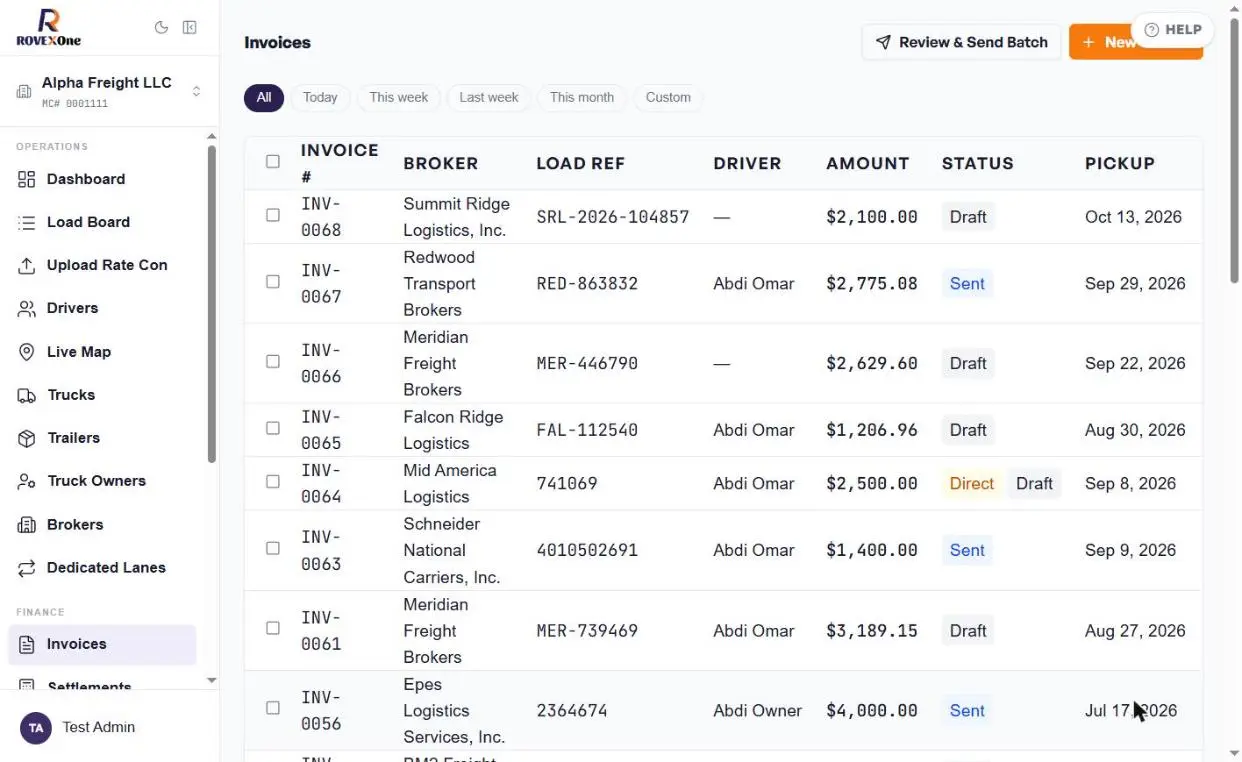
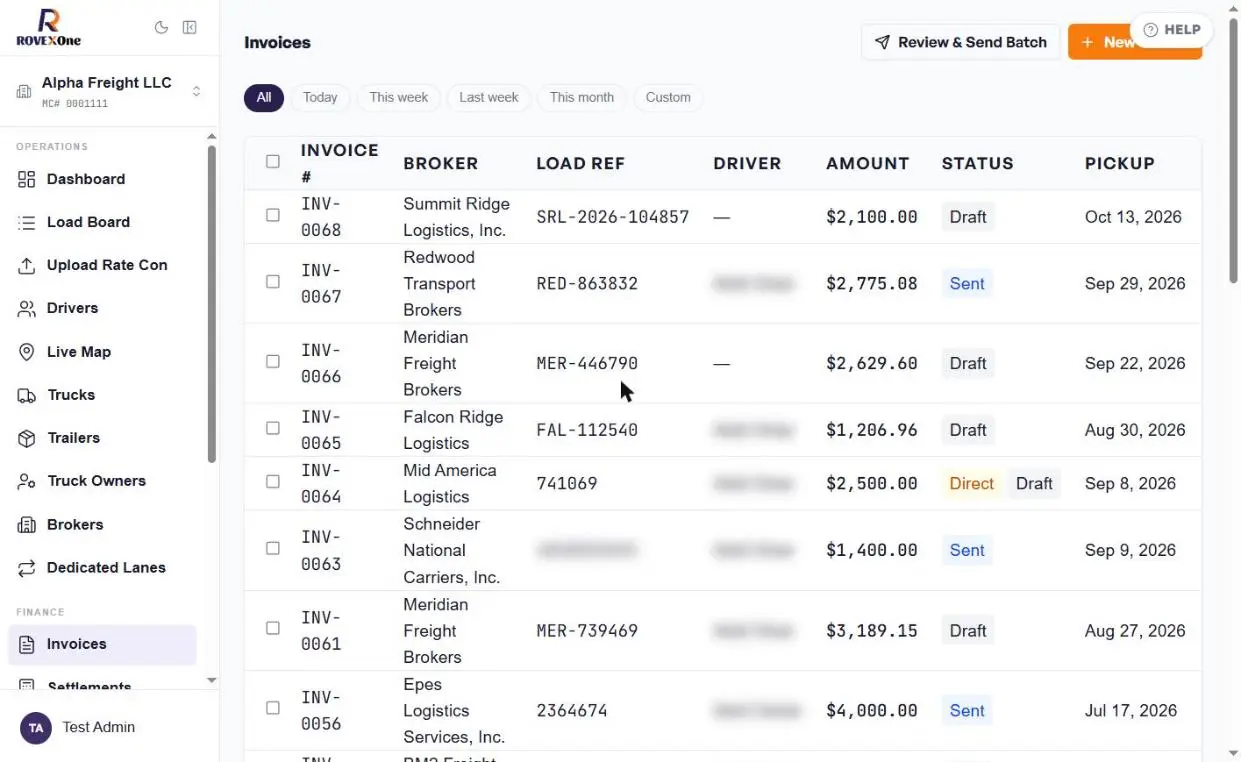
Go to Invoices in the sidebar. New invoices show as Draft until they're sent. Click the invoice to open it.
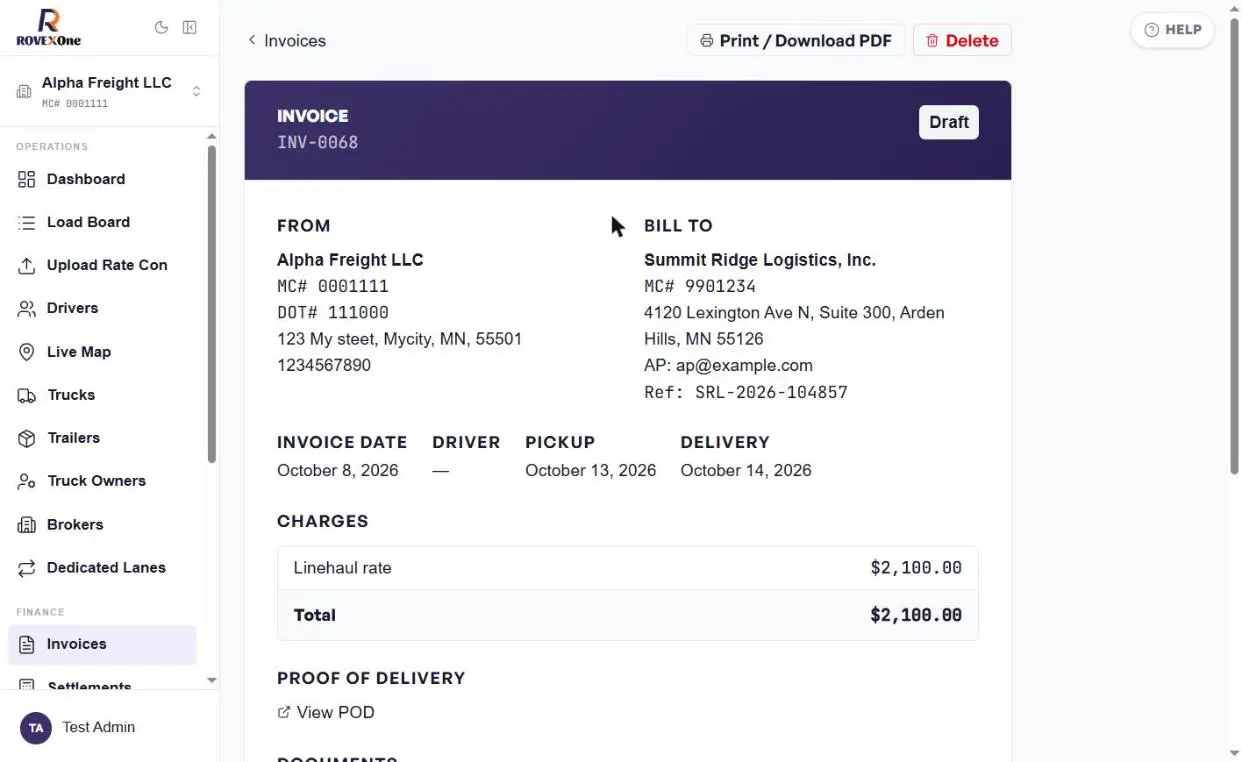
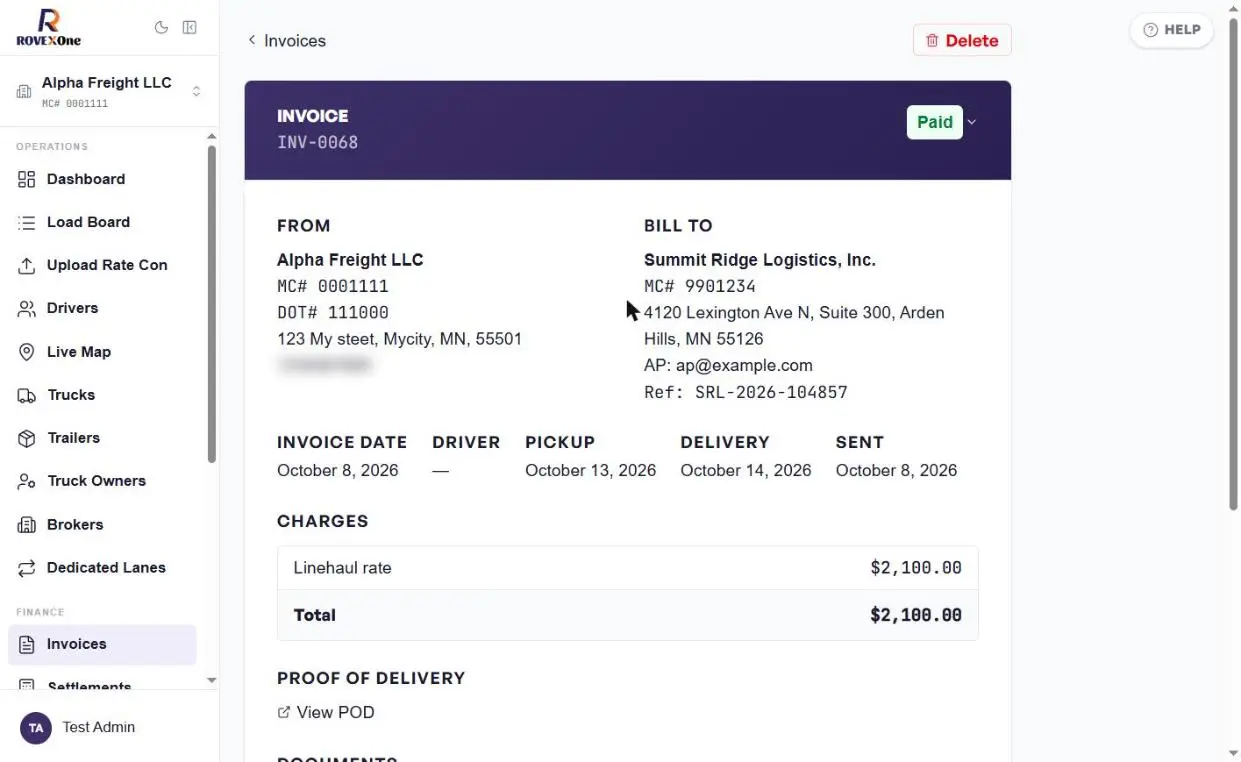
Check the invoice
Make sure the Bill To broker, MC #, AP email and Ref number are right, and that the charges match the rate con. Click Print / Download PDF at the top to get a PDF copy.
Send it
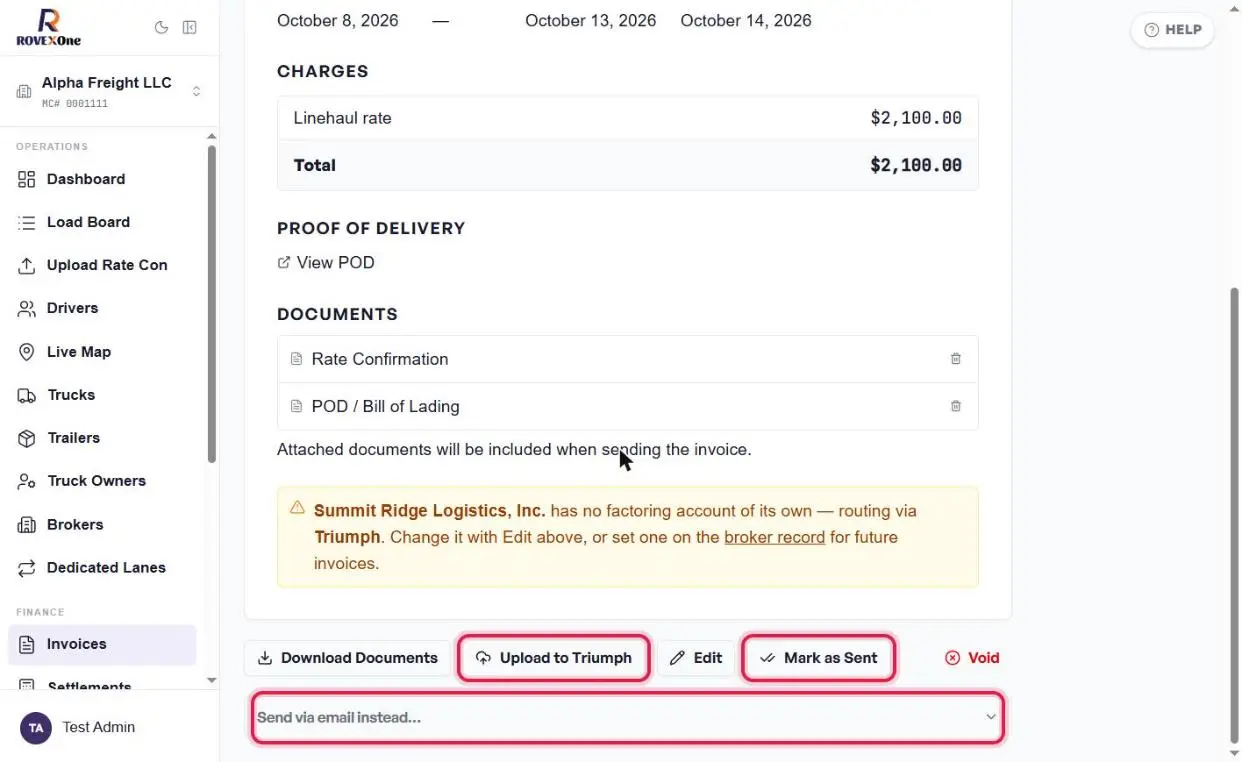
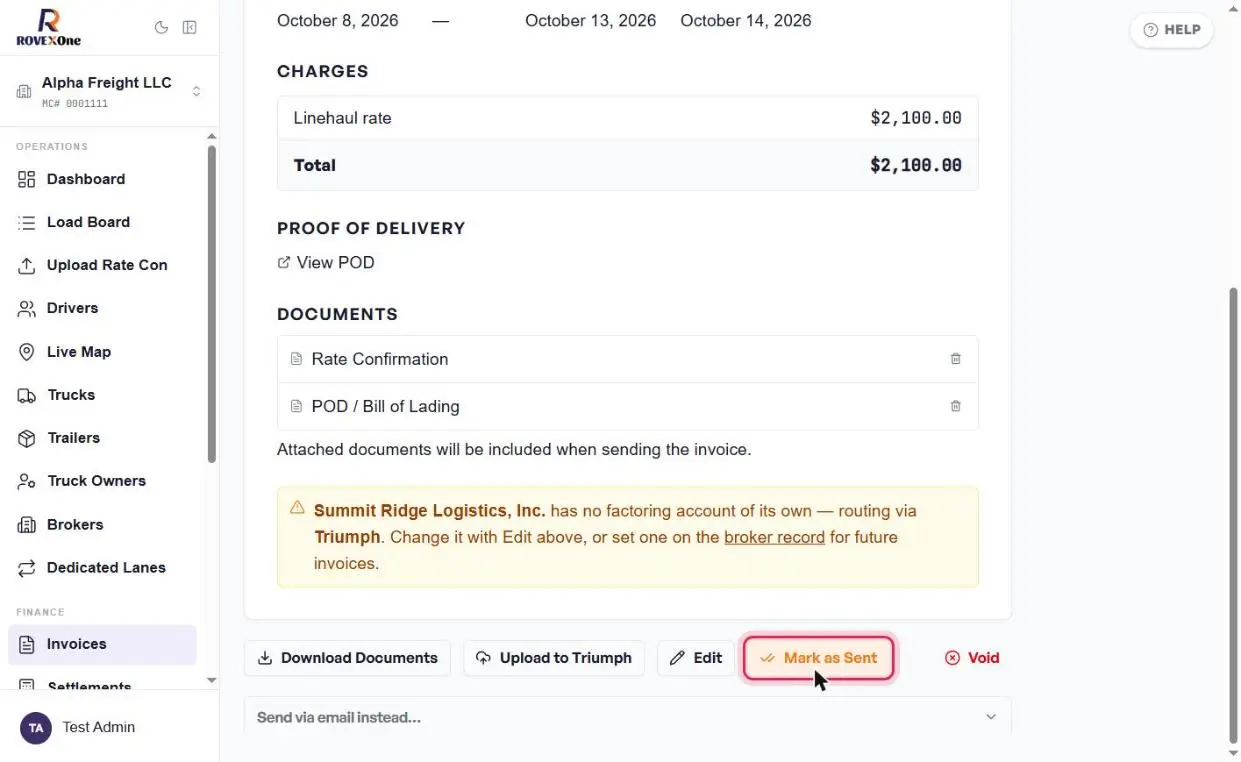
Scroll to the bottom of the invoice. The attached documents are listed, and they're included when you send. Pick one of the buttons outlined in red:
Button
Use it when
Upload to Triumph
You factor this load. It sends the invoice and documents to your factoring company (Triumph in this example).
Send via email instead…
You want to email the invoice to the broker's AP yourself instead of factoring it
Mark as Sent
You already sent it outside RovexOne, for example through a broker portal, and just want the status updated
Use Edit to change charges or who the invoice goes to, and Void to cancel an invoice that shouldn't be paid.
No factoring set for the broker?
The yellow note means the invoice goes to your default factoring company. Change it with Edit, or set one on the broker's record so future invoices route correctly.
Send options outlined in red. This example invoice was not sent.
Or send several invoices at once
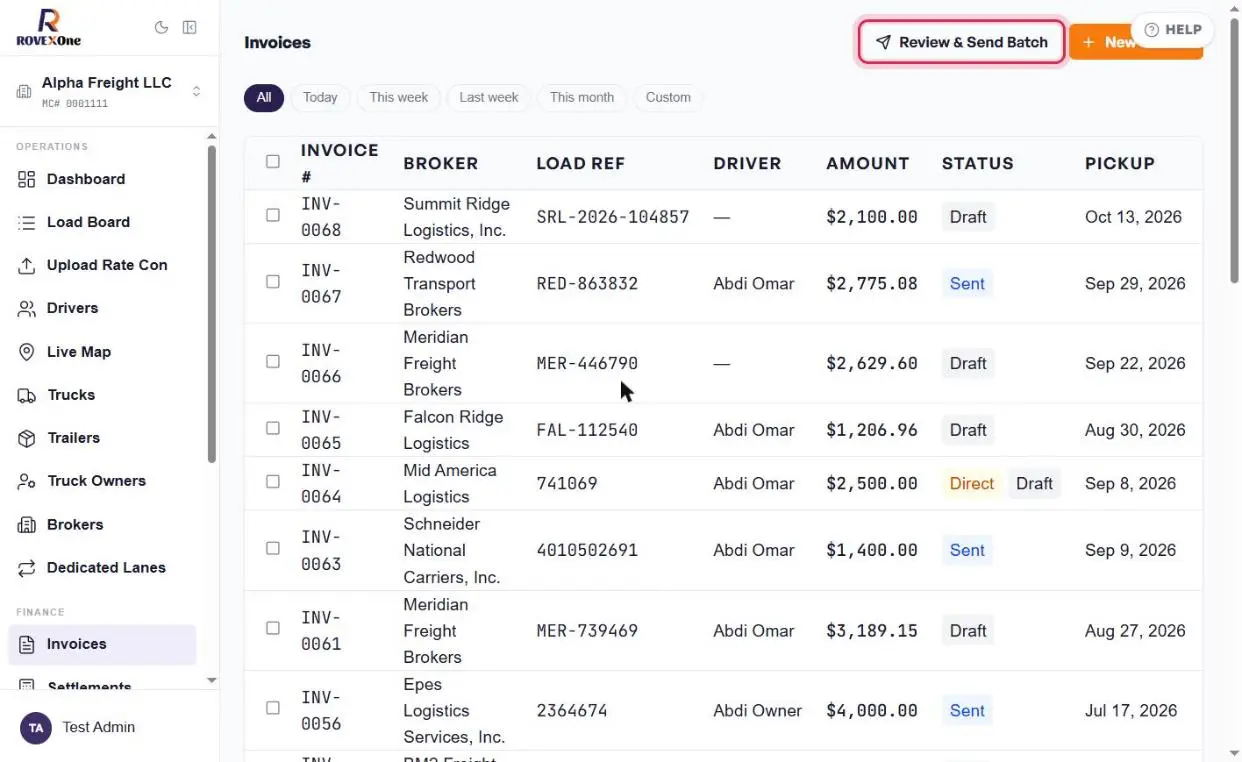
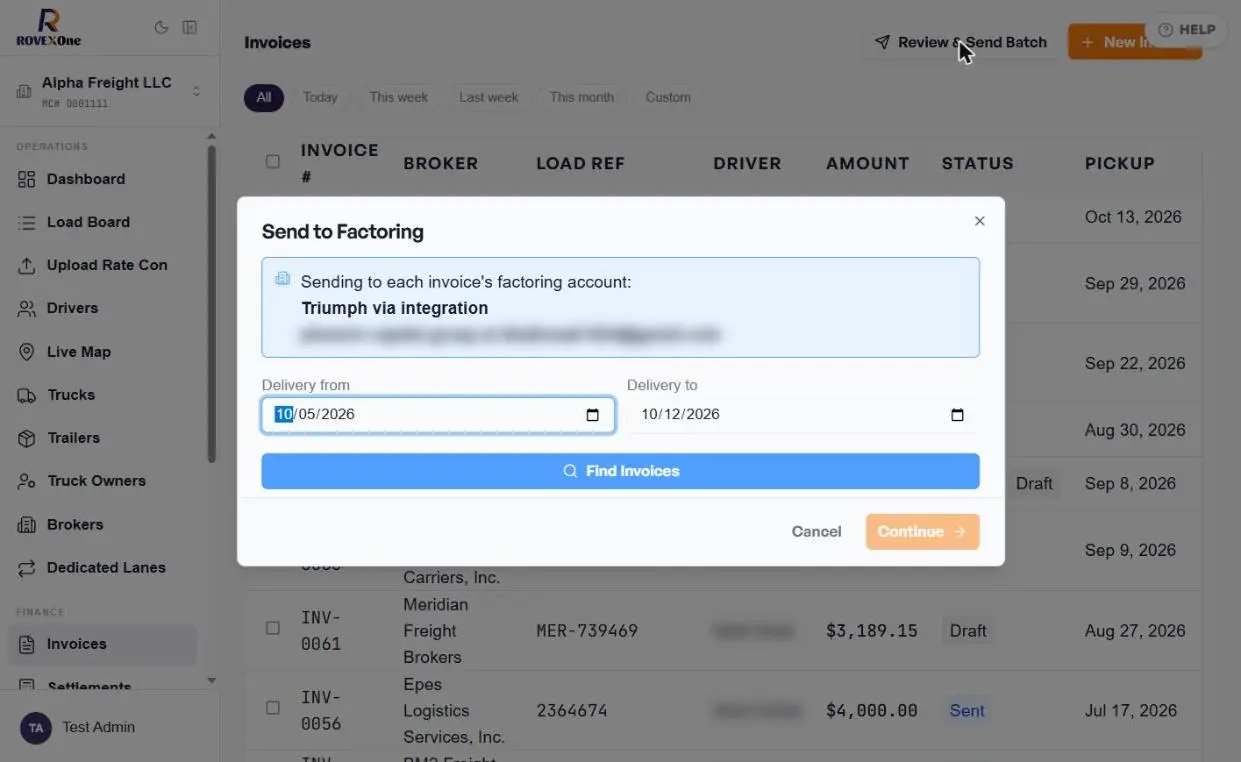
To send all your drafts in one go, click Review & Send Batch at the top of the Invoices page.
Review & Send Batch outlined in red.
Common questions
I don't see the Create invoice button on the load.
It only appears once the load is Delivered. Update the status first.
Where did my load go after I invoiced it?
Invoiced loads are hidden from the Load Board to keep it clean. They're counted in the "invoiced · hidden" chip at the top, and you can find the invoice under Invoices.
The POD is several pages. Do I upload them separately?
No. Add them all in the same upload using Add another page, or later with Add pages on the POD row. They're kept together as one POD.
I uploaded the wrong POD.
Click Replace on the POD row to swap the file, or Delete to remove it.
Can I fix an invoice after it's created?
Yes. Open it and click Edit. If it's already been sent, check with the broker or factoring company before changing it.
Loads › Cancel a load and record a TONU
Cancel a load and record a TONU
When a broker cancels a load after you've dispatched a truck, record it as a TONU (Truck Ordered Not Used). That way the load is cancelled, the truck and driver are freed up, and you still bill the broker the cancellation fee.
For owners and dispatchersAbout 2 minutes8 steps
Before you start
Get the TONU amount from the broker in writing. Most brokers send a revised rate con for the TONU.
Have that TONU rate con PDF ready to upload. It's optional, but it's proof for the broker or your factoring company.
If the broker isn't paying a fee, cancel the load without ticking the TONU box.
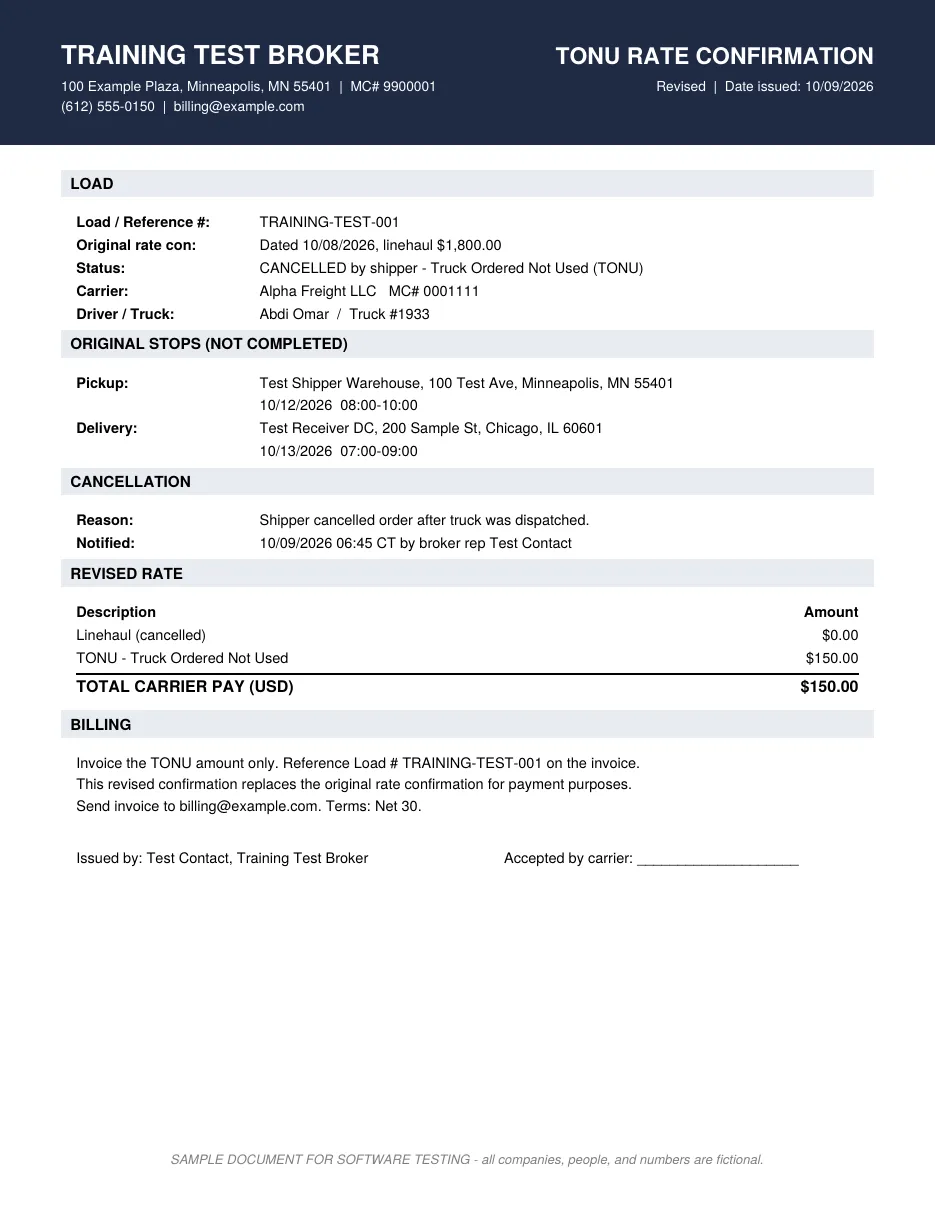
Example TONU rate con. The linehaul is cancelled and only the $150 TONU is paid. All details are fictional.
Part 1: Cancel the load as a TONU
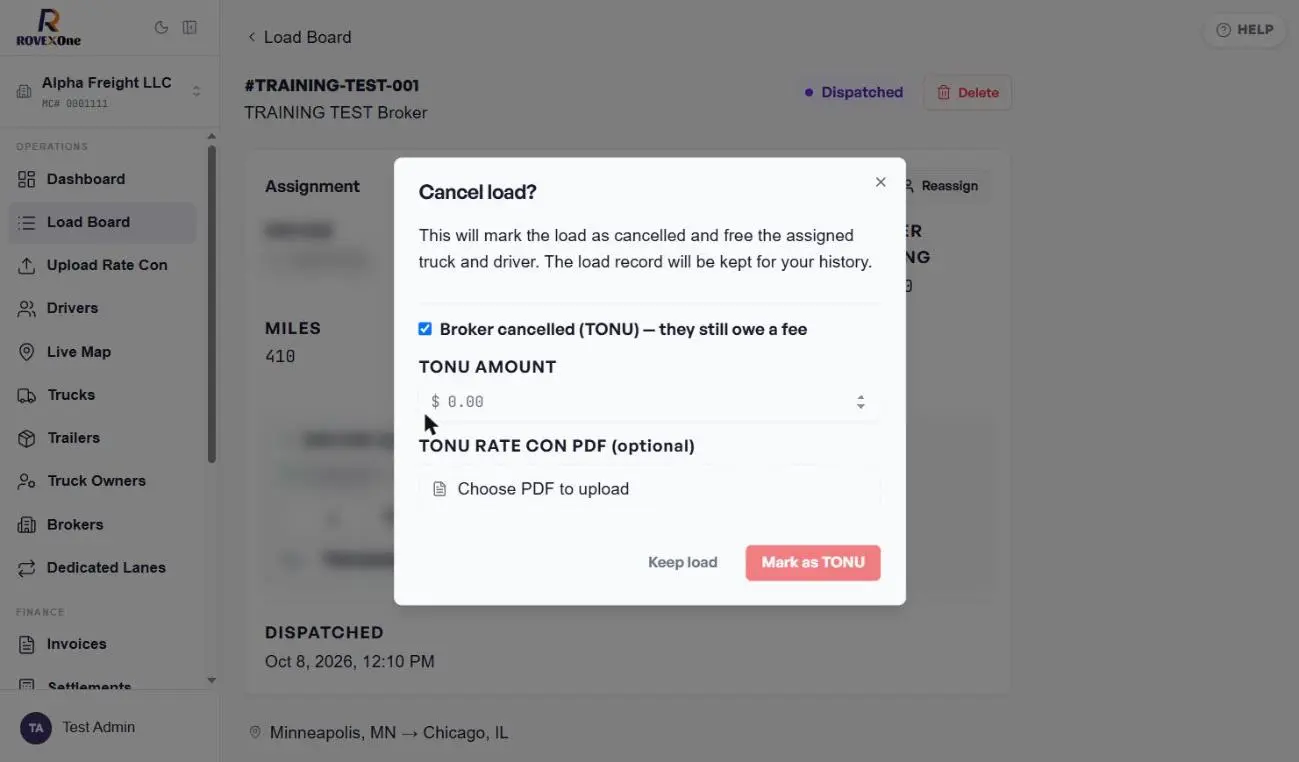
Open the load and click Cancel load
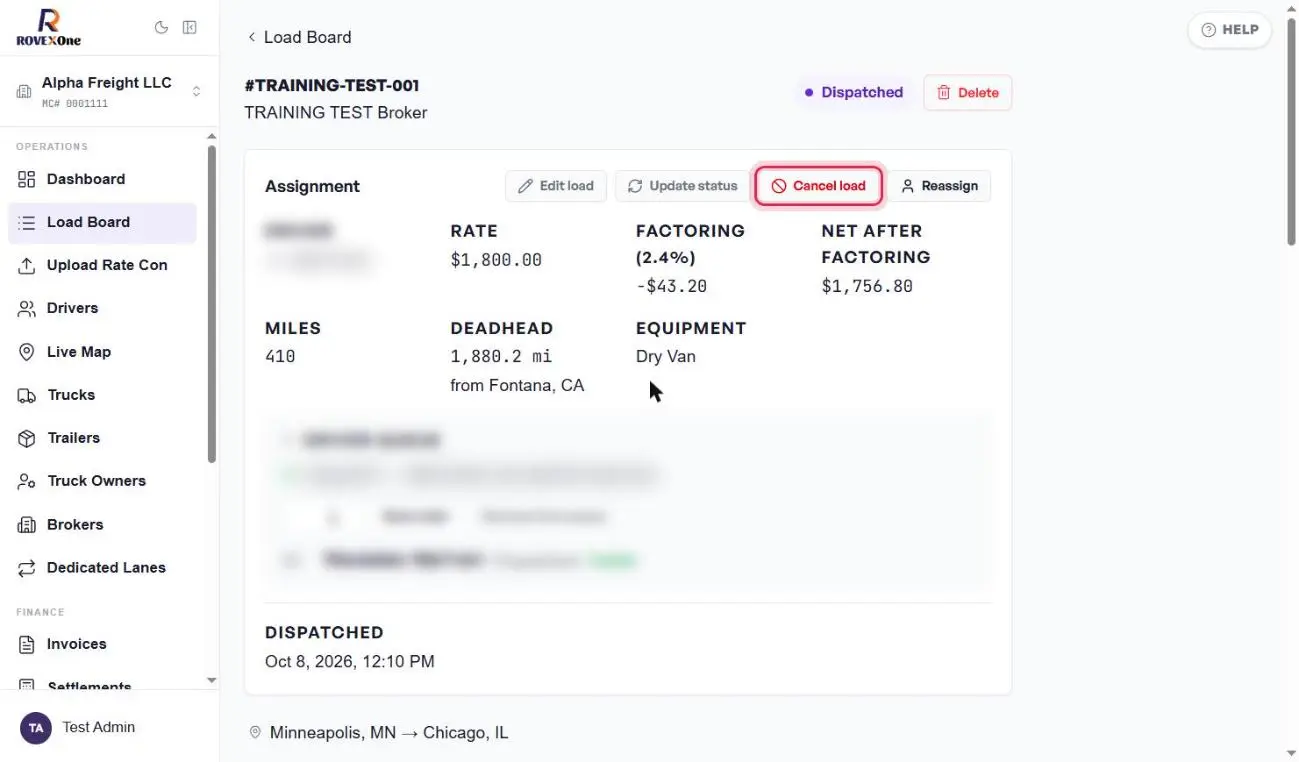
Open the load from the Load Board. In the Assignment card, click Cancel load.
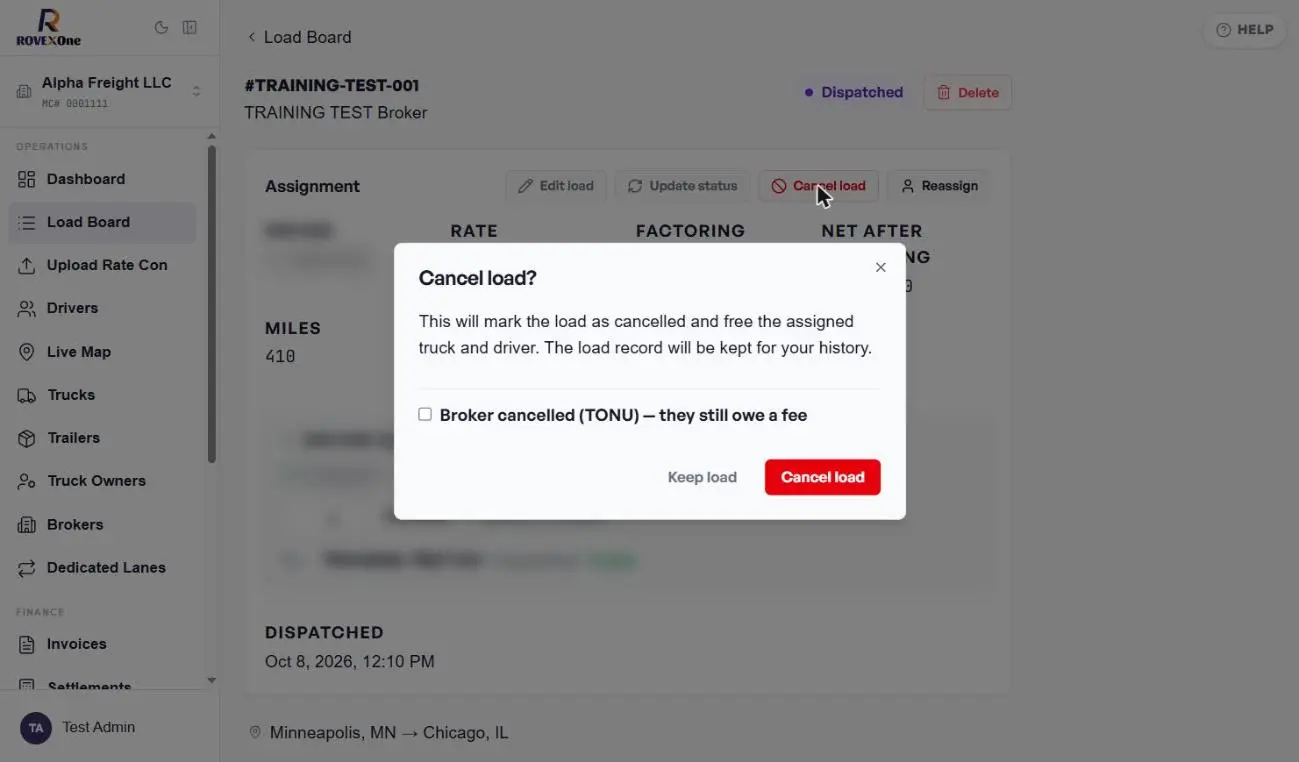
Tick Broker cancelled (TONU)
The window explains that cancelling frees the assigned truck and driver and keeps the load in your history. If the broker owes you a fee, tick Broker cancelled (TONU) — they still owe a fee.
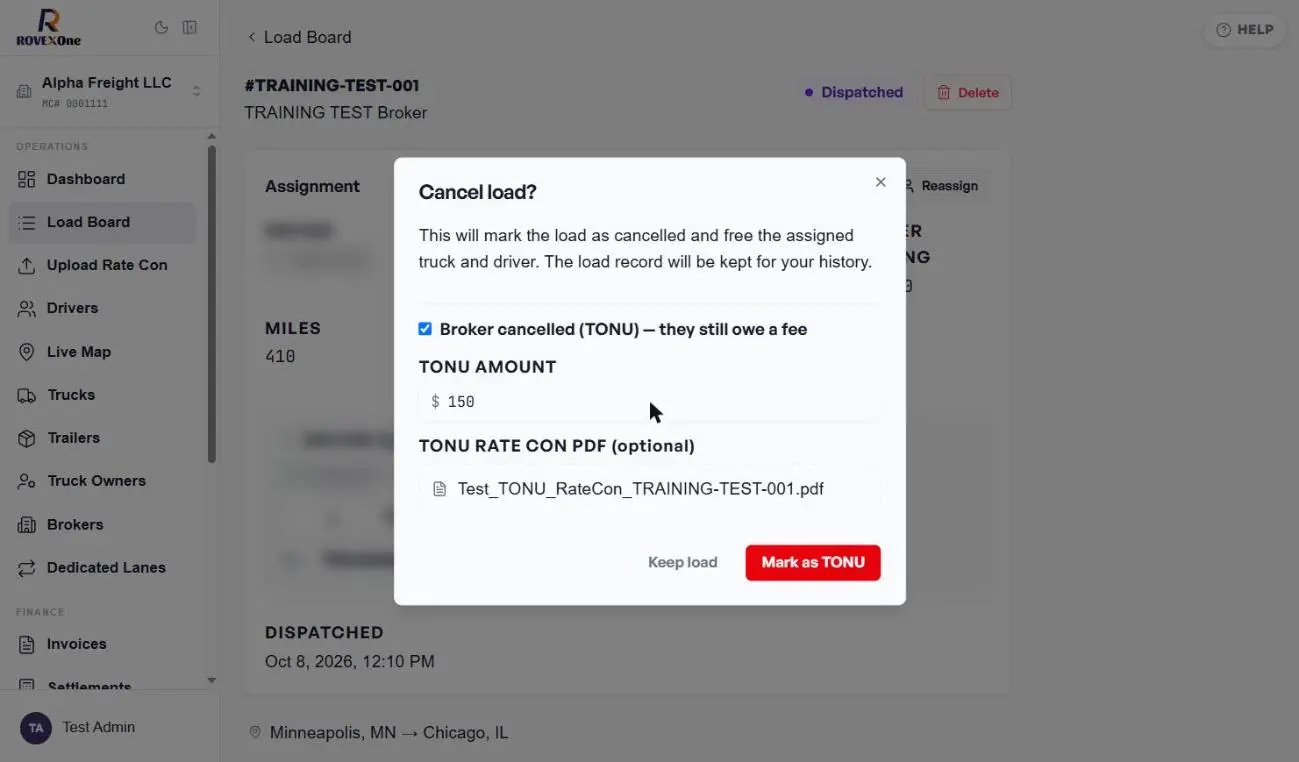
Enter the TONU amount and upload the TONU rate con
Two fields appear. Enter the TONU amount the broker agreed to. Then click Choose PDF to upload and add the TONU rate con.
Click Mark as TONU
Check the amount and file name, then click Mark as TONU. Click Keep load if you opened this by mistake.
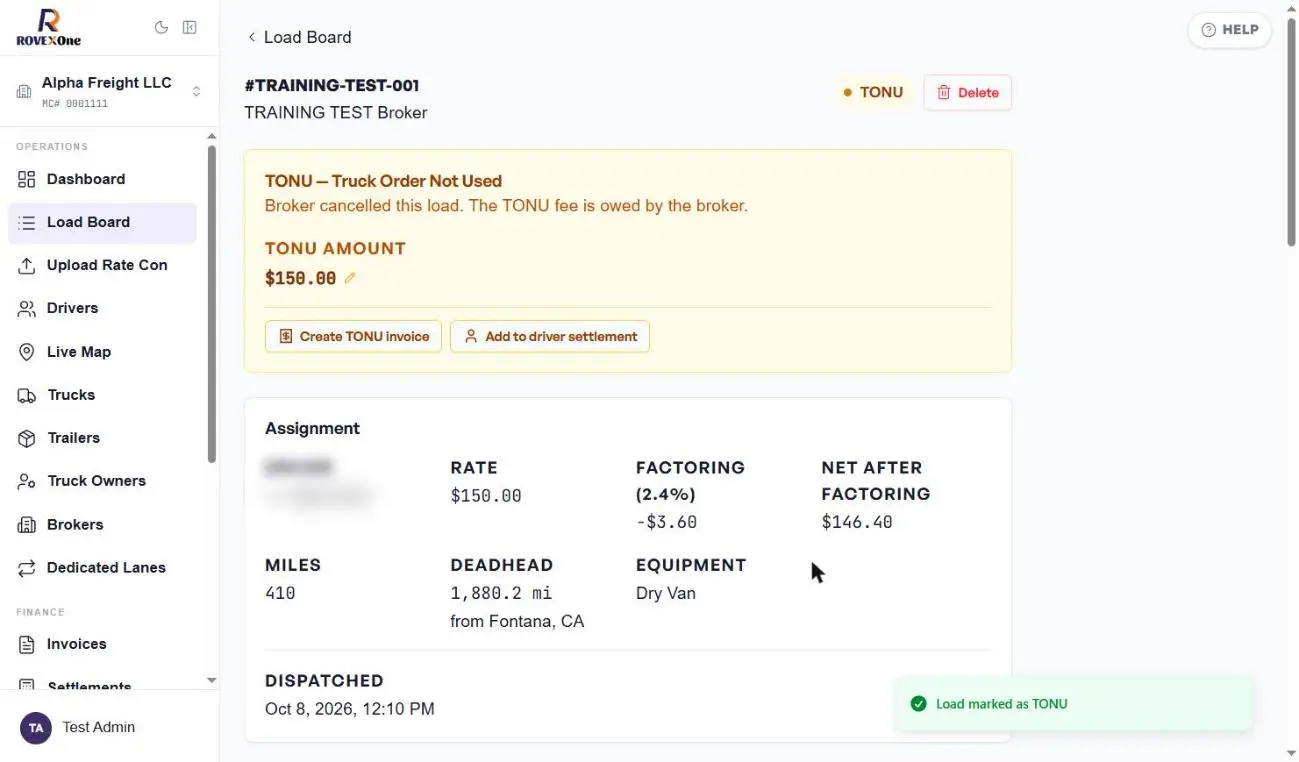
Check the load
You'll see Load marked as TONU, and the status badge changes to TONU. A yellow box confirms the broker cancelled and owes the fee. The load's Rate changes to the TONU amount, and the factoring fee and net are recalculated.
The TONU rate con is saved under Documents as the Rate Confirmation. Status history shows Cancelled with the TONU amount.
Part 2: Bill the TONU and pay the driver
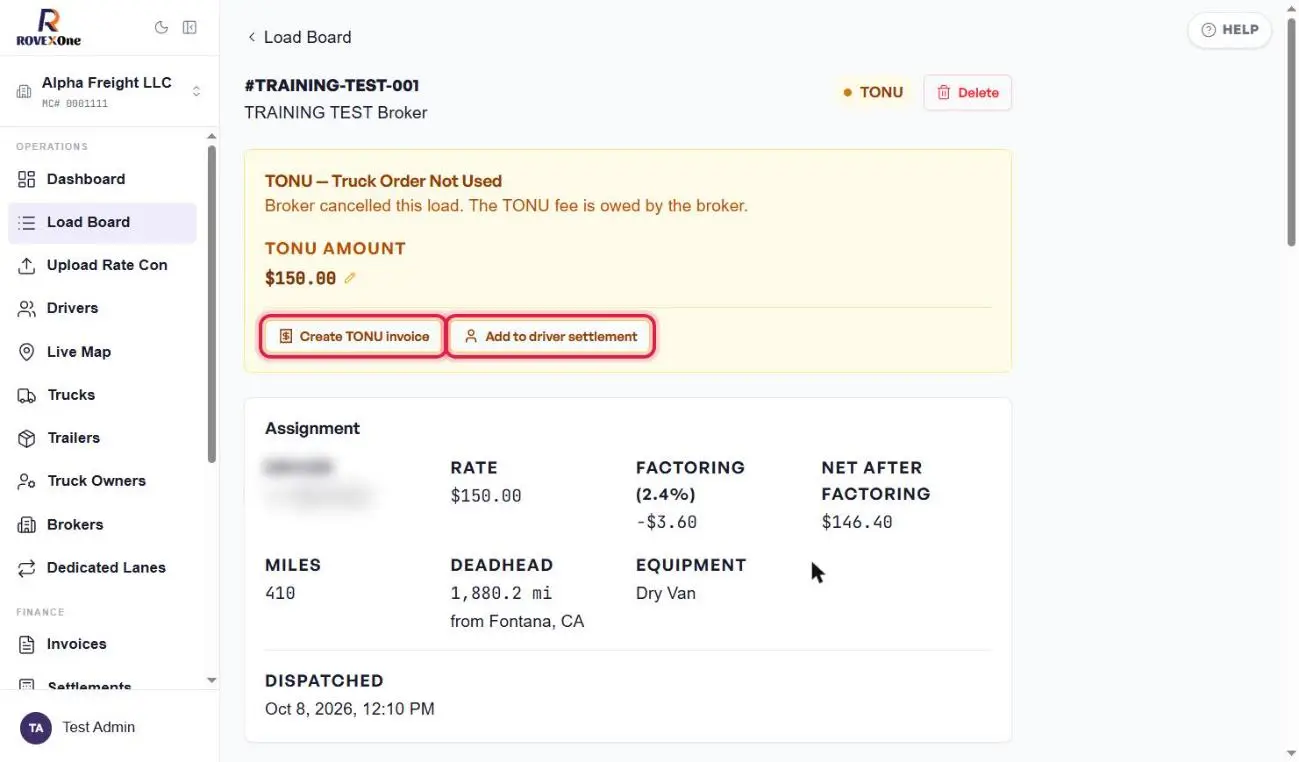
Choose what to do next
The TONU box has two buttons:
Create TONU invoice bills the broker for the TONU amount.
Add to driver settlement adds a TONU payment to the driver's next settlement, if you pay drivers for cancelled loads.
To change the amount, click the pencil next to it.
Create the TONU invoice
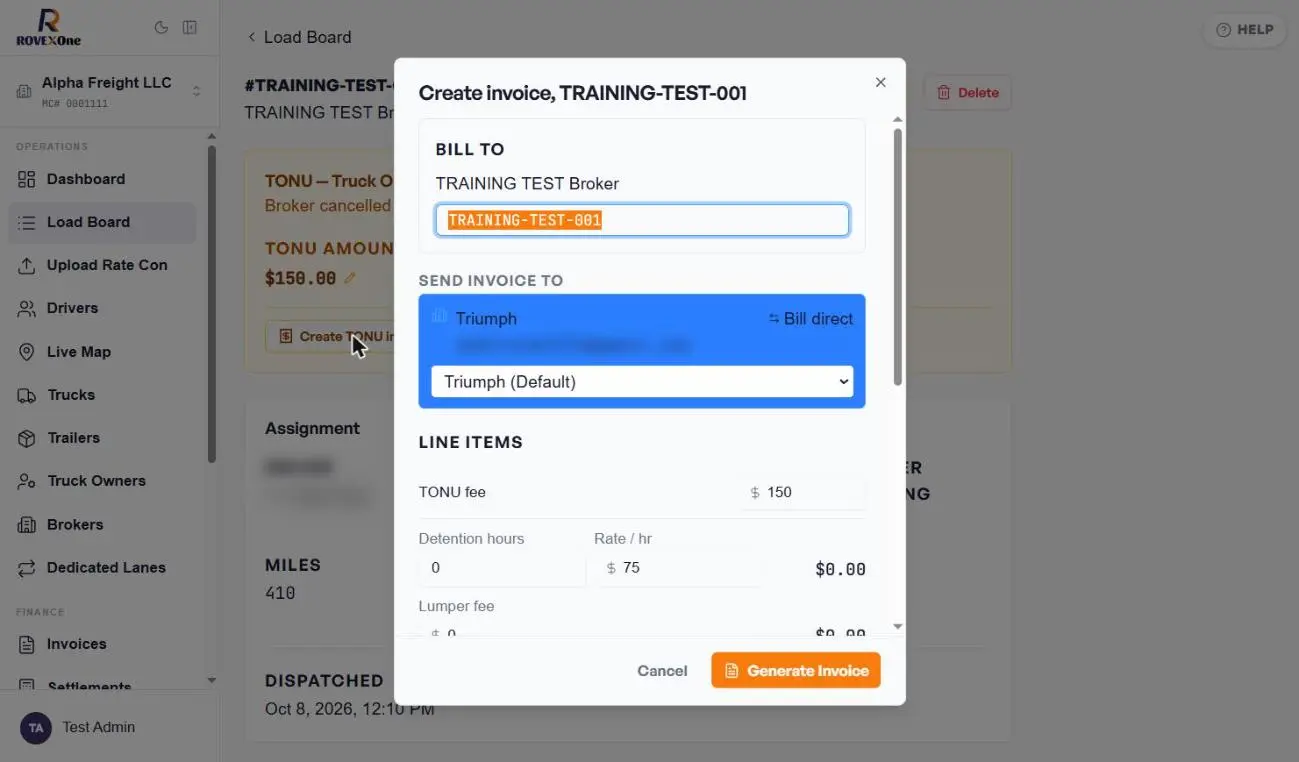
Click Create TONU invoice. The form fills in the broker, the load reference, and a TONU fee line for the agreed amount. Check Send invoice to (your factoring company or Bill direct). Add detention or other charges only if the broker approved them.
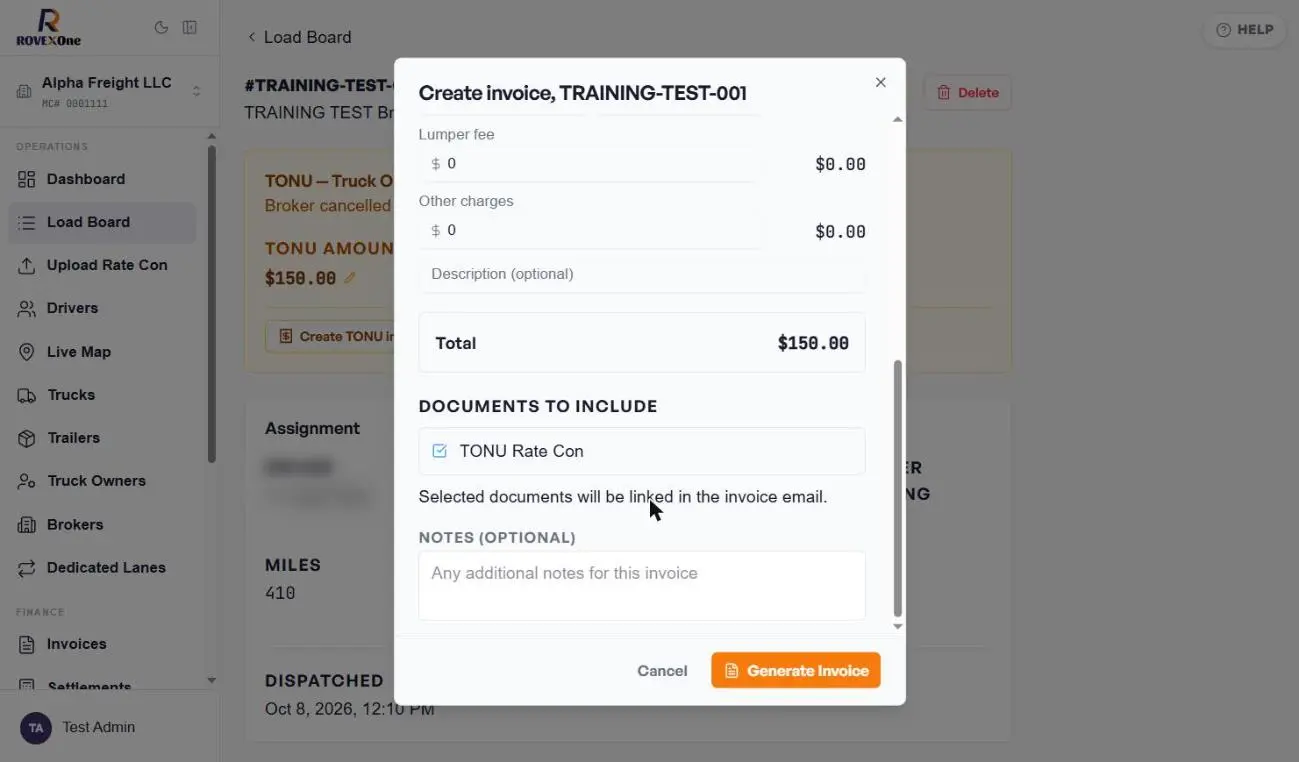
Under Documents to include, the TONU rate con is ticked. Click Generate Invoice. This creates a draft and doesn't send anything.
Review and send the invoice
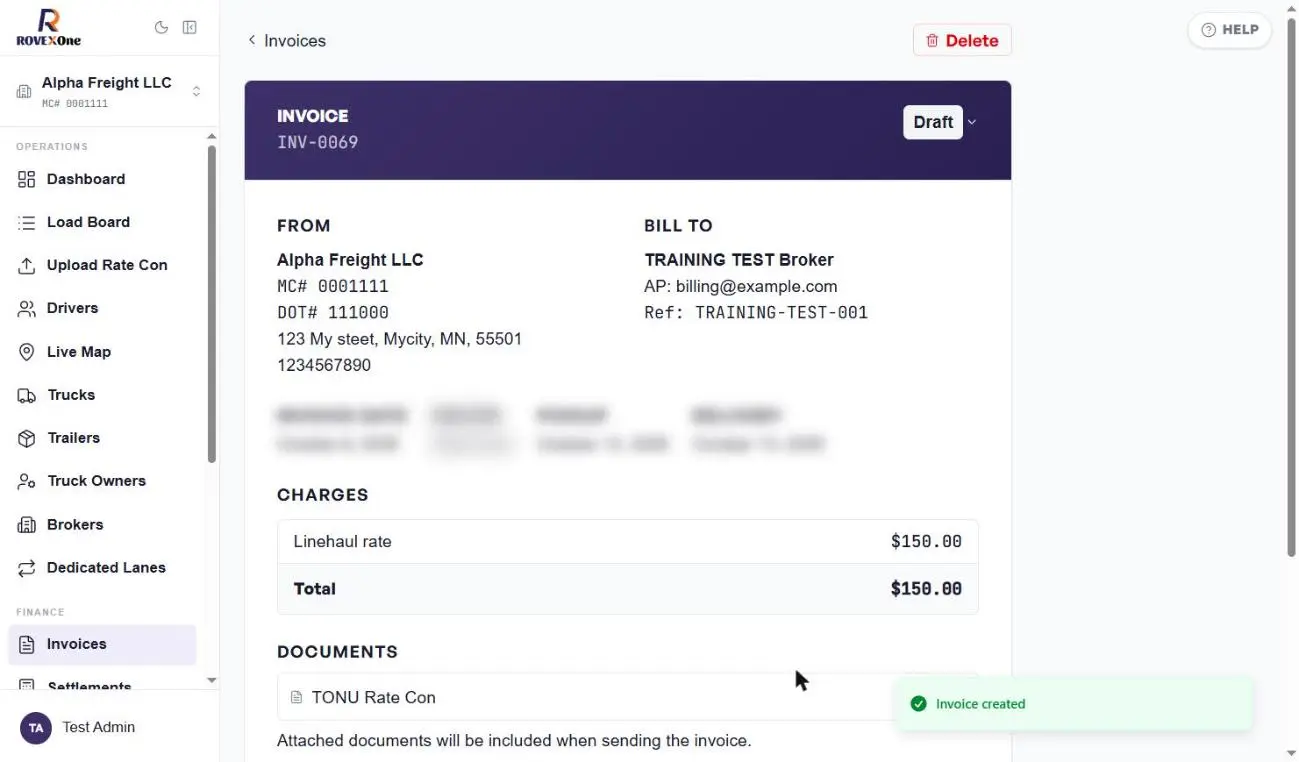
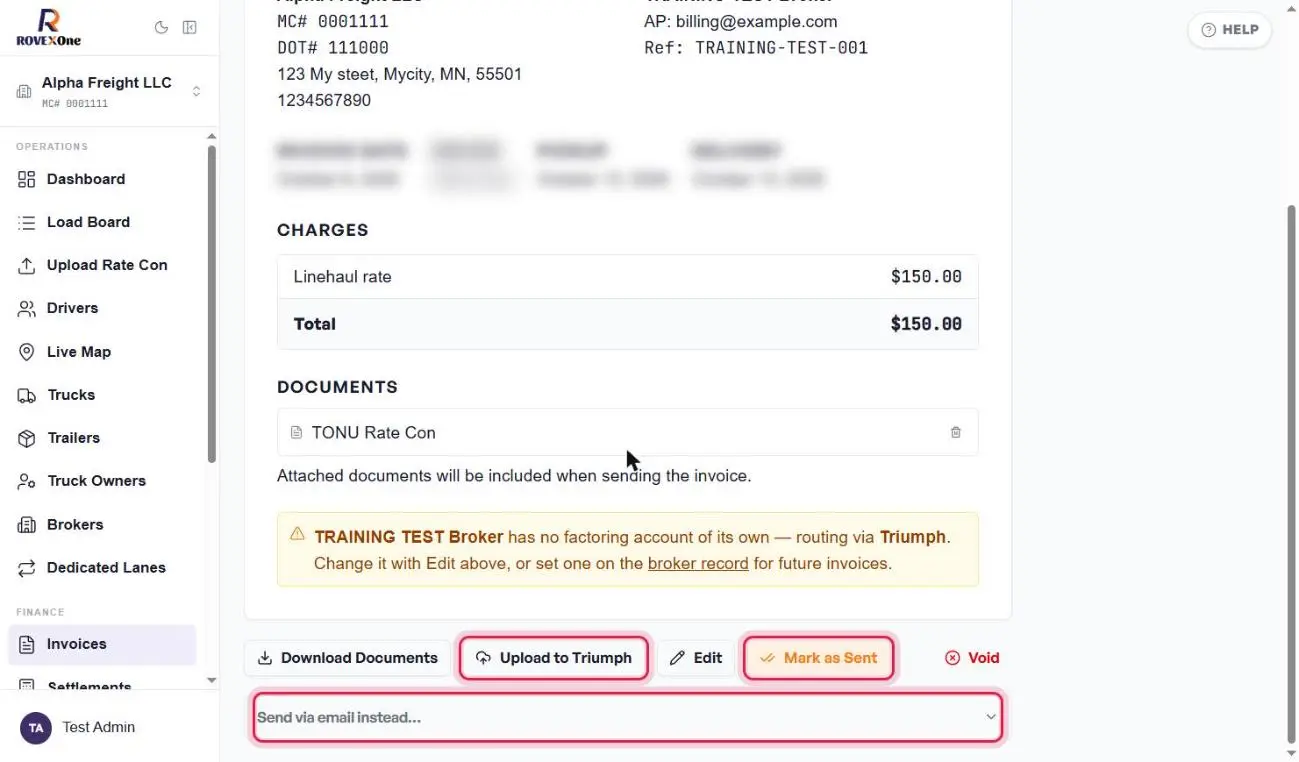
The draft invoice opens with the TONU rate con attached. Check the total matches the TONU amount, then send it the same way as any other invoice: Upload to Triumph (your factoring company), Send via email instead…, or Mark as Sent if you sent it yourself. See Manage invoices and direct billing.
Send options outlined in red. This invoice was not sent.
Where TONU loads go
TONU and cancelled loads move to the Cancelled section at the bottom of the Load Board, with an orange TONU tag. Once the TONU is invoiced, the load is hidden along with your other invoiced loads.
Common questions
What if the broker won't pay a TONU?
Cancel the load without ticking the TONU box. It's kept in your history as cancelled, with no invoice.
The broker changed the TONU amount after I saved it.
Click the pencil next to the TONU amount on the load and enter the new amount before you create the invoice.
Do I need a TONU rate con?
It's optional in RovexOne, but most factoring companies and brokers want it before they pay. Ask the broker for one.
Does cancelling free up the driver and truck?
Yes. Cancelling marks the load as cancelled and frees the assigned truck and driver, so you can dispatch them on another load.
Billing › Manage invoices and direct billing
Manage invoices and direct billing
Send invoices in batches, mark them sent or paid, change an invoice's status, and set a broker to direct bill so their invoices skip factoring.
For owners and dispatchersAbout 4 minutes4 parts
In these screenshots:
Buttons outlined in red are the ones you'd click to send. Nothing was sent while making this guide. Driver names are blurred.
Invoice statuses
Status
What it means
Draft
Created but not sent yet
Sent
Sent to your factoring company or the broker, or marked as sent by you
Paid
Money received. Paid invoices move to their own Paid section.
Void
Cancelled. It won't be sent or paid.
Direct tag
The invoice is billed straight to the broker instead of through factoring
Part 1: The Invoices page
Open Invoices
Click Invoices in the sidebar. Each row shows the invoice #, broker, load reference, driver, amount, status and dates. Use the filters at the top (All, Today, This week, Last week, This month, Custom) to narrow the list by date.
Select invoices for bulk actions
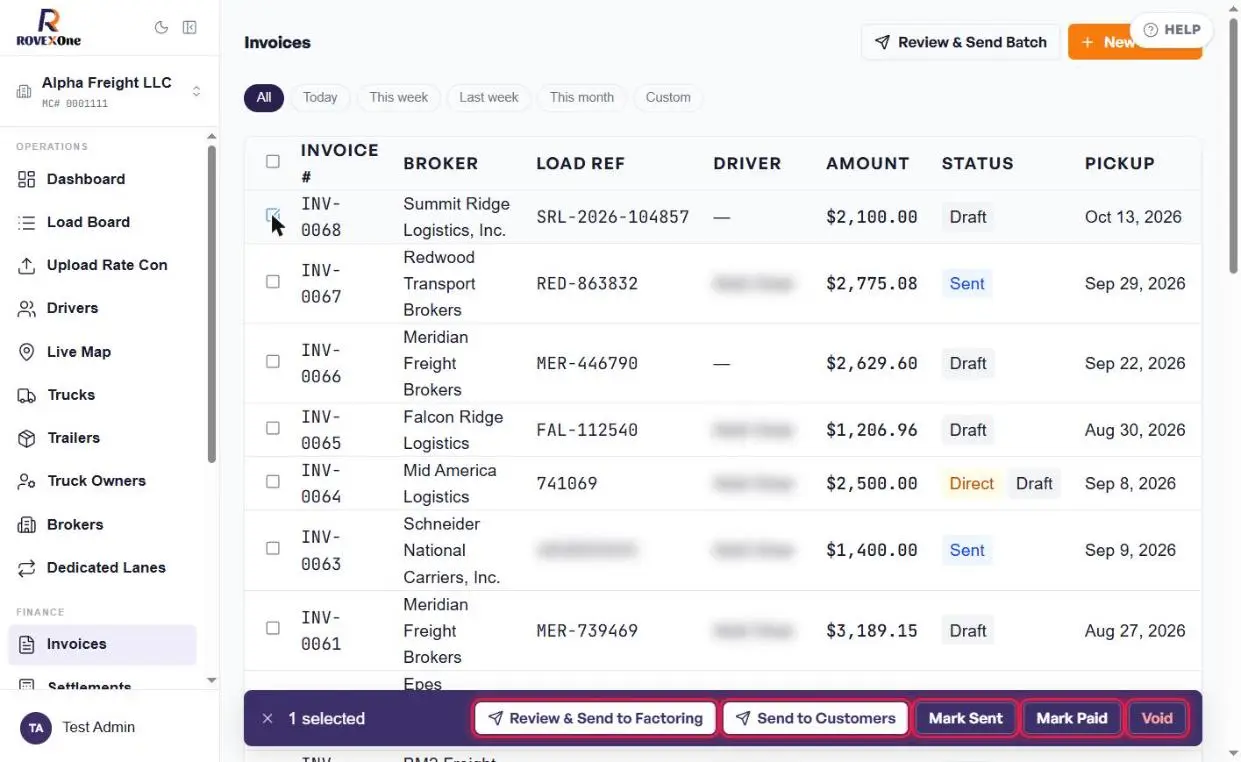
Tick the checkbox next to one or more invoices. A bar appears at the bottom with:
Button
What it does
Review & Send to Factoring
Review the selected invoices, then send them to your factoring company
Send to Customers
Email the selected invoices to the brokers you bill directly
Mark Sent
Change the status to Sent without emailing anyone
Mark Paid
Record that you've been paid
Void
Cancel the selected invoices
Bulk actions outlined in red.
Part 2: Send a batch to factoring
Click Review & Send Batch
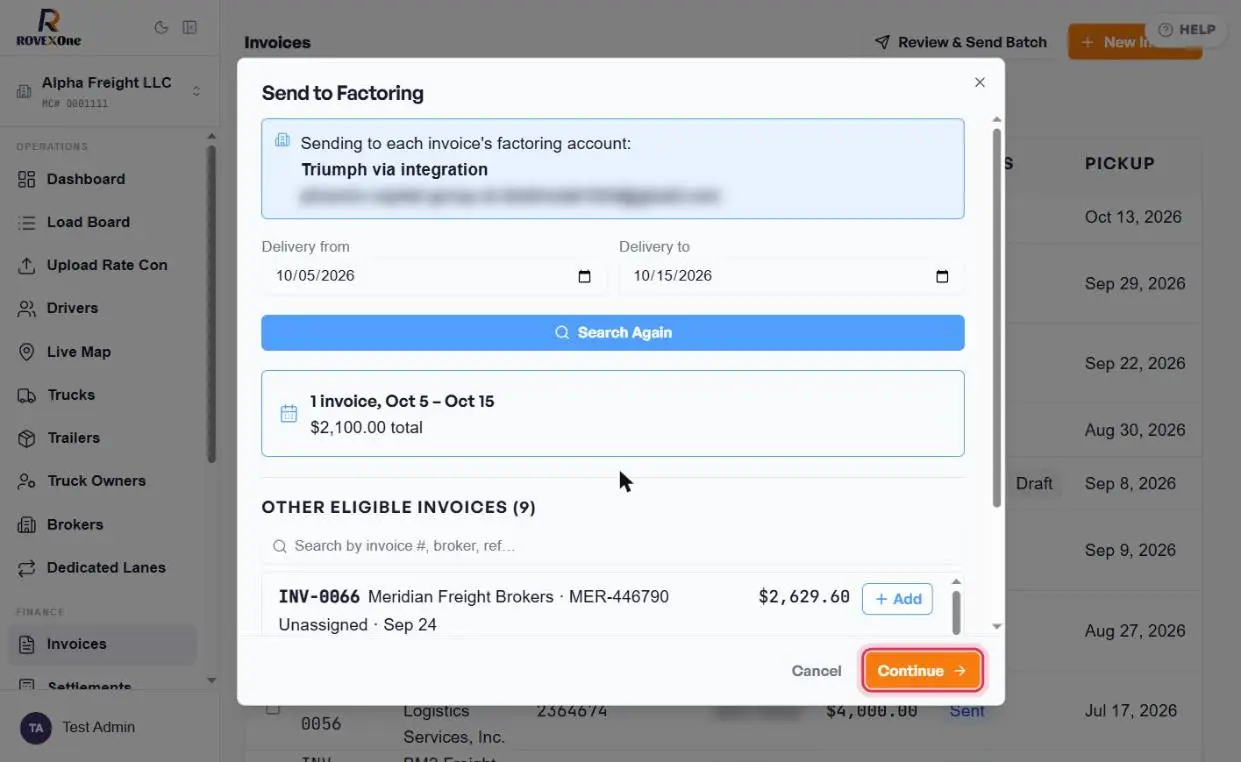
At the top of the Invoices page, click Review & Send Batch. The Send to Factoring window shows which factoring account the invoices go to. Pick a Delivery from and Delivery to date range, then click Find Invoices.
Review the batch and click Continue
RovexOne shows how many invoices fall in that range and their total. Under Other eligible invoices, search or click + Add to include drafts from outside the date range. When the batch looks right, click Continue to review and send.
Weekly routine:
Use last week's delivery dates every Monday so every delivered load gets factored once.
Continue outlined in red. This batch was not sent.
Part 3: Mark sent, mark paid and change status
Mark an invoice as sent
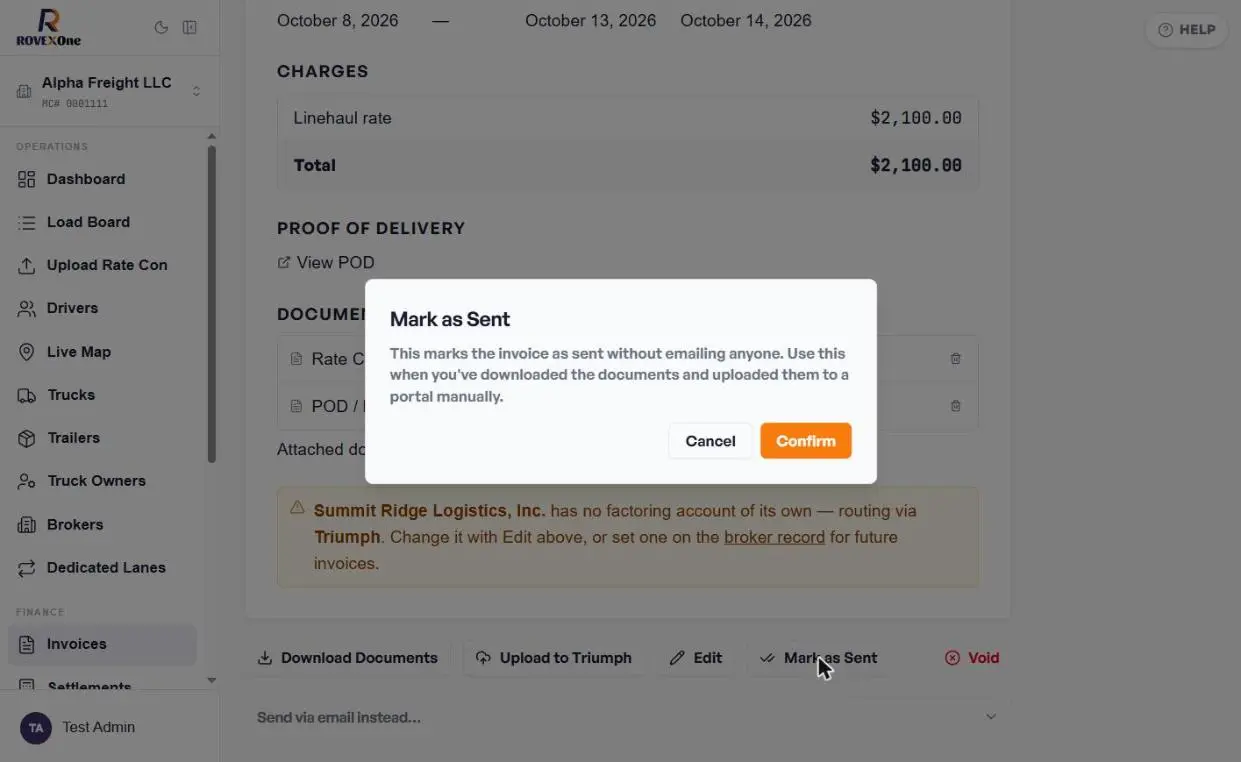
Open the invoice and scroll to the buttons at the bottom. If you sent it outside RovexOne, for example through a broker portal, click Mark as Sent.
RovexOne confirms that this marks the invoice as sent without emailing anyone. Click Confirm.
Mark it paid when the money arrives
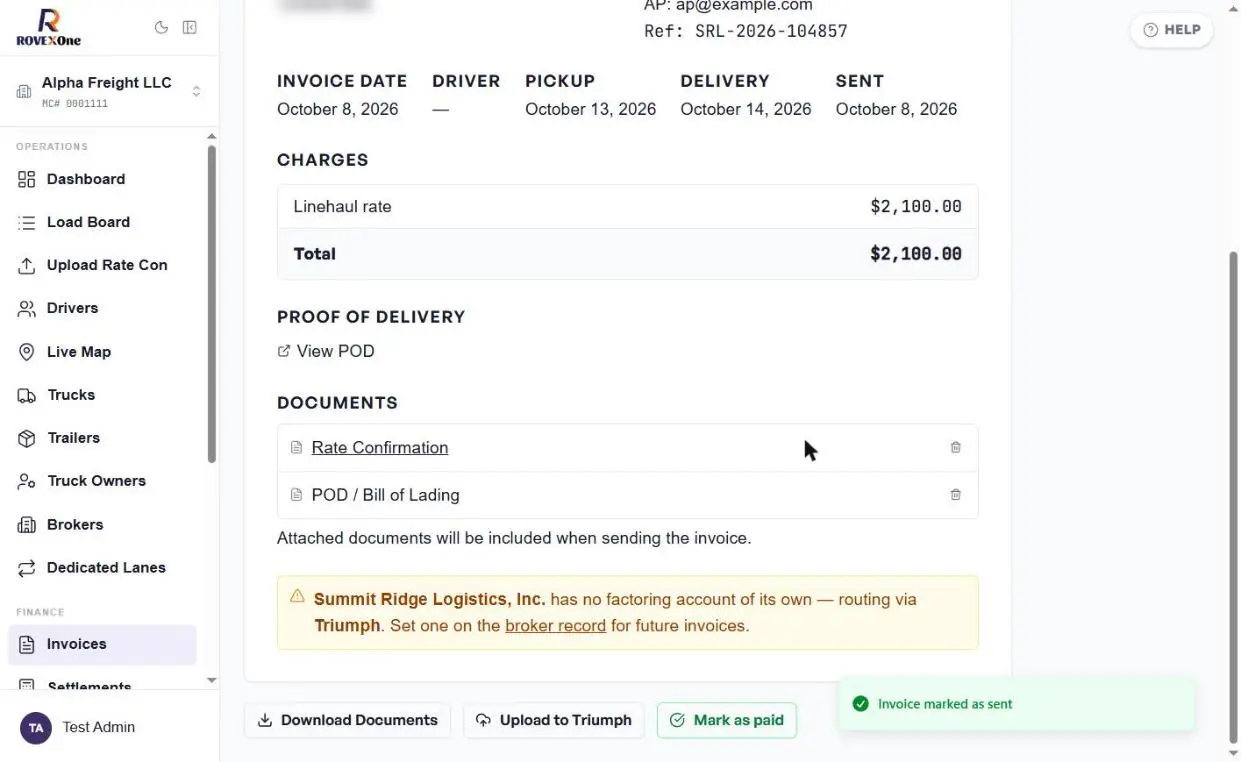
The invoice now shows the Sent date and a Mark as paid button. Click it when the payment lands.
There's no confirmation step. The invoice changes to Paid straight away and records the paid date.
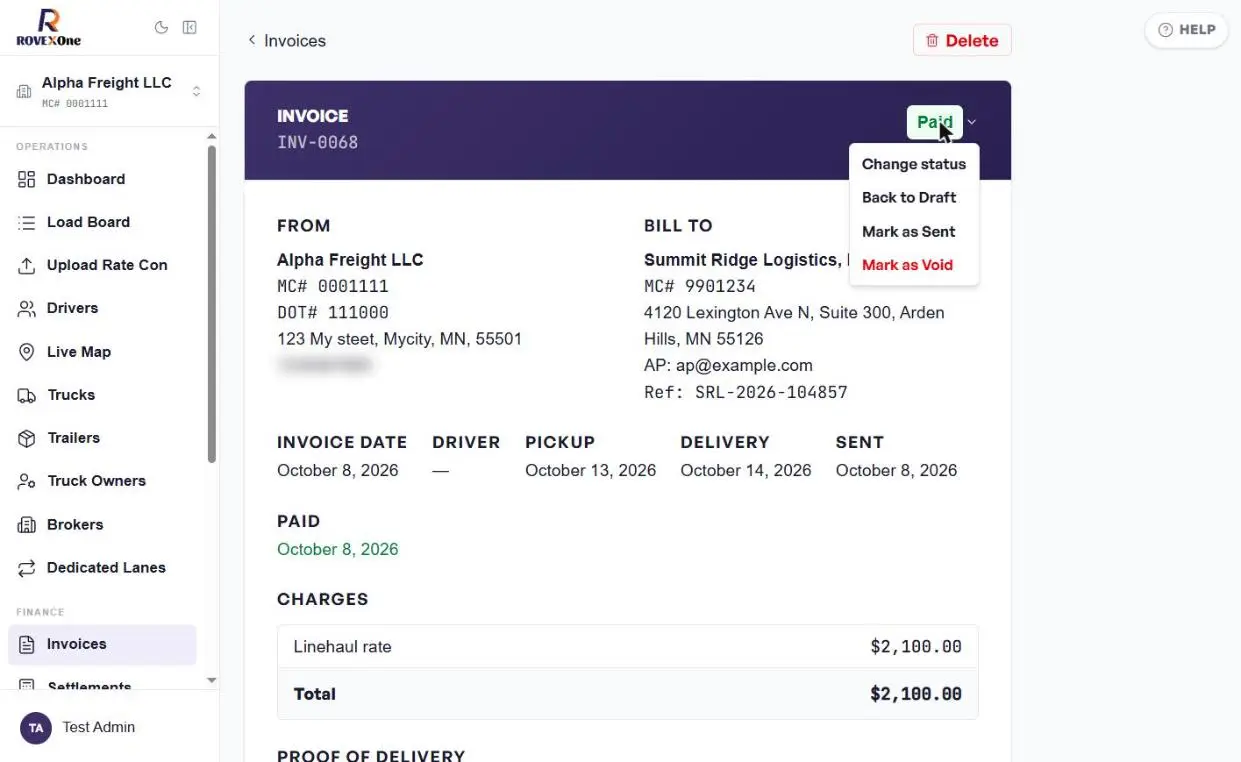
Change the status if something was marked by mistake
Click the arrow next to the status badge at the top of the invoice. From Change status you can choose Back to Draft, Mark as Sent or Mark as Void. The options depend on the current status.
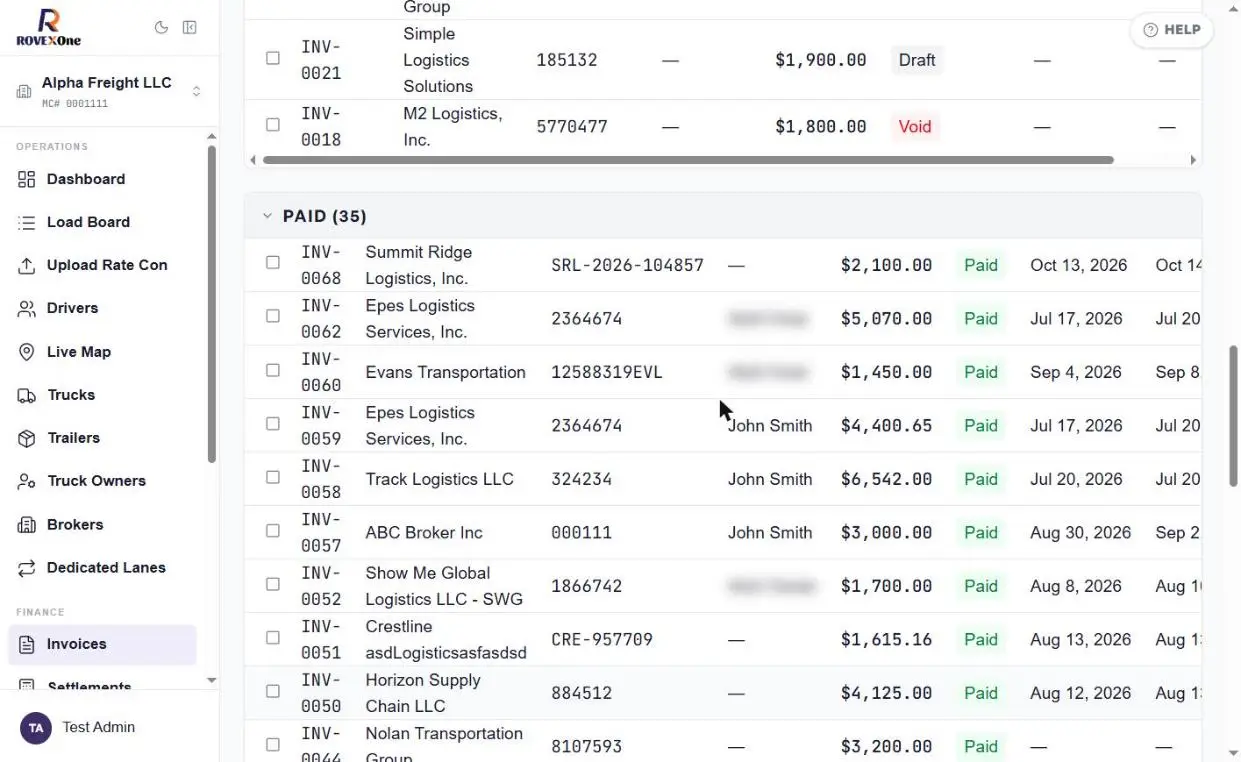
Find paid invoices
Paid invoices move out of the main list into the Paid section at the bottom of the Invoices page. Click it to expand.
Part 4: Set up direct billing for a broker
Use direct billing for brokers you don't factor with. Their invoices go straight to the broker's AP email instead of your factoring company.
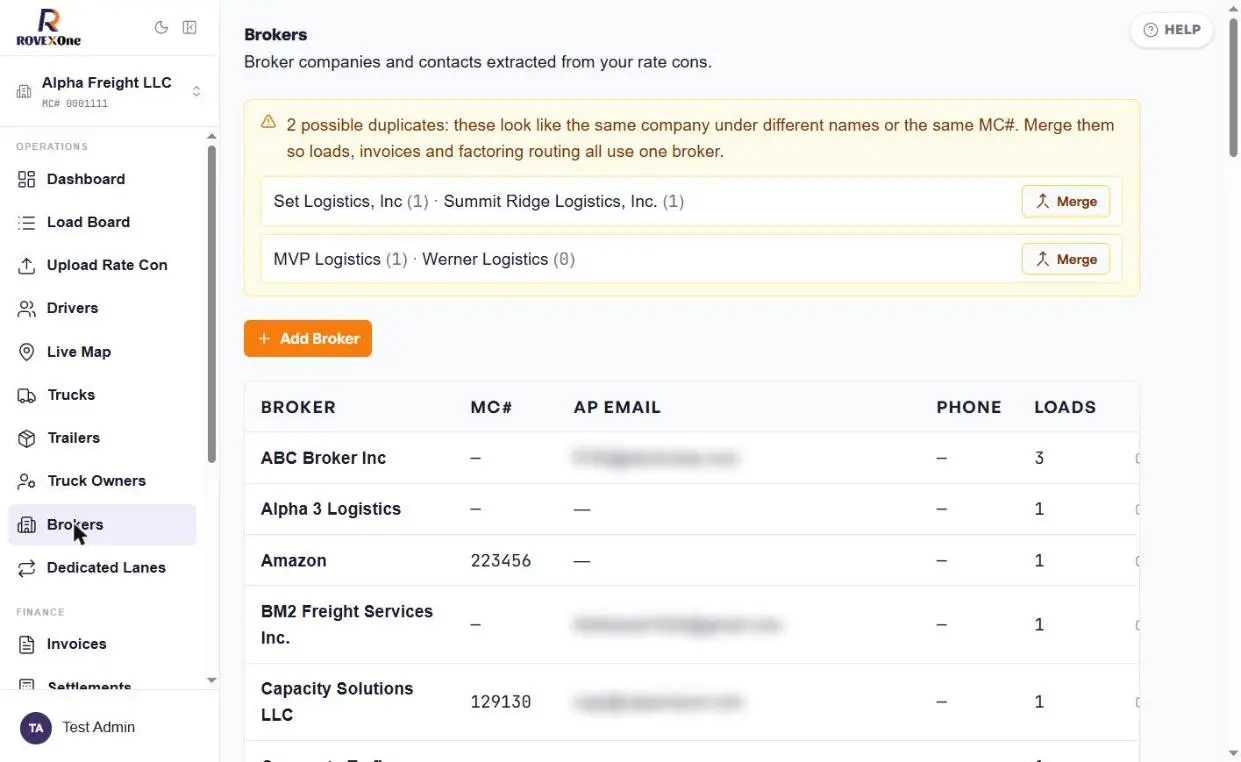
Open Brokers
Click Brokers in the sidebar. RovexOne builds this list from your rate cons. If the same company appears twice, a yellow box suggests Merge so its loads, invoices and billing stay together. Check that the two really are the same company before merging.
Open the broker and click Edit
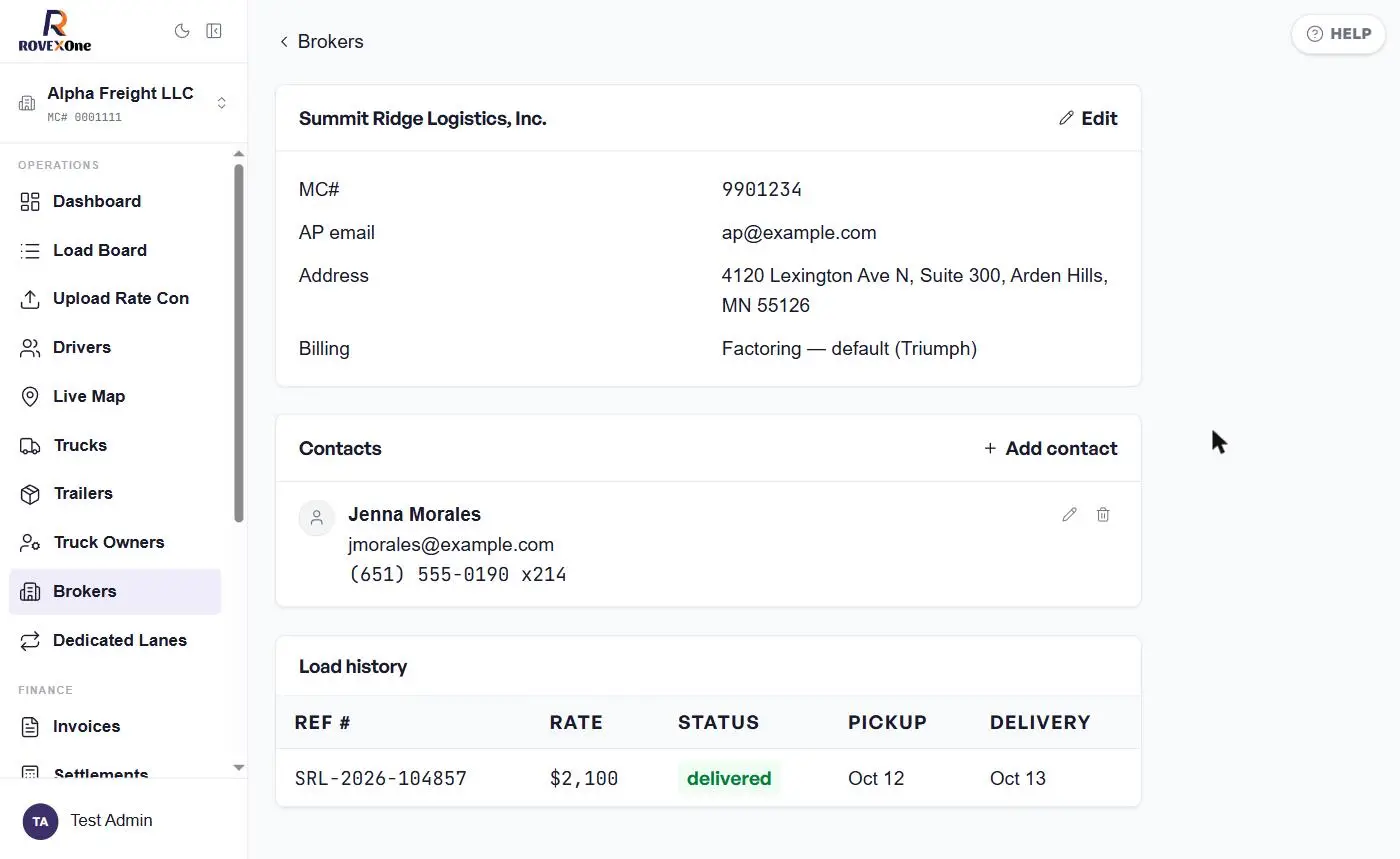
Click the broker you want. The Billing line shows how their invoices are handled now, for example Factoring, default (Triumph). Click Edit.
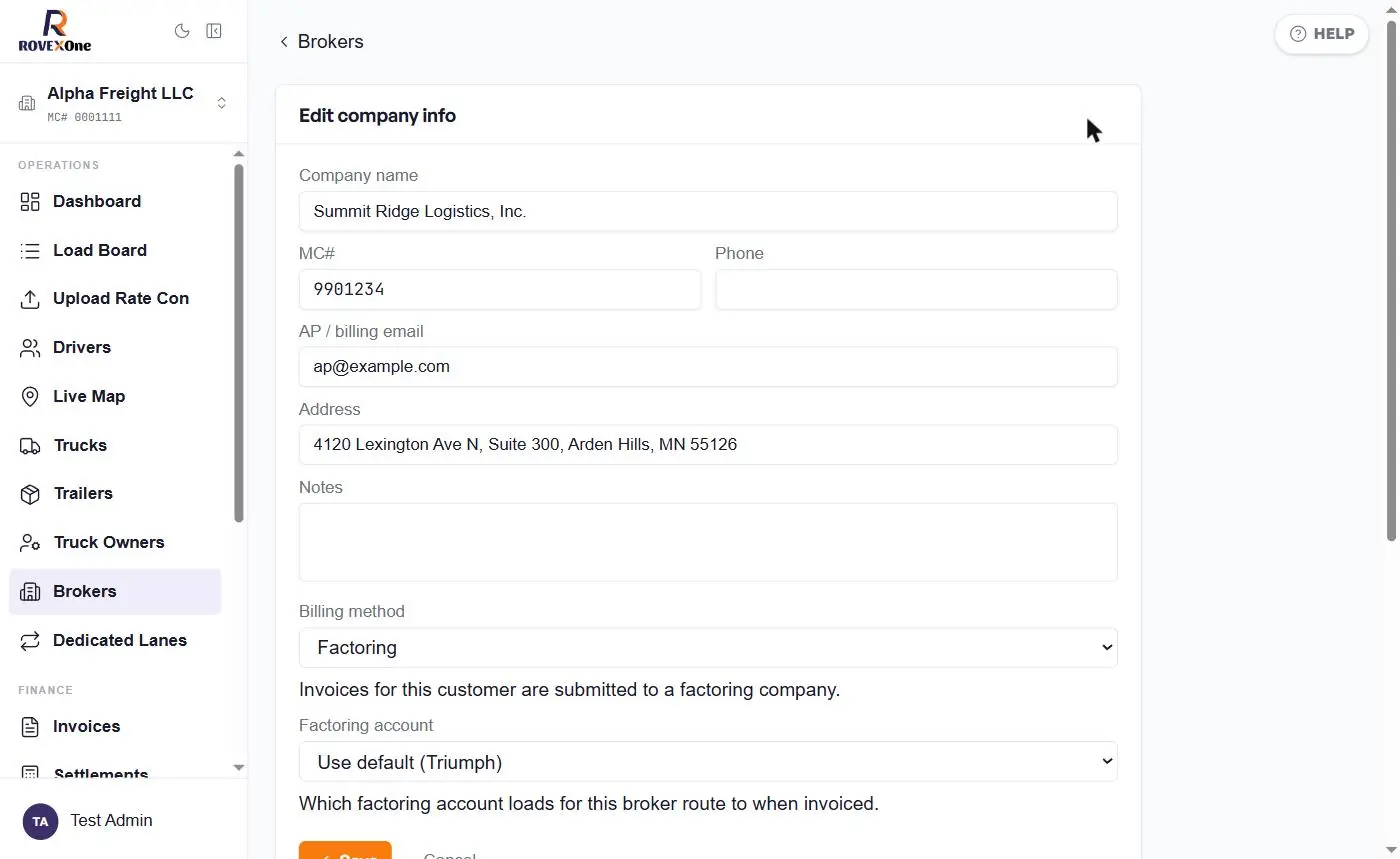
Change Billing method to Direct bill
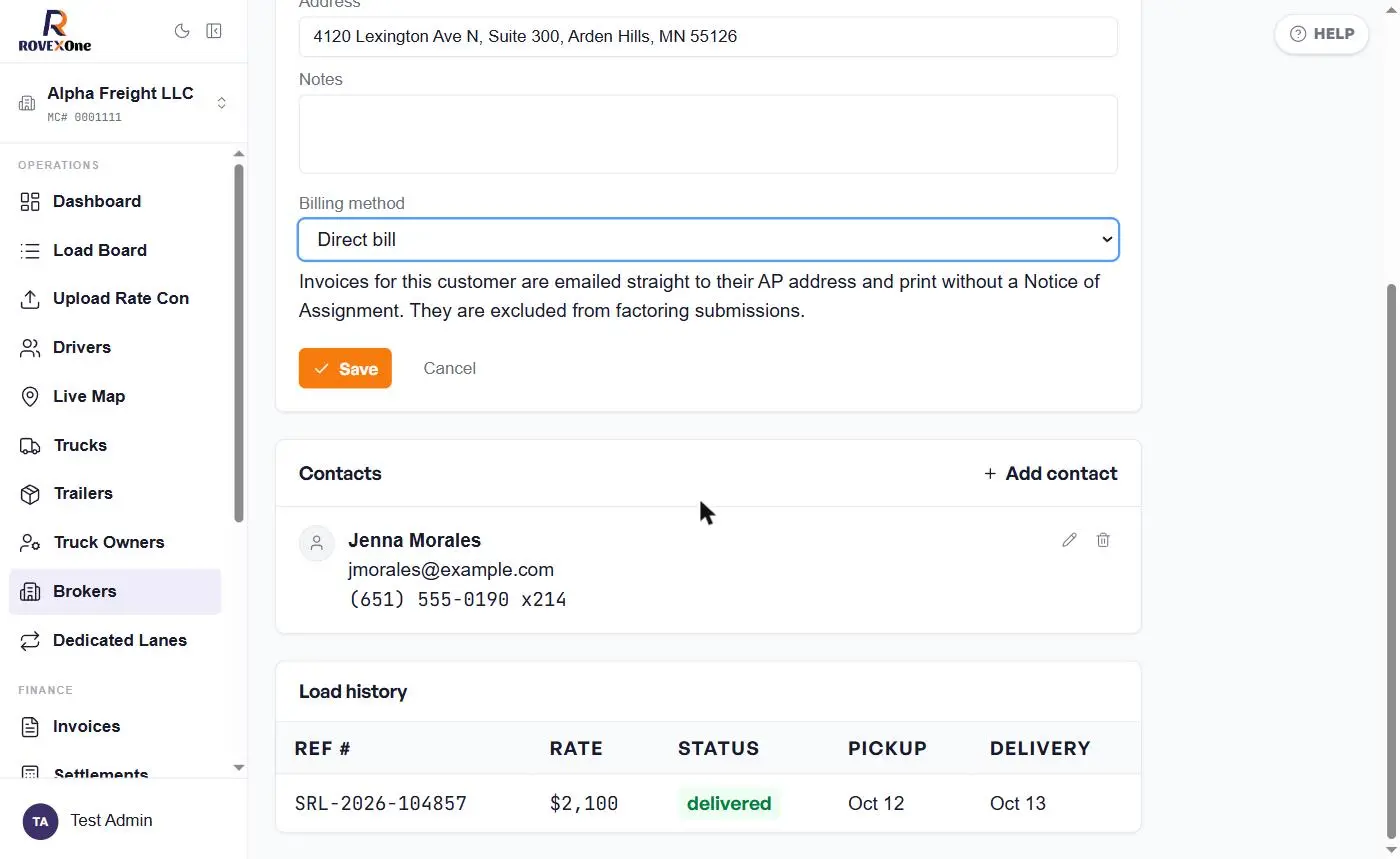
Check the AP / billing email is correct, since direct-bill invoices are emailed there. Then change Billing method from Factoring to Direct bill.
RovexOne explains what changes: invoices are emailed straight to the broker's AP address, print without a Notice of Assignment, and are left out of factoring submissions. Click Save.
Confirm the billing method
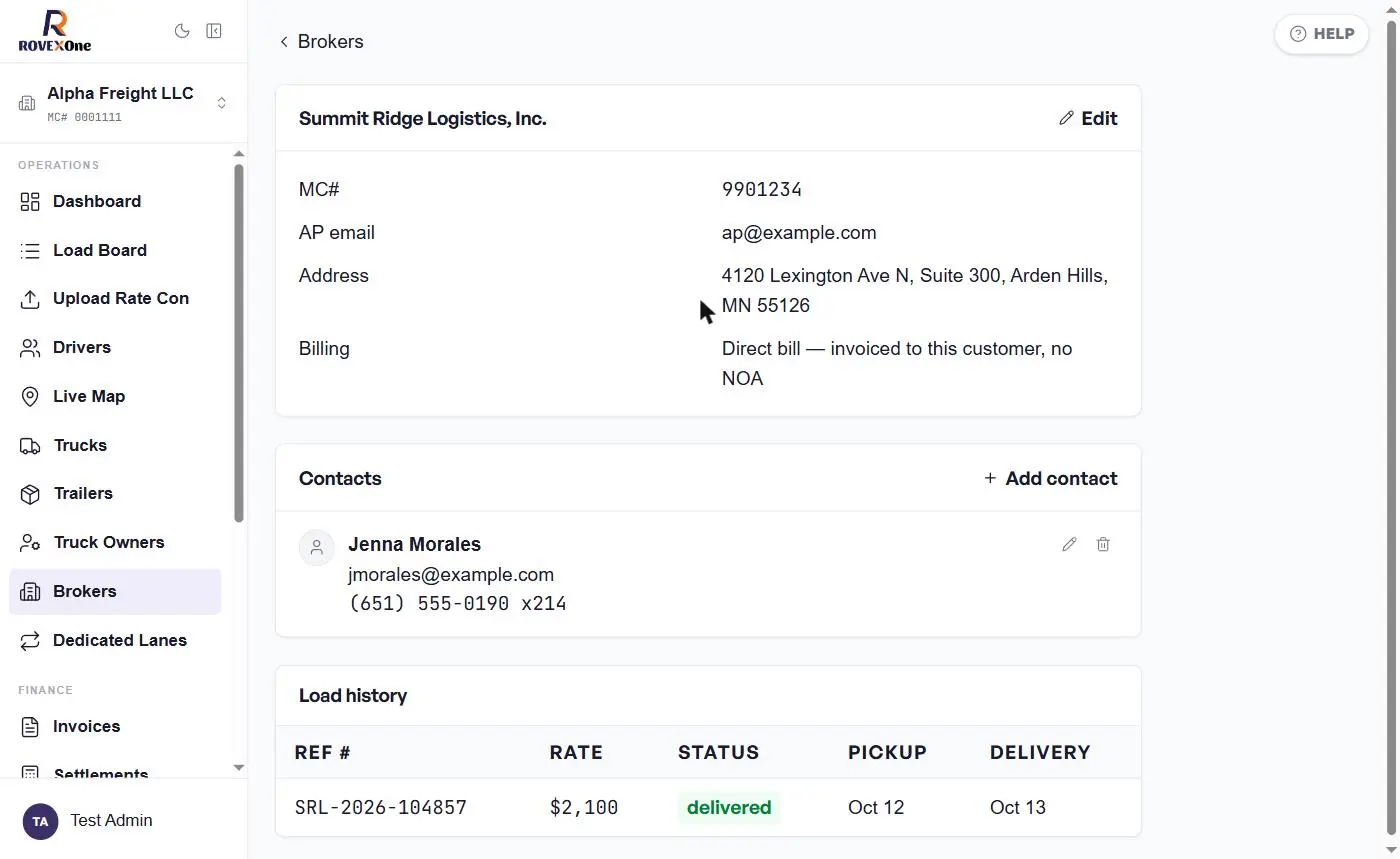
The broker's Billing line now reads Direct bill, invoiced to this customer, no NOA. Invoices billed directly show a Direct tag on the Invoices page.
Factoring with a different company?
Keep Billing method on Factoring and choose the right Factoring account for this broker instead of the default.
Common questions
Does Mark as Sent email the broker?
No. It only changes the status. Use it when you've already sent the invoice another way.
I marked an invoice paid by mistake.
Open it, click the arrow next to the Paid badge, and choose Back to Draft or Mark as Sent.
Why is an invoice missing from the factoring batch?
Check its delivery date is inside the range, or add it under Other eligible invoices. Invoices for direct-bill brokers are left out on purpose.
Will switching a broker to direct bill change old invoices?
Check any existing draft invoices for that broker. Open each one, click Edit, and confirm who it's being sent to before sending.
Fleet › Manage drivers and trucks
Manage drivers and trucks
Add a driver and their truck in one step, then use the driver profile and truck page to manage pay, documents, deductions and compliance.
For owners and dispatchersAbout 4 minutes4 parts
About these screenshots:
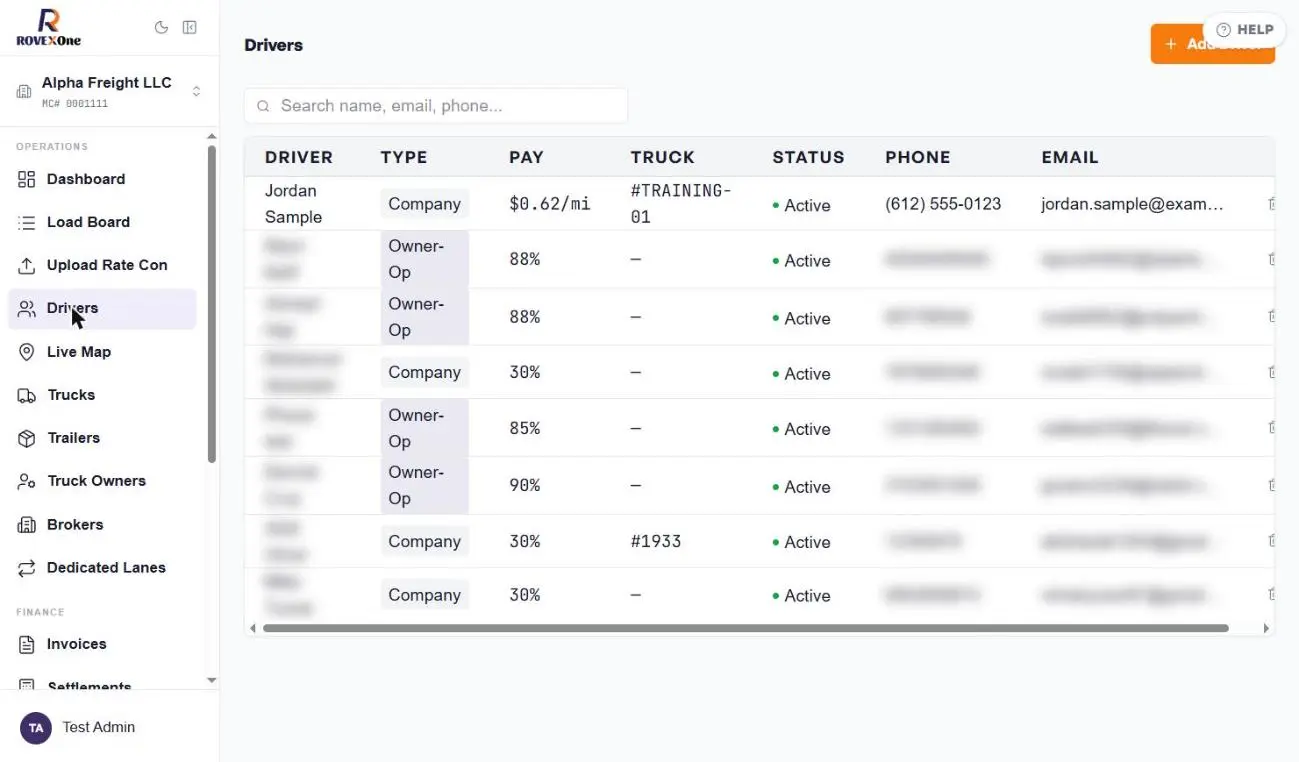
Real driver names, phone numbers, emails and plates are blurred. The example driver, Jordan Sample, and truck TRAINING-01 are test records.
Part 1: Add a driver and their truck
Open Drivers and click Add Driver
Click Drivers in the sidebar. The list shows each driver's type, pay, truck, status, phone and email. Use the search box to find a driver by name, email or phone. Click + Add Driver in the top right.
Enter the driver's info
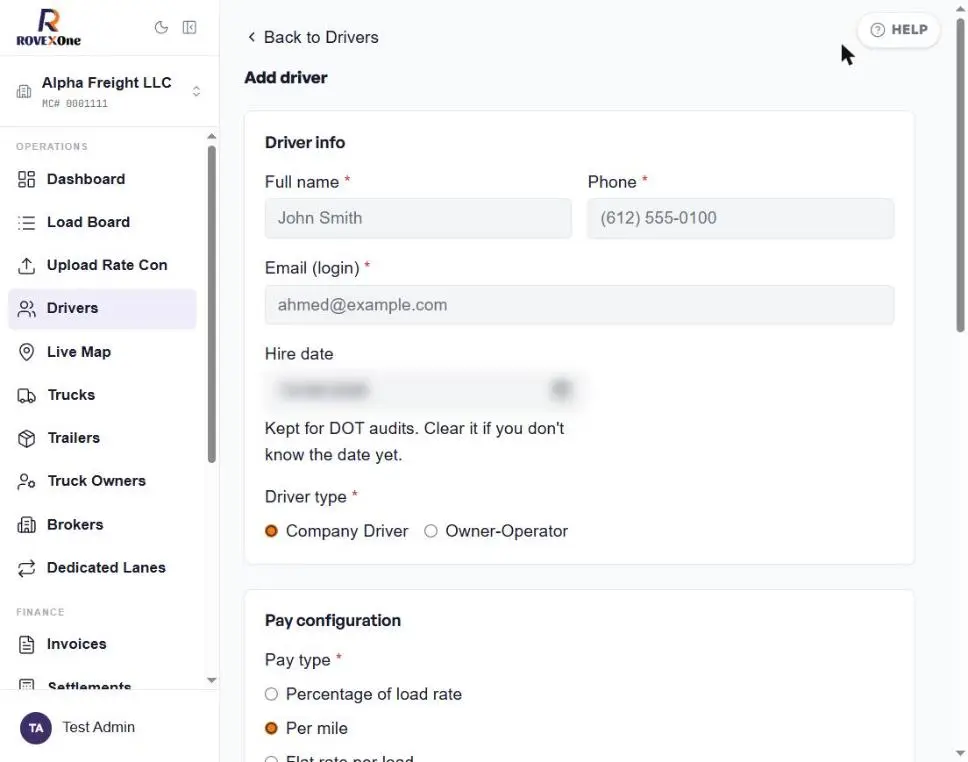
Full name, Phone and Email (login) are required. The email is the driver's login, and RovexOne emails them their login details.
Hire date defaults to today and is kept for DOT audits. Clear it if you don't know the date yet.
Driver type: Company Driver or Owner-Operator
Set up pay
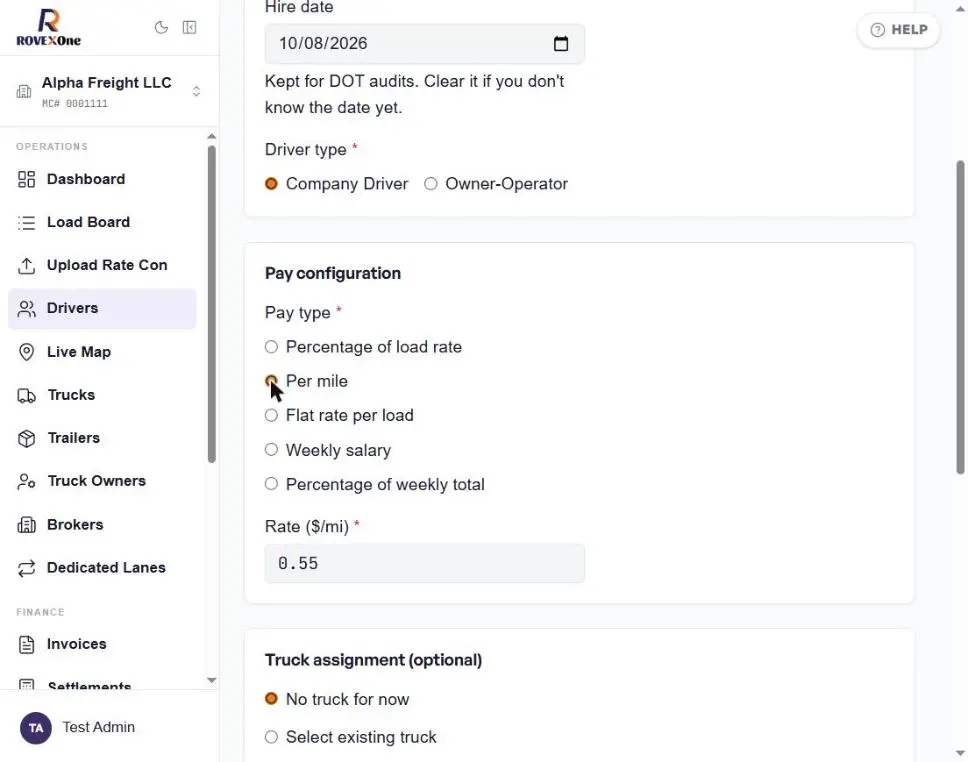
Choose how this driver is paid. The rate field changes to match.
Pay type
Example
Percentage of load rate
88% of each load's rate
Per mile
$0.62 per mile
Flat rate per load
$400 per load
Weekly salary
A fixed amount every week
Percentage of weekly total
A percentage of everything the driver hauled that week
Clear the rate box first:
The rate field may already hold a starting value, such as 0.55 for per mile. Select it and type over it so you don't end up with something like 0.5562.
Assign a truck, or create one here
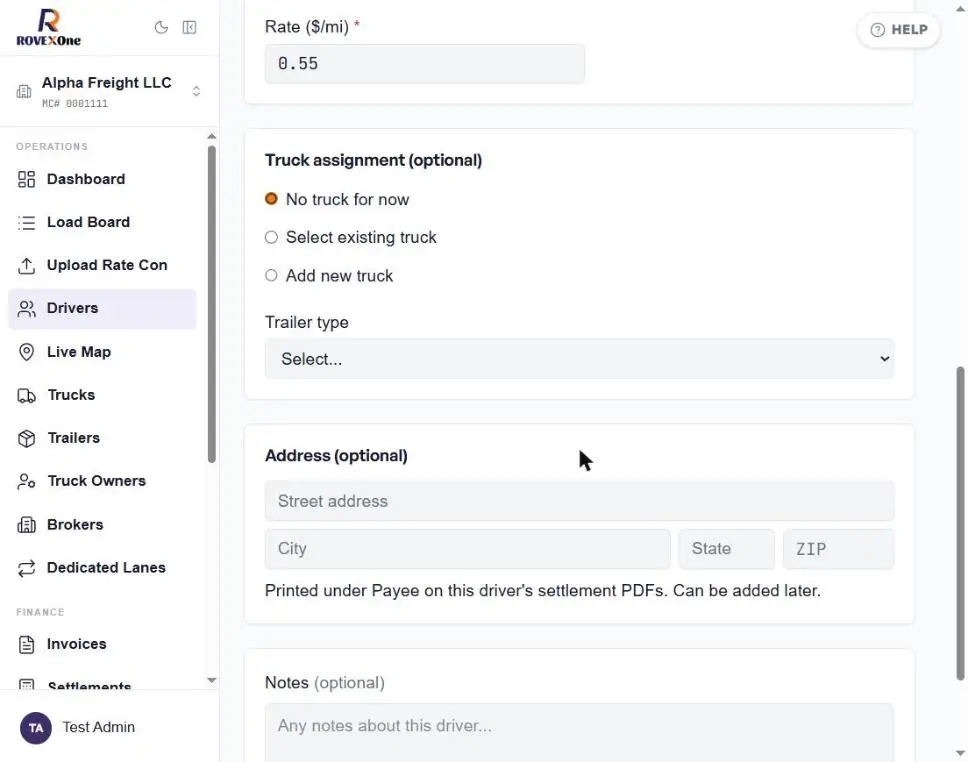
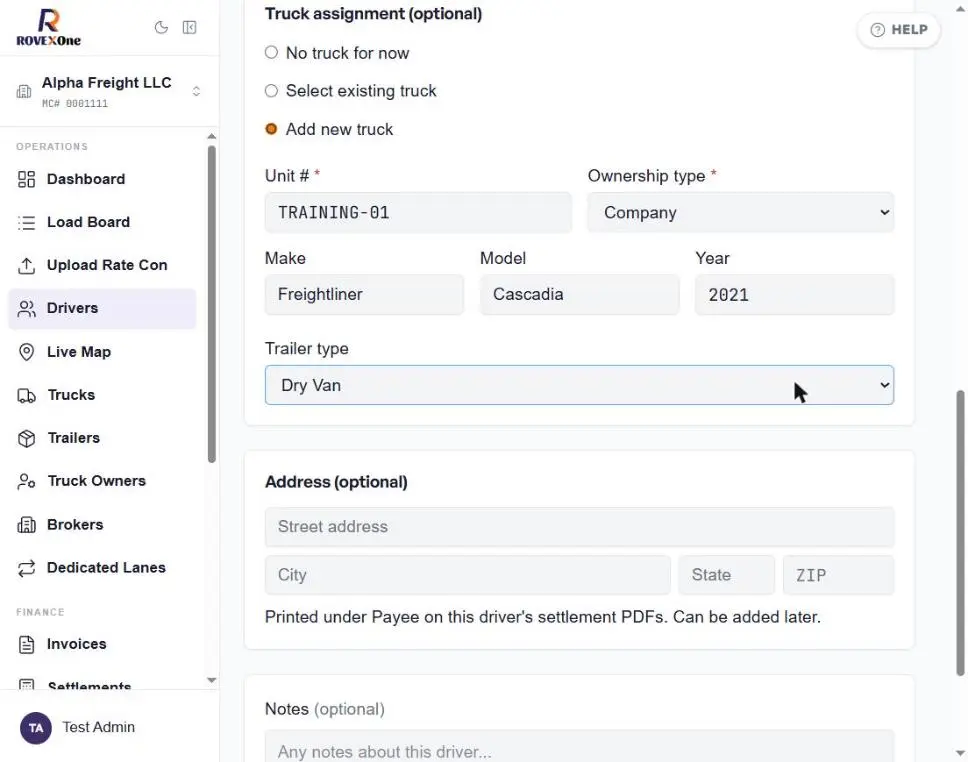
Under Truck assignment, choose:
No truck for now: add one later from the driver's profile
Select existing truck: pick a truck that's already in RovexOne
Add new truck: create the truck at the same time as the driver
For a new truck, enter the Unit # and Ownership type (Company, Owner-Operator or Leased), which are both required. Then add the make, model, year and trailer type. You can add the VIN, plate and other details later on the truck's page.
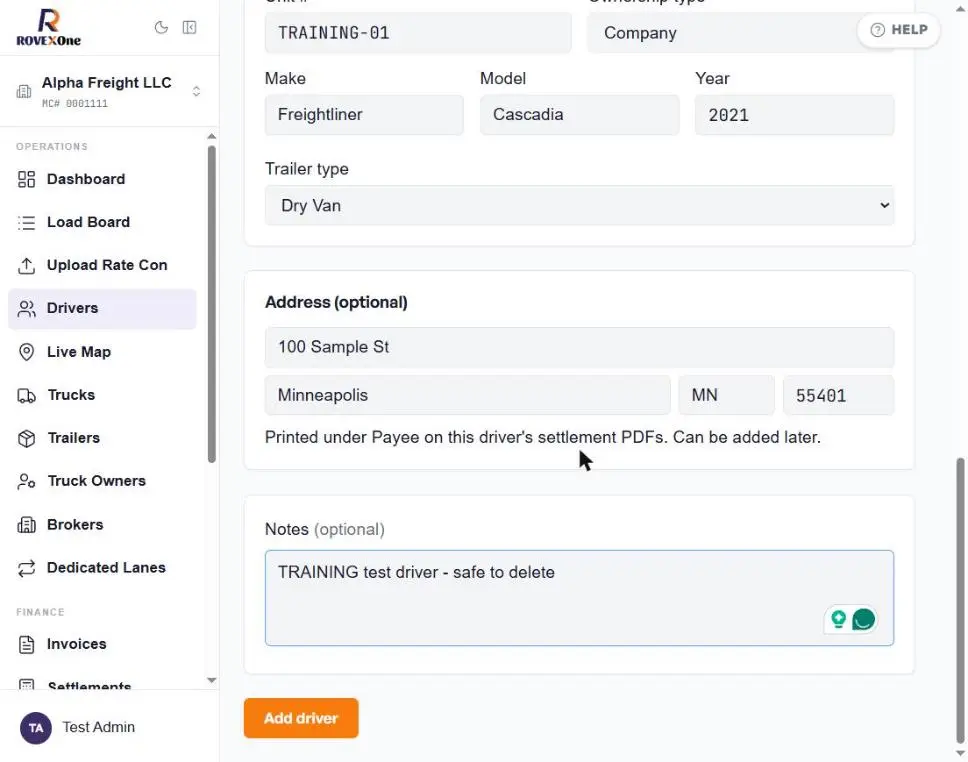
Add the address and notes, then click Add driver
The Address is optional. It's printed under Payee on the driver's settlement PDFs. Add any Notes for your team, then click Add driver.
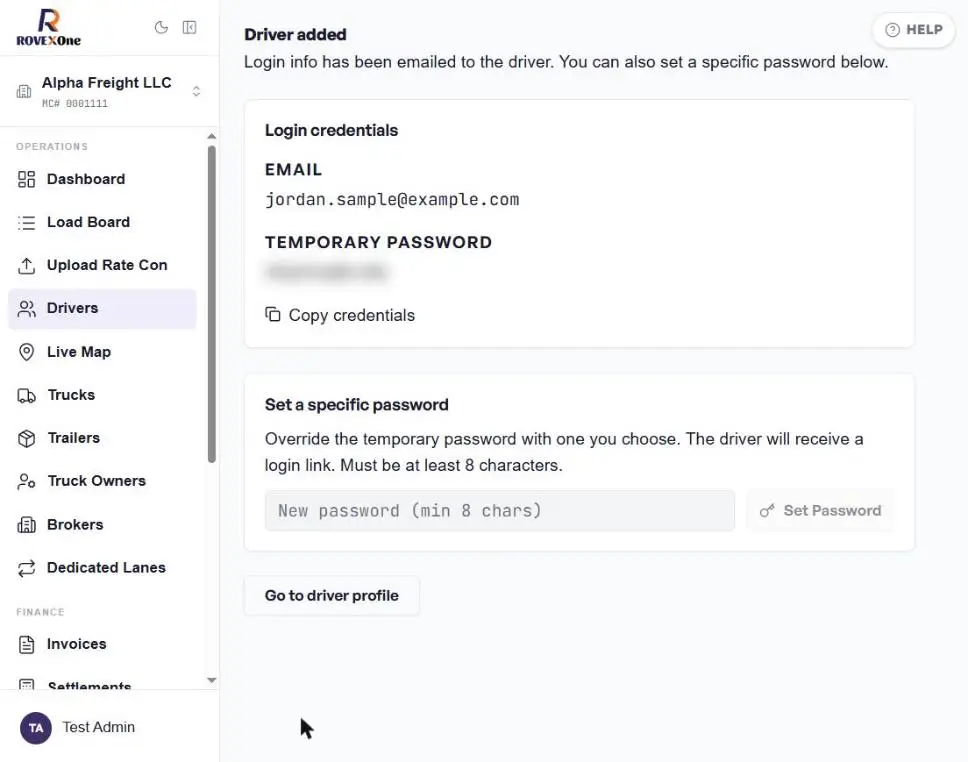
Share the driver's login
RovexOne shows Driver added and emails the driver their login. The screen shows the login email and a temporary password. You can:
Click Copy credentials to text them to the driver yourself
Type a password of at least 8 characters under Set a specific password and click Set Password. The driver gets a login link.
Click Go to driver profile when you're done.
Keep it private:
Treat the temporary password like any other password. Don't post it in group chats or leave it on a shared screen.
The temporary password is blurred in this screenshot.
Part 2: The driver profile
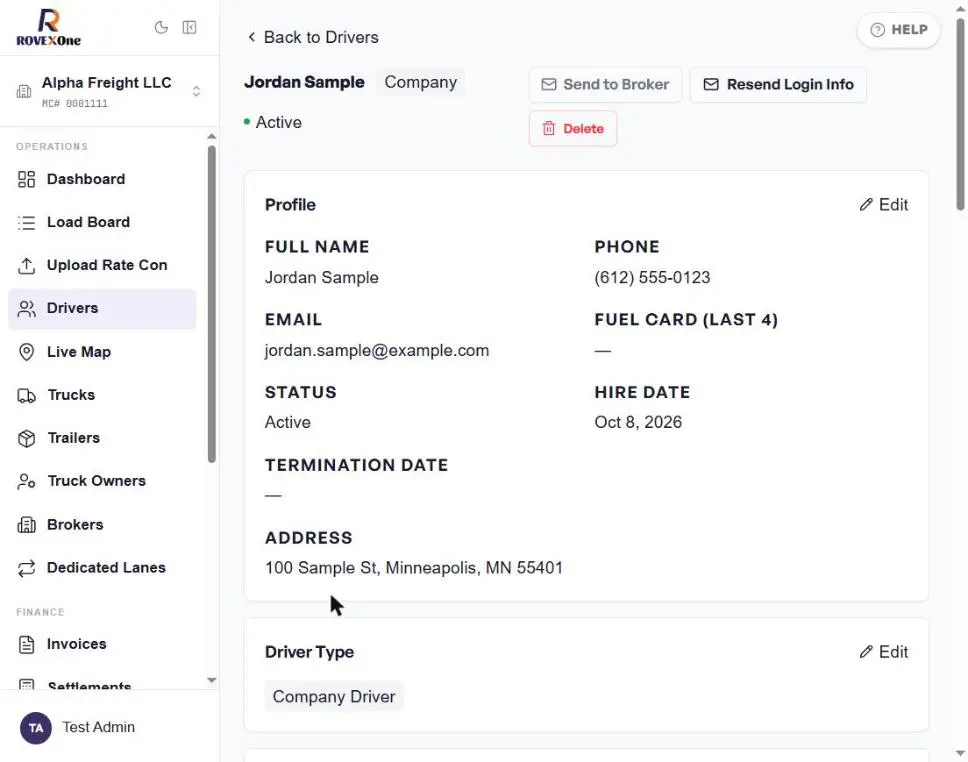
Open any driver from the Drivers list. Each card on the profile has its own Edit link.
Profile and account
The top of the page shows the driver's name, type and status, with buttons to Resend Login Info, Send to Broker and Delete.
The Profile card holds contact details, the last 4 digits of their fuel card, status, hire date, termination date and address. When a driver leaves, set their termination date here instead of deleting them, so their history stays on file.
Driver type, pay and truck
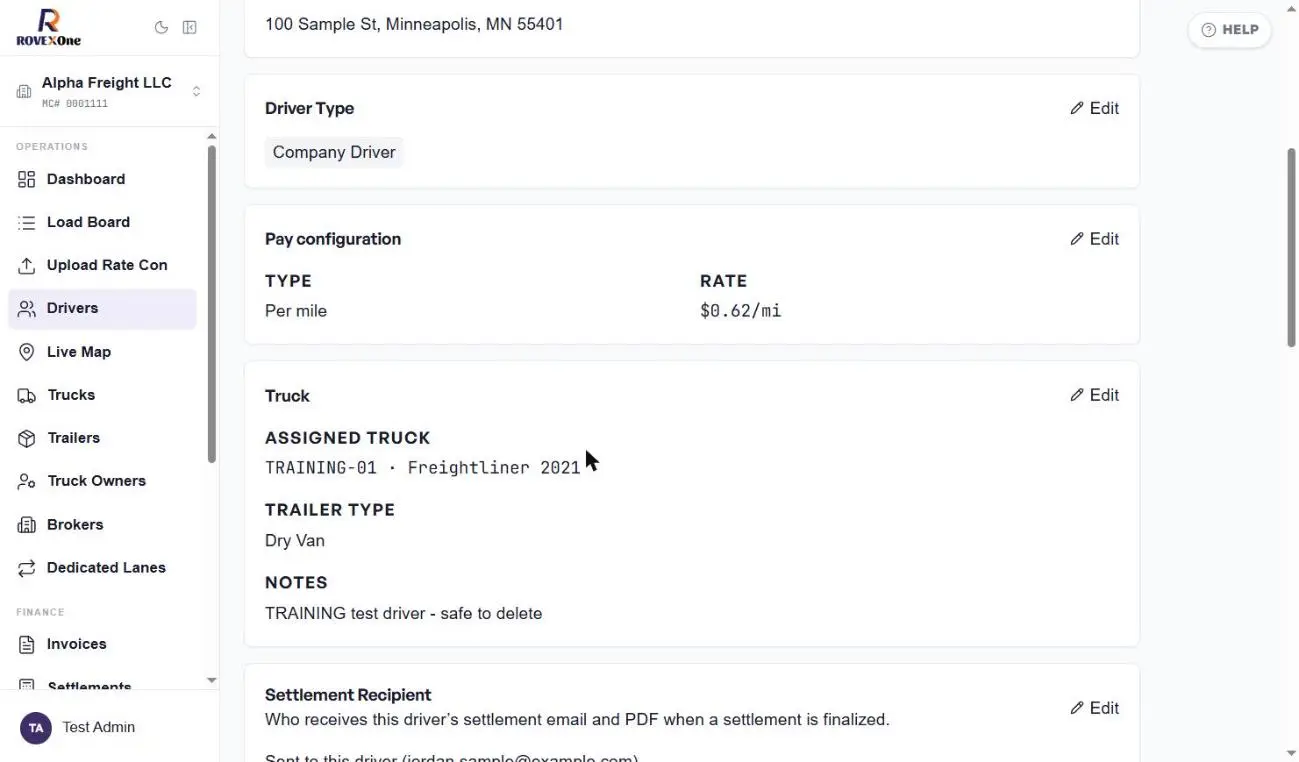
Check or change the Driver Type, Pay configuration and Truck. The Truck card shows the assigned truck, trailer type and notes.
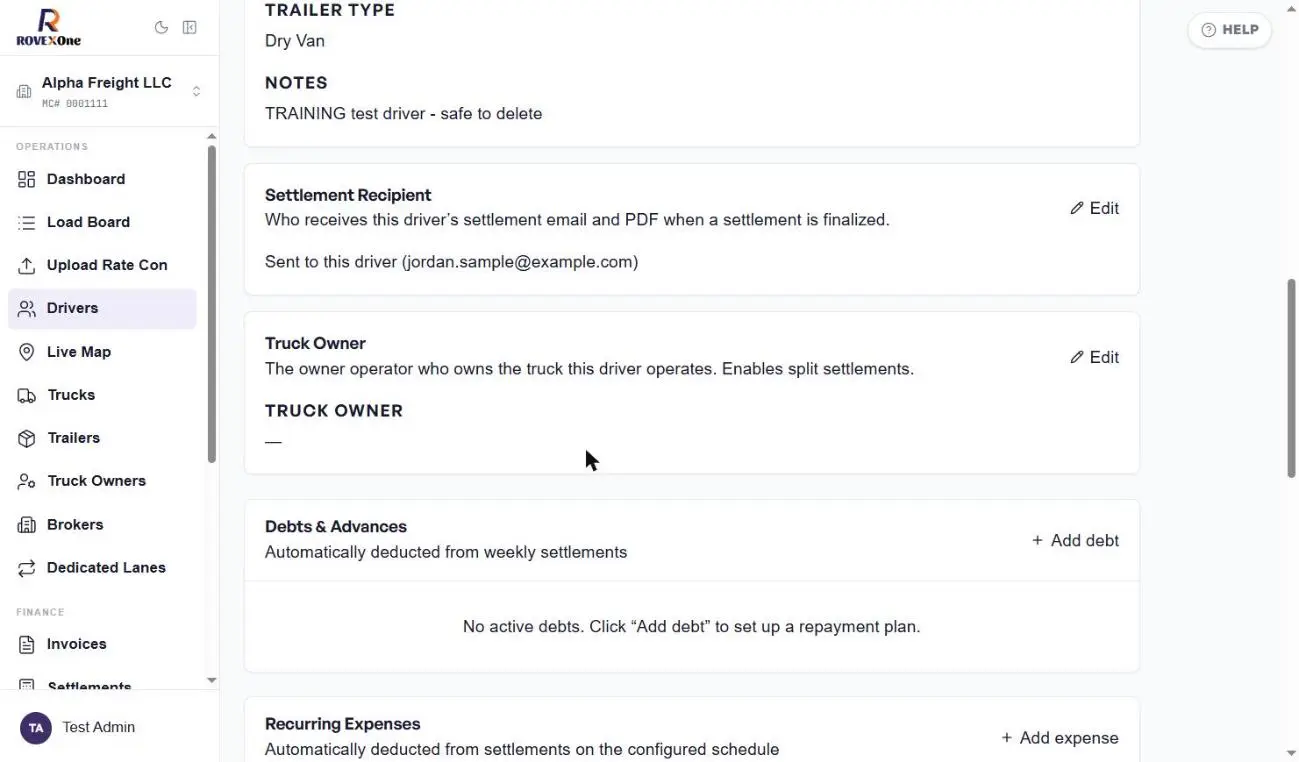
Settlements and truck owner
Settlement Recipient sets who gets the driver's settlement email and PDF. By default it's the driver.
Truck Owner links the owner-operator who owns the truck this driver runs. This turns on split settlements between the driver and the owner.
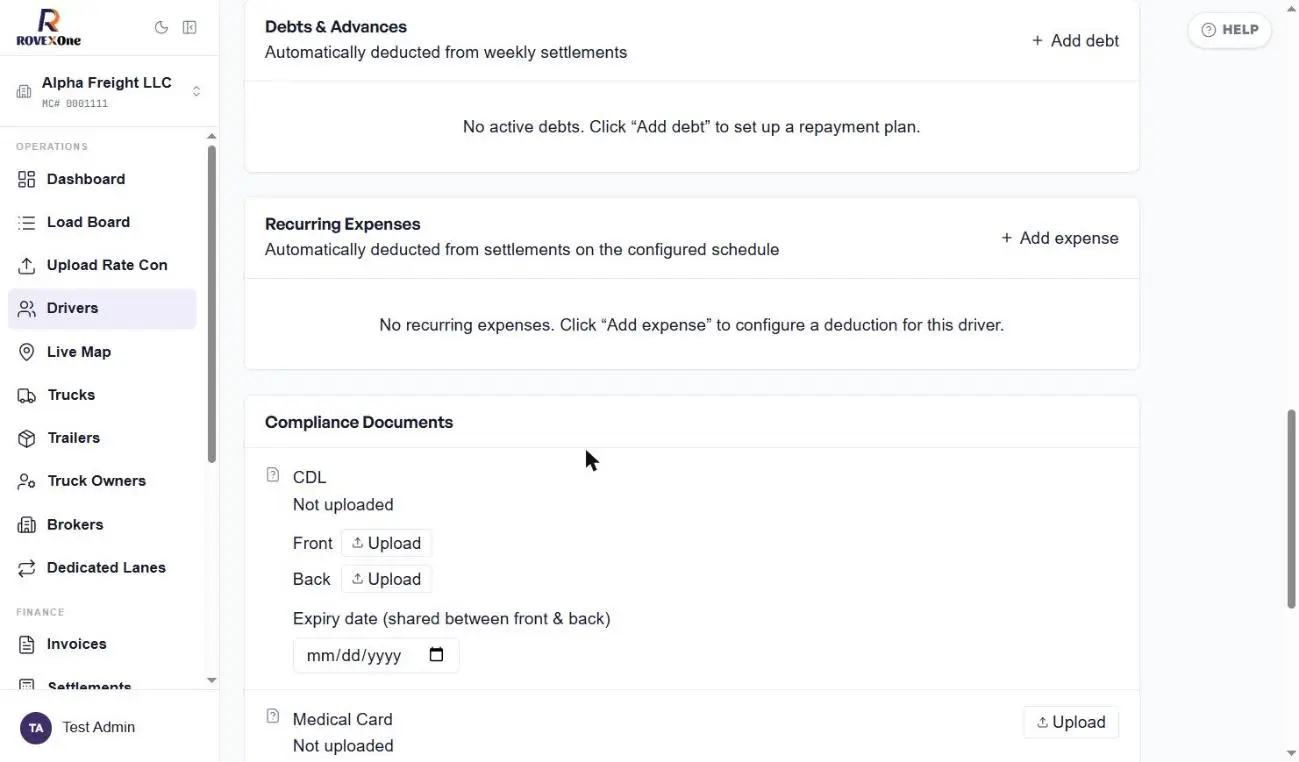
Deductions
Debts & Advances: click + Add debt to set up a repayment plan, for example for a cash advance. Payments are taken out of weekly settlements automatically.
Recurring Expenses: click + Add expense for charges that repeat, like insurance, ELD or trailer rental. They're deducted on the schedule you set.
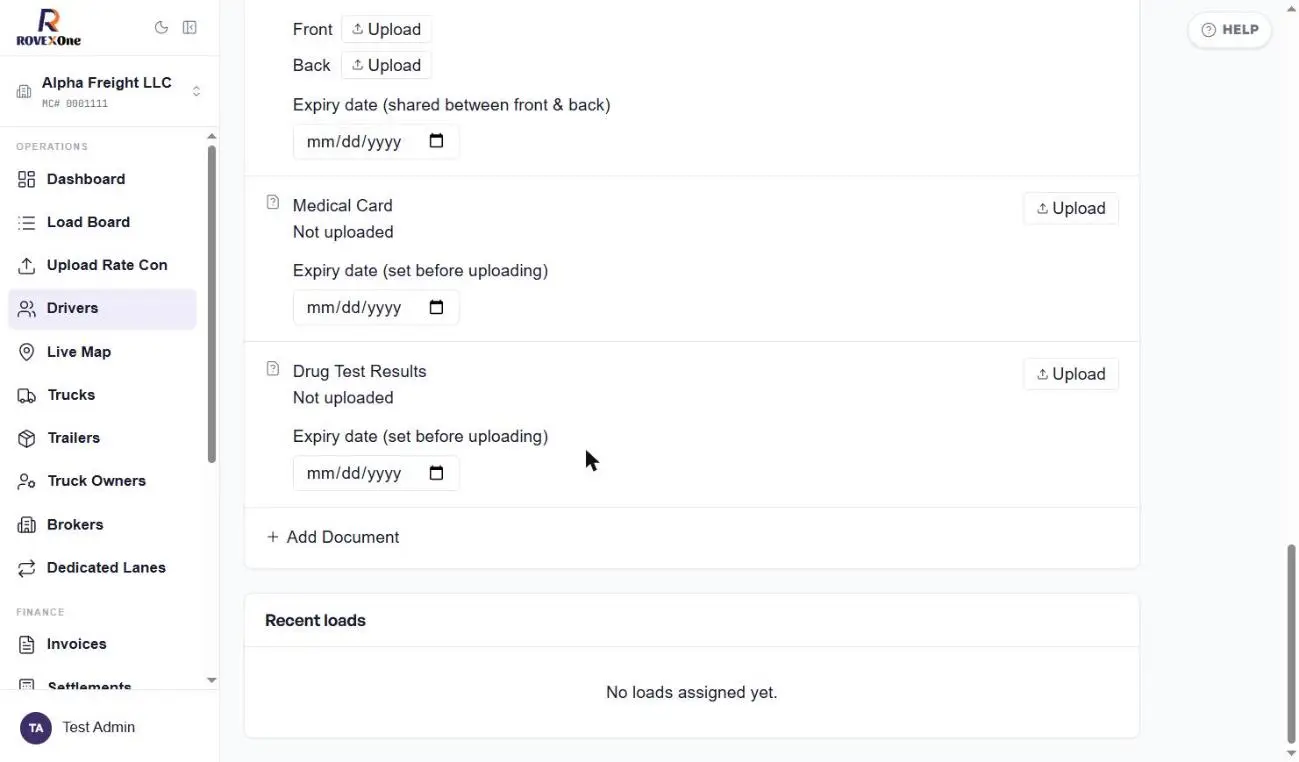
Compliance documents
Upload the driver's CDL (front and back), Medical Card and Drug Test Results. Set the expiry date first, then click Upload. Use + Add Document for anything else.
When a document expires, the driver gets an Expired docs badge and you'll see a compliance warning when you try to assign them a load. See Assign driver, truck and trailer.
Recent loads at the bottom lists the loads this driver has run.
Part 3: The Trucks page
Find a truck
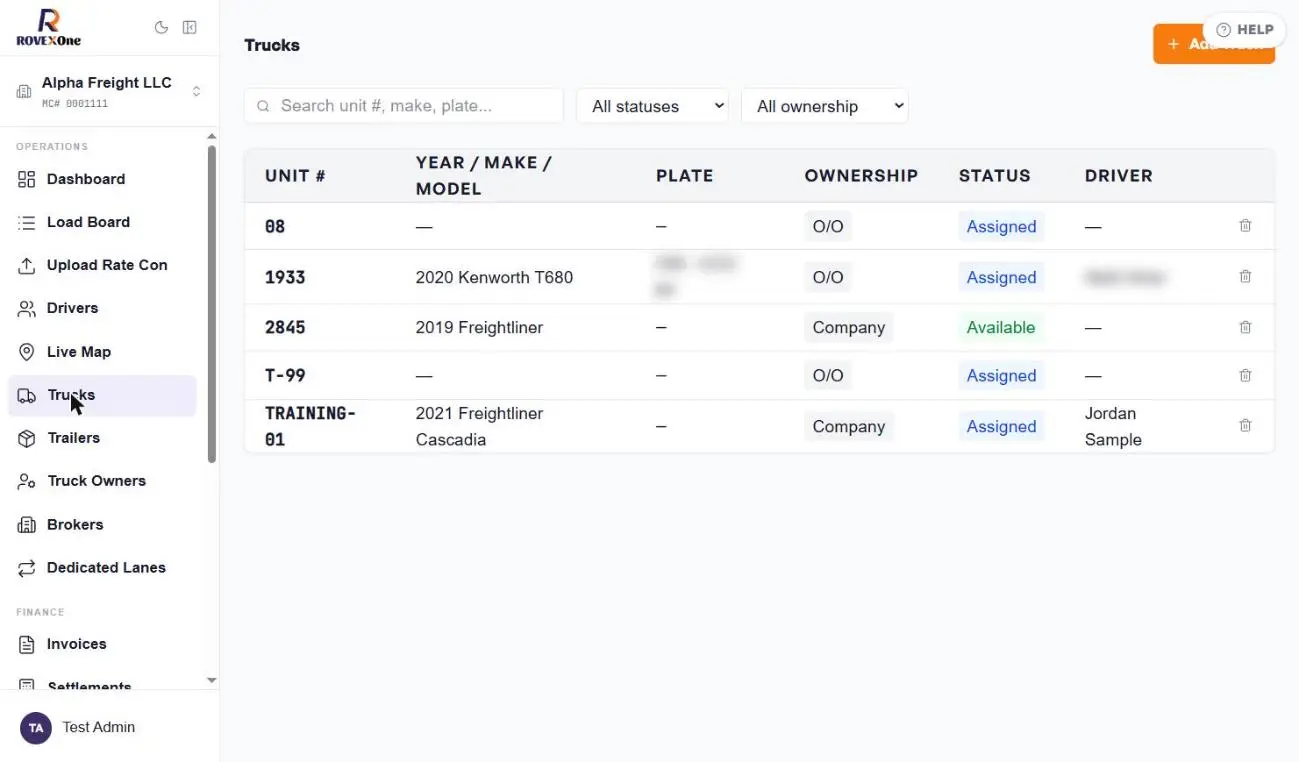
Click Trucks in the sidebar. The truck you created with the driver is already listed and shows the driver's name. Search by unit #, make or plate, or filter by status (Available, Assigned, In Shop, Out of Service) and ownership (Company, Owner-Operator, Leased). Click + Add Truck to add a truck without a driver.
Truck details
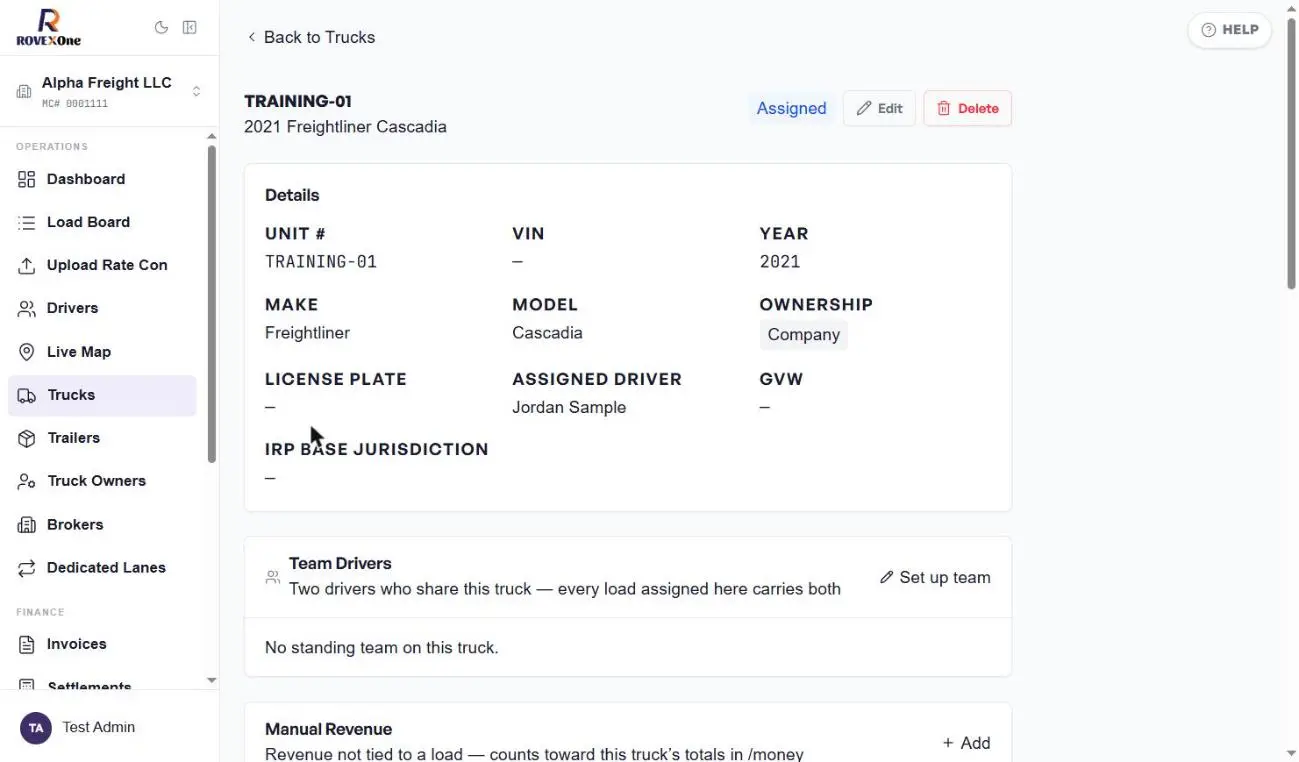
Click the unit # to open the truck. Details shows the unit #, VIN, year, make, model, ownership, license plate, assigned driver, GVW and IRP base jurisdiction.
Team drivers, revenue and IRP mileage
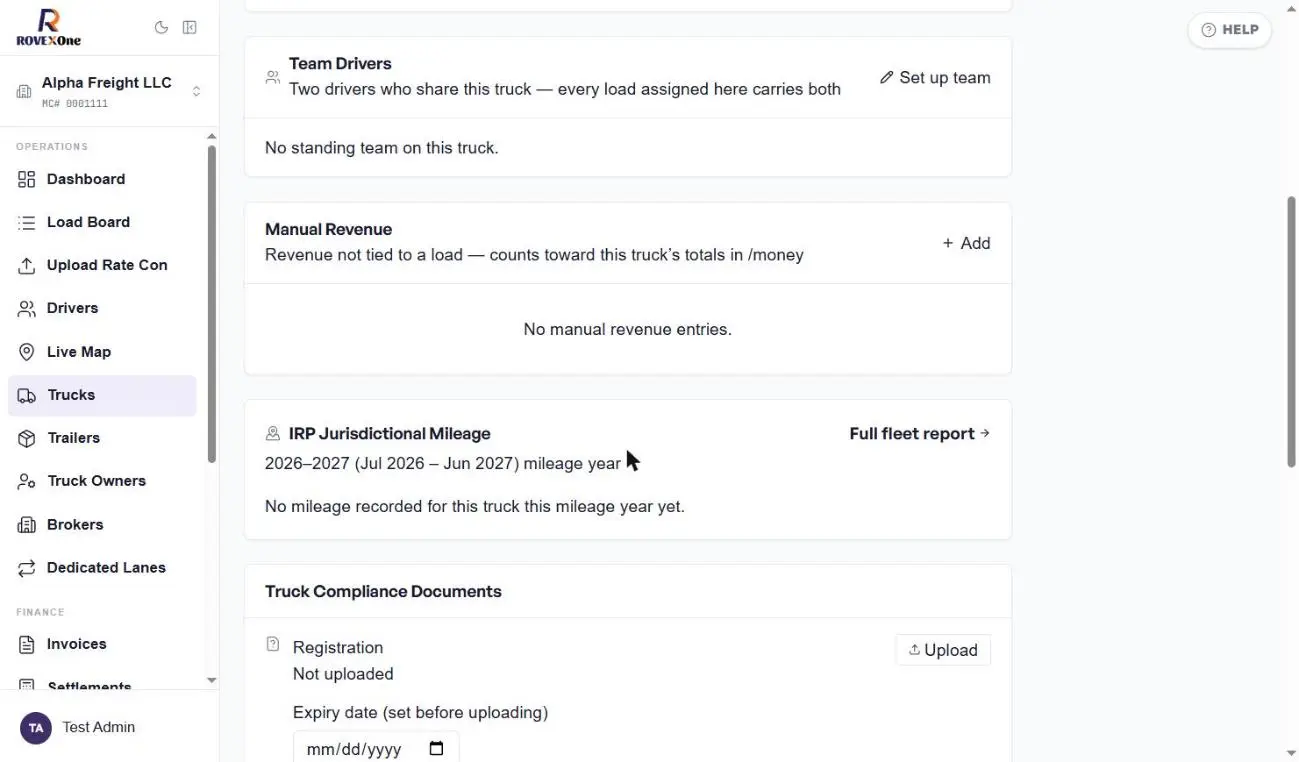
Team Drivers: click Set up team when two drivers share the truck. Every load assigned to this truck then carries both drivers.
Manual Revenue: click + Add to record income that isn't tied to a load. It counts toward this truck's totals.
IRP Jurisdictional Mileage: miles by state for the current IRP mileage year, which runs July to June. Click Full fleet report for all trucks.
Truck compliance documents
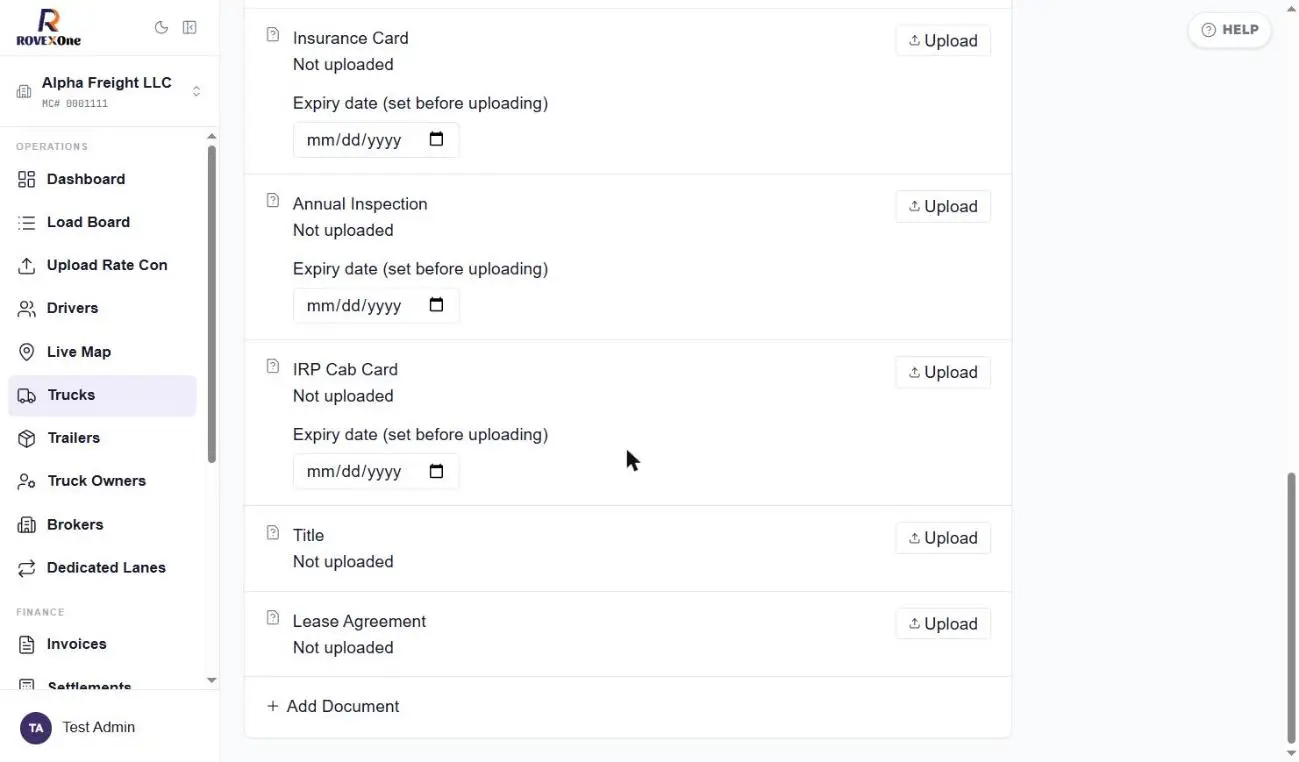
Upload the Registration, Insurance Card, Annual Inspection and IRP Cab Card, setting the expiry date before each upload. Title and Lease Agreement have no expiry. Use + Add Document for anything else.
Part 4: Edit a truck's settings
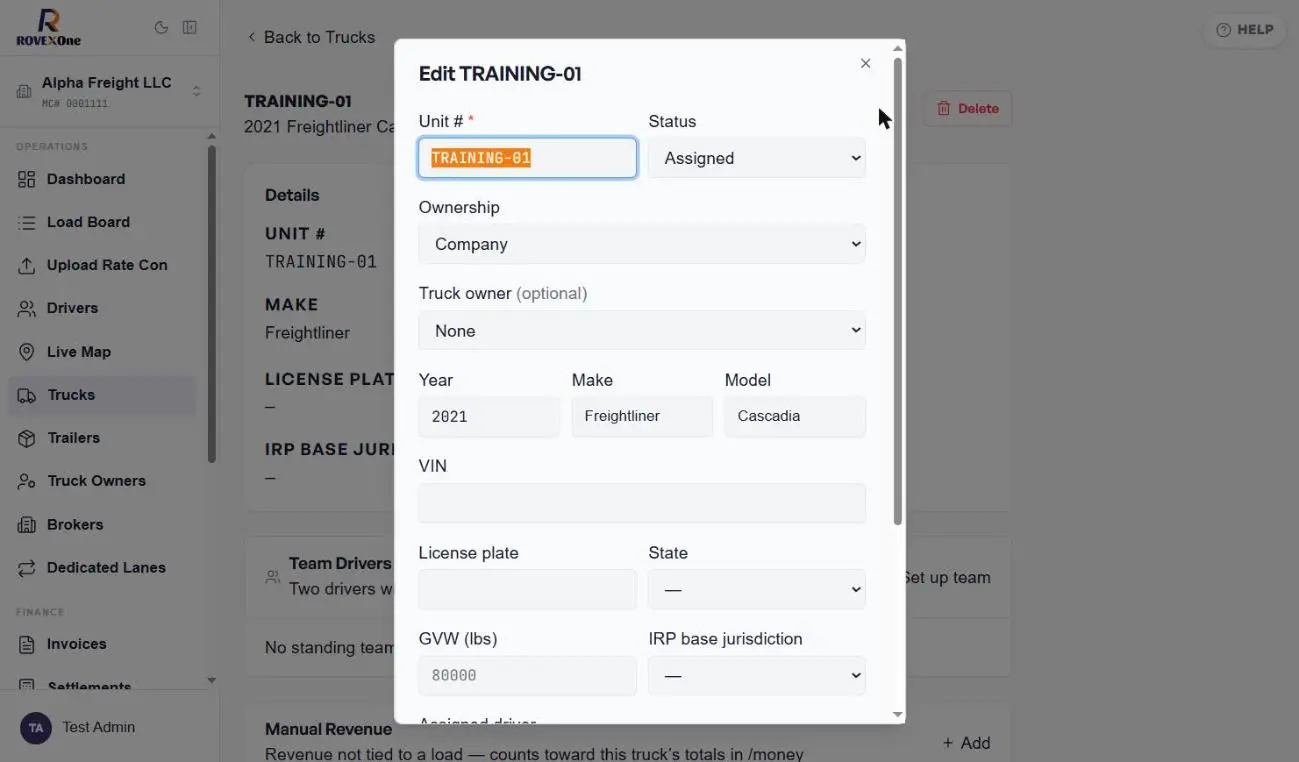
Click Edit on the truck
At the top of the truck page, click Edit. You can change:
Setting
What it's for
Unit #
The number you use for the truck
Status
Available, Assigned, In Shop or Out of Service. Set In Shop or Out of Service when the truck can't run.
Ownership and Truck owner
Company, Owner-Operator or Leased, and which truck owner it belongs to
Year, Make, Model, VIN
Vehicle details
License plate and State
The plate and the state it's registered in
GVW (lbs) and IRP base jurisdiction
Used for IRP and registration
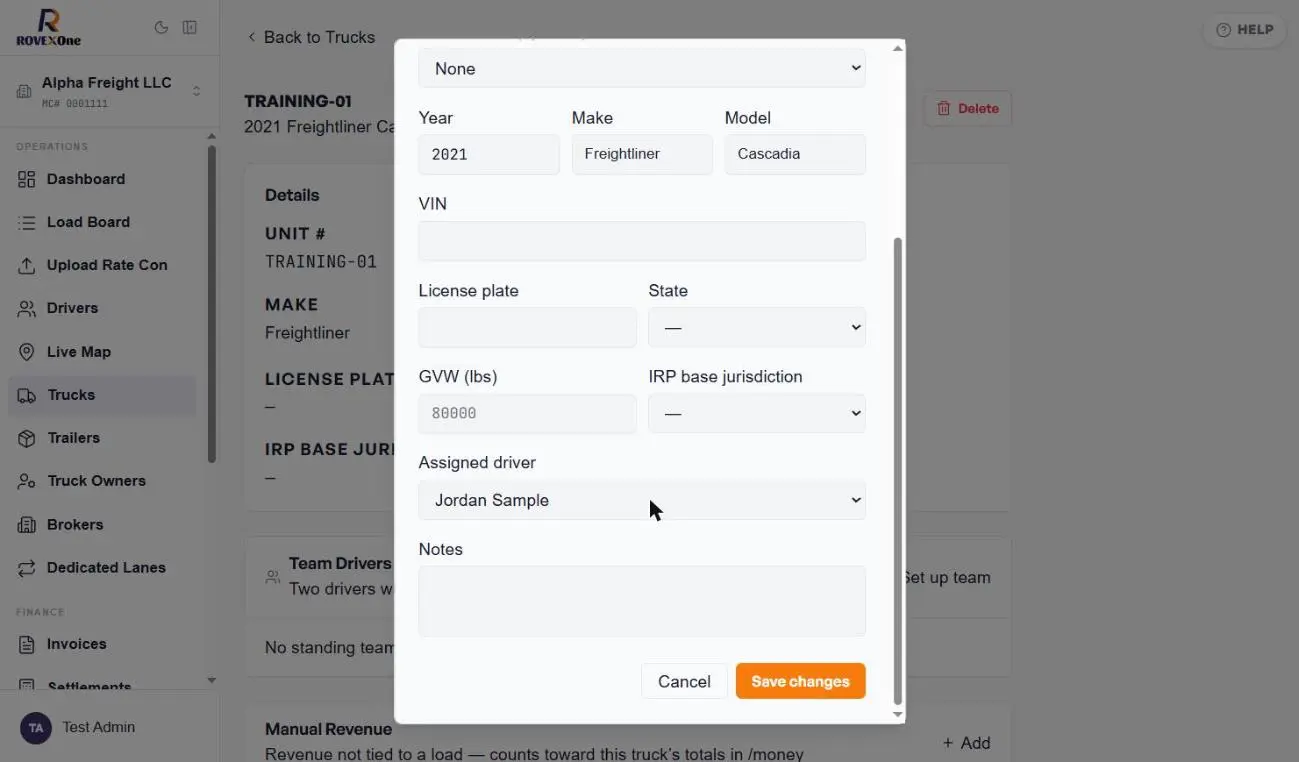
Assigned driver
Swap the truck to a different driver
Notes
Anything your team should know
Save your changes
Scroll down and click Save changes, or Cancel to close without saving.
Common questions
The driver didn't get their login email.
Open their profile and click Resend Login Info, or use Copy credentials on the Driver added screen and send them yourself.
Can I add the truck later?
Yes. Choose No truck for now, then use Edit on the Truck card in the driver's profile.
A driver switched trucks. Where do I change it?
Edit the Truck card on the driver's profile, or change Assigned driver on the truck's Edit form.
Why does a driver show Expired docs?
One of their compliance documents is past its expiry date. Upload the new document with its new expiry date on the driver's profile.
Fleet › Use the Live Map
Use the Live Map
See where your drivers are, check how fresh their location is, and follow a driver's active load from pickup to delivery.
For owners and dispatchersAbout 2 minutes6 steps
Where locations come from:
Drivers share their location through the RovexOne mobile app. A driver only appears on the map after they've logged in on their phone. Names and addresses are blurred in these screenshots.
Open the Live Map
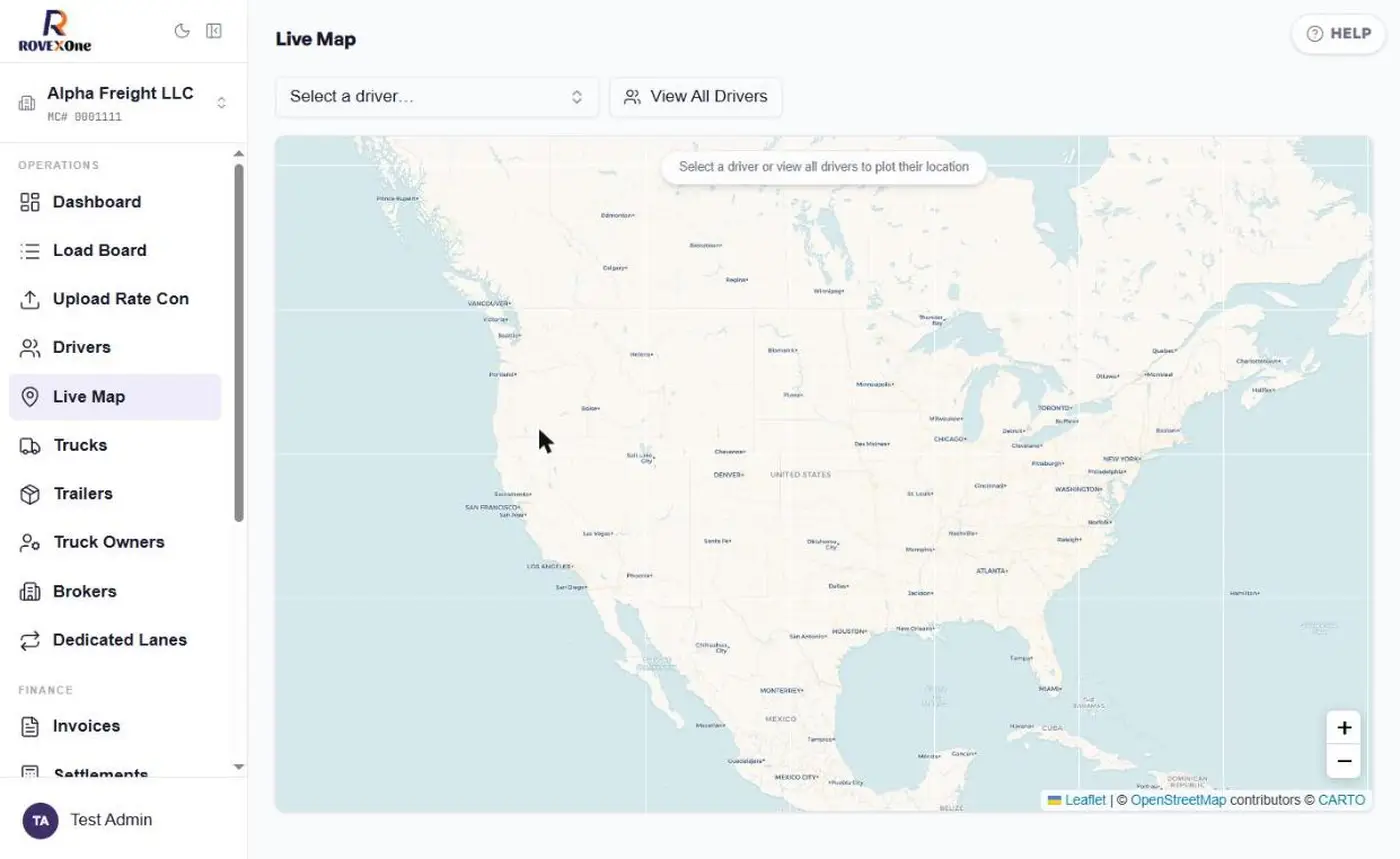
Click Live Map in the sidebar. The map starts empty until you choose which drivers to show.
View all drivers
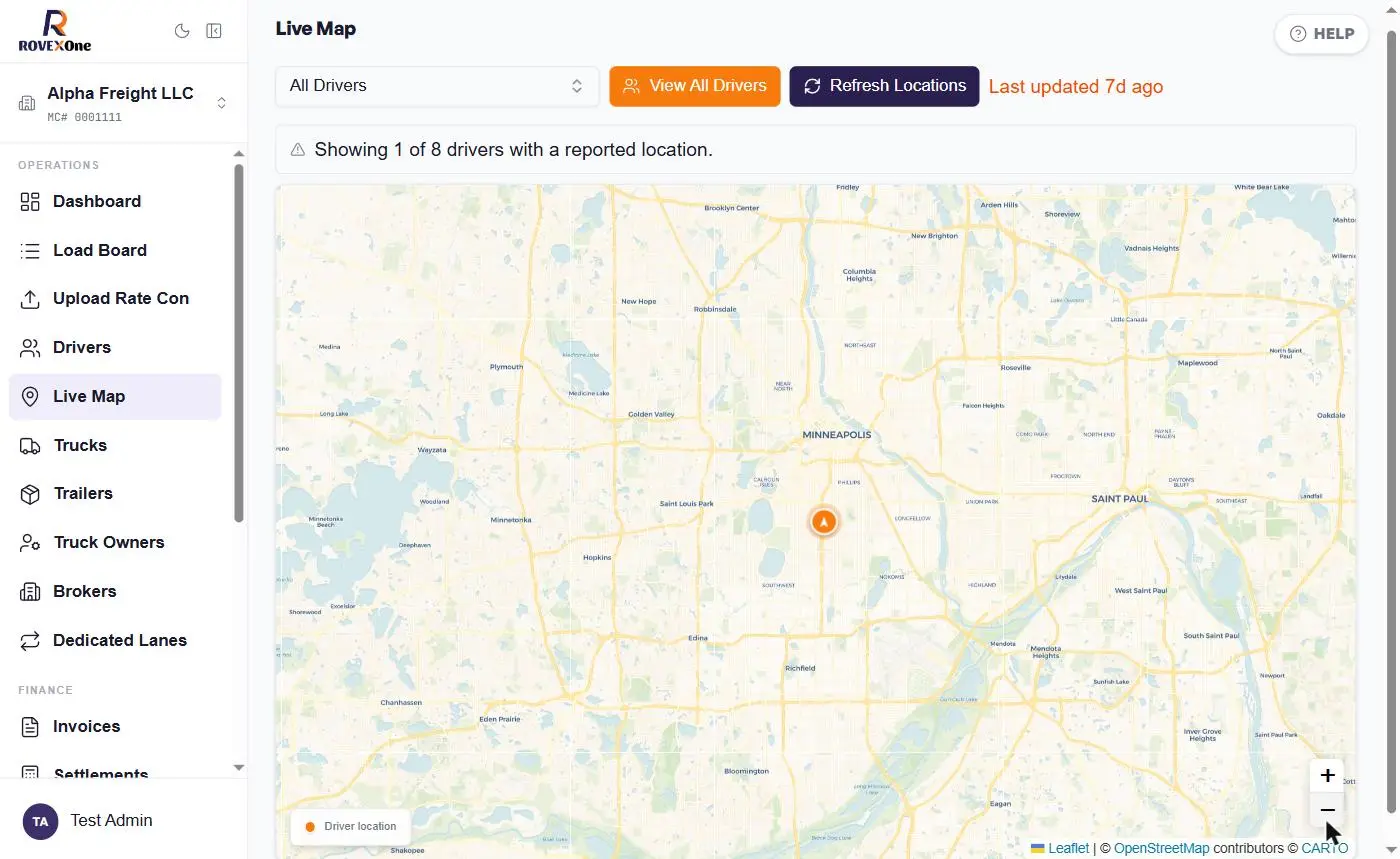
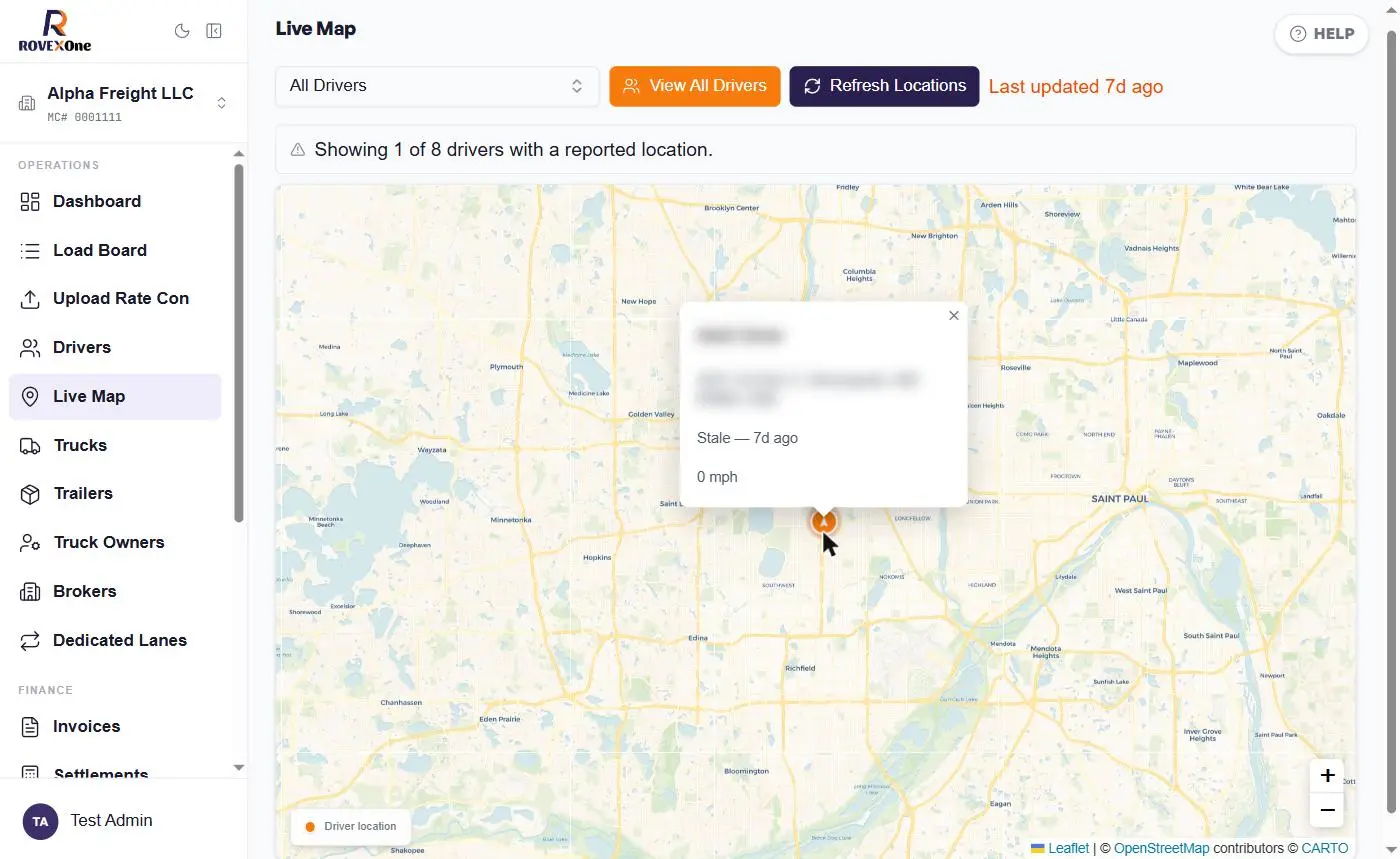
Click View All Drivers. Each orange marker is a driver. The banner shows how many of your drivers are sharing a location, for example Showing 1 of 8 drivers with a reported location.
Check Last updated next to the buttons. If it's old, click Refresh Locations to load the latest positions. Use + and − to zoom.
Click a marker for details
Click a driver's marker to see their name, the address of their last location, how long ago it was updated, and their speed. Stale means the location hasn't updated recently.
Pick one driver
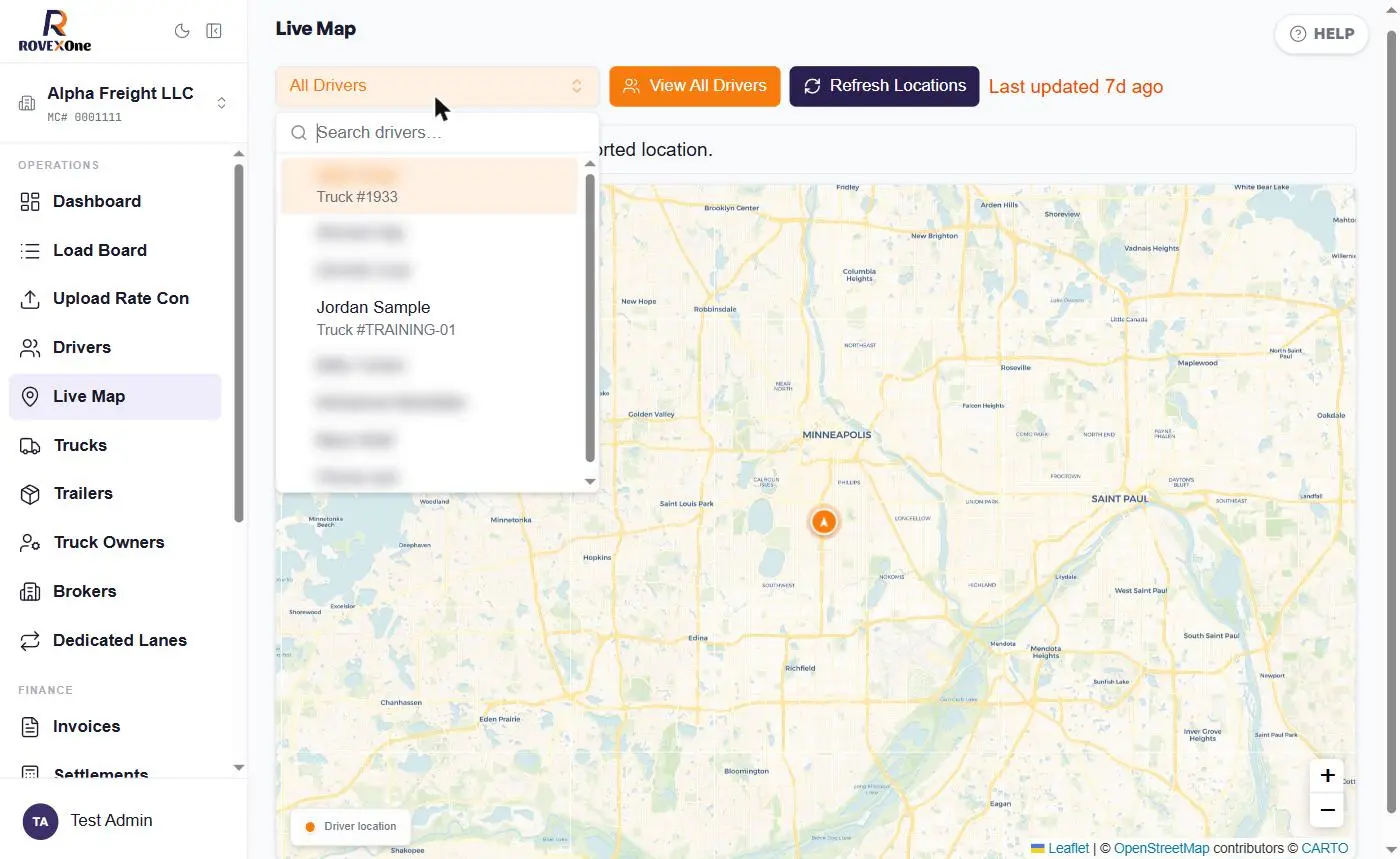
Click the driver selector at the top left. Search by name, or scroll the list. Each driver shows their truck number.
Follow their active load
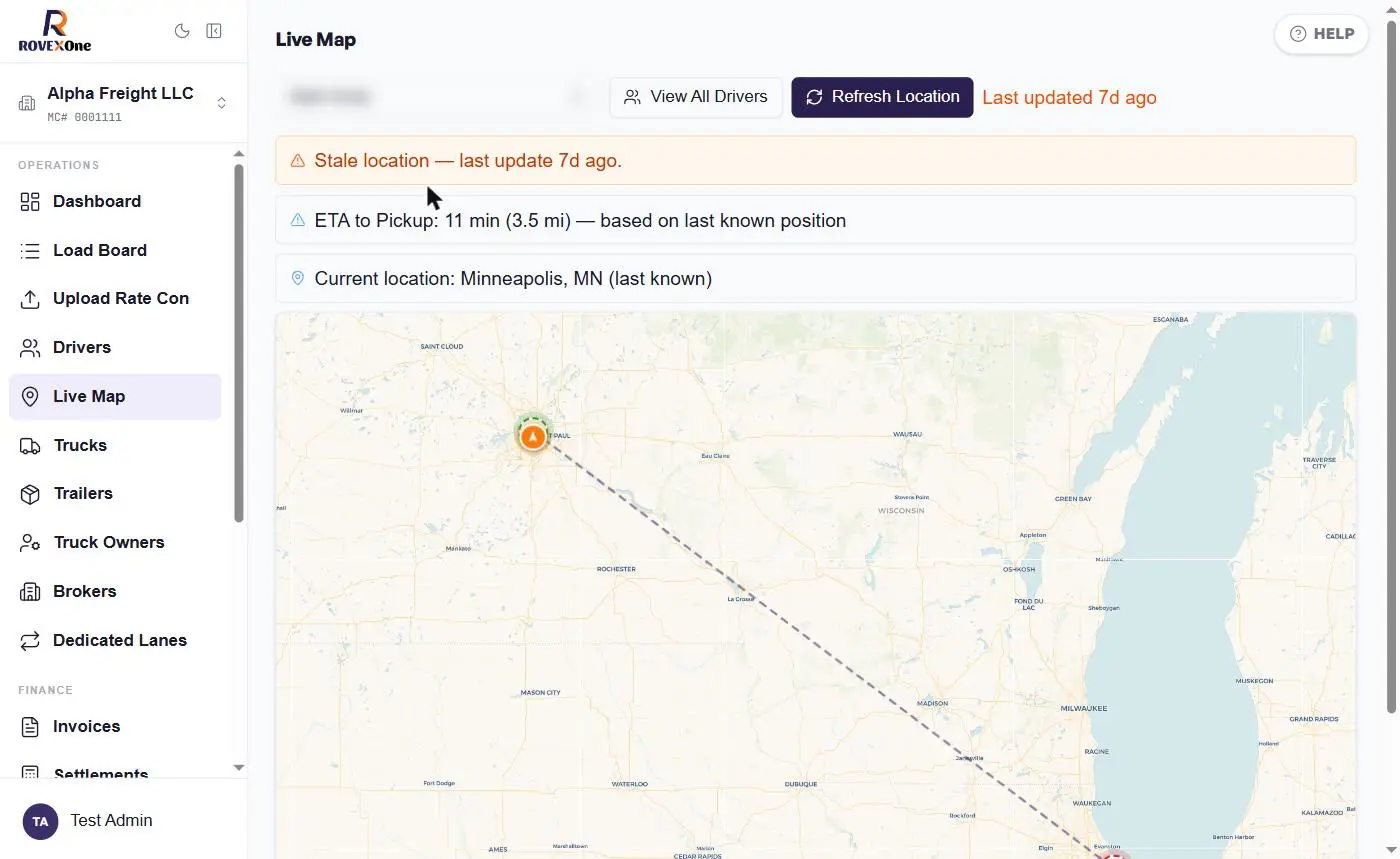
With one driver selected, the map shows their active load. The pickup is marked in green, the delivery in red, and a dotted line shows the route. Above the map you'll see:
An orange Stale location warning if the position is old. Check in with the driver before relying on it.
ETA to Pickup or to the next stop, based on the last known position
Current location, the driver's last known city
If a driver has no location
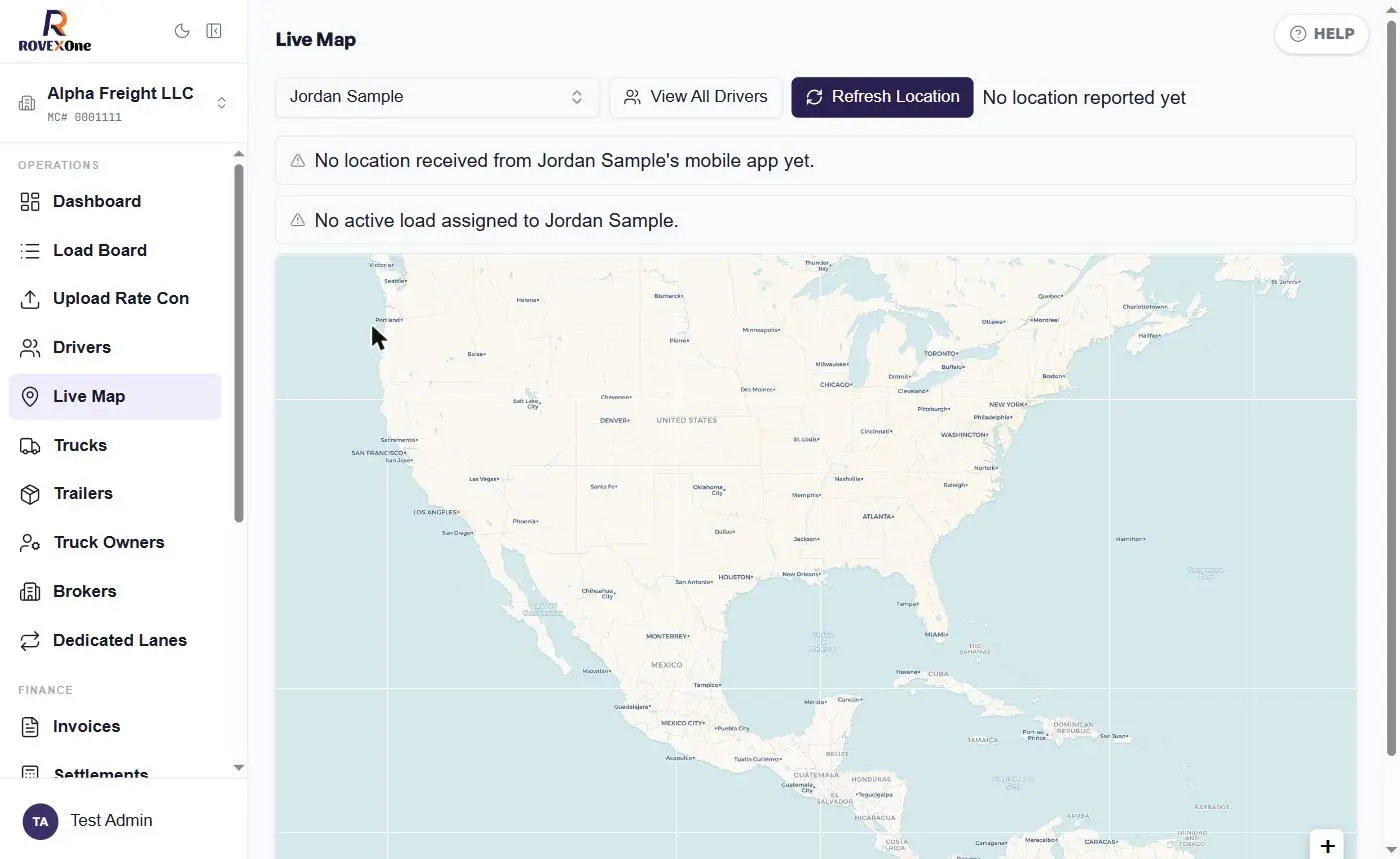
You'll see No location received from the driver's mobile app yet, and No active load assigned if they don't have a load. Ask the driver to install the RovexOne mobile app, log in, and allow location access.
Common questions
Why are only some of my drivers on the map?
Only drivers who have shared a location from the mobile app appear. The banner tells you how many that is.
The location says stale. What do I do?
Click Refresh Location. If it's still old, call the driver. Their phone may be off, out of signal, or the app may not have location permission.
Why doesn't a driver's route show?
The route only appears when the driver has an active load assigned to them.